As promised, this week we will finish the Lemoyne Star block. Right now, I’m putting this out here: This is the way I finish my blocks. As with most processes in quilting, there’s more than one way to do all the steps. This way works for me, but it may not work for you. And you know what? That’s okay. That’s why there’s more than one way to do things. This isn’t possible with all arts and crafts, but quilting is one area which gives you lots of options. Find the best way which works for you and use that method.
In the first step, we will inset one of the triangles. We’ll take the triangles which I cut out last week and mark them in a similar manner as we did the diamonds. Before marking, be sure to hit the triangles with a shot of spray starch and a hot iron to help stabilize the bias. All of the points of the triangle will need to be marked ¼-inch in from the sides. We can do this the same way we did the 45-degree diamonds – either by dots or by a line. I am using my Jinny Beyer Perfect Piecer for this process.
Take the triangle and match its dots or the X with the ¼-inch mark on the diamond. I pin them together at those points. Now gently, because even though we’ve stabilized the edges, we’re still handling bias, pin the triangle to the diamond at the other end, too. Now slowly sew from the end down to the ¼-inch end point. The same rules apply for this process as for joining the diamonds – tie (or knot) off or reverse stitch at the beginning and ends of the seams and slow down even more about a half an inch from the end point so you don’t over shoot your target. When that side is completed, join the other side of the triangle to the adjacent diamond in the same manner. This is where it can get a little awkward with your fabric. Double check everything before you sew so that you don’t get the other side caught up under your needle and sew it. You want to be as accurate as you can because even though we’ve stabilized the bias as much as possible with the spray starch, bias is bias. It can still be stretched. We’re limiting how much we handle it (as little as we can) and we’re doing our very best to be accurate, so we don’t have to rip out any stitches.
When the other side is completed, press the seams open to reduce bulk.
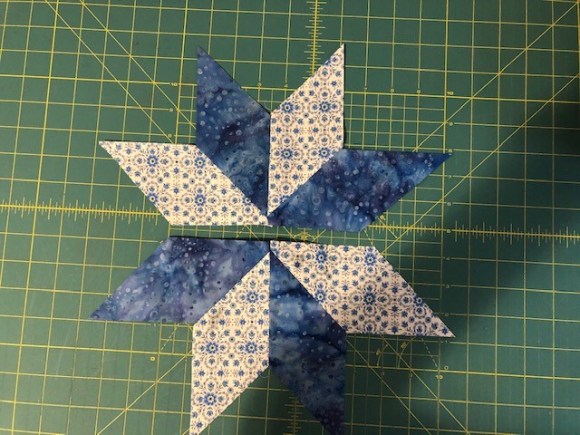
This is what it should look like from the front. At this point, it should like nice and flat with no ripples.
The next step involves the squares in the corners. Like the triangles, they need to be marked at the ¼-inch reference points. I still use my Perfect Piecer for this step, but unlike the triangles where I’m more inclined to make dots at the ¼-inch spots, I find it better to draw a line ¼-inch of the way in from the sides of my squares. With a square, I don’t have to worry about stretching the bias and a line is easier to see. I do hit the squares with a shot of starch and a hot iron before marking, though.
Technically, joining the square to one side of the triangle and one side of the diamond is not called a Y-seam. It’s a partial seam. I imagine it’s called this because the seams are joined at 90-degree angles (right angles), instead of the 45-degree angles which make up the Y-seams. No matter what it’s called, the method of joining the squares to the triangle and diamond is exactly like sewing the triangle to the diamonds. Match the intersecting points, pin, and sew slowly from one point to the other, remembering to knot or reverse stitch at the beginning and end to lock your stitches. When complete, press.
The square’s seams can either be pressed open or out towards the triangles and diamonds. This is a personal preference. Some quilters think open is easier to deal with as you’re matching starting and stopping points and others think pressing them towards the sides is easier. The more you work with eight-pointed star blocks, you’ll quickly see which way works best for you. With me it depends on the size of the quilt square. The Lemoyne Star block I’m using for this blog is 12 ½-inches unfinished and with larger blocks, I prefer to press the squares’ seams to one side. With smaller blocks I tend to press the seams open to reduce all the bulk I can. Smaller squares have a lot of seams coming together in a small space and this can make the quilting process difficult. The more I can reduce the bulk so my needle doesn’t break during the quilting process, the better.
Repeat this process for the other square on the diamond unit. Then repeat the entire procedure again for the other half of the diamond unit, but don’t inset the large triangles on the left and right sides.
Instead, once the diamond units are complete to this point, sew the two halves together and press the seam open (again to reduce bulk). Then insert the two left and right triangles with the same method we used above.
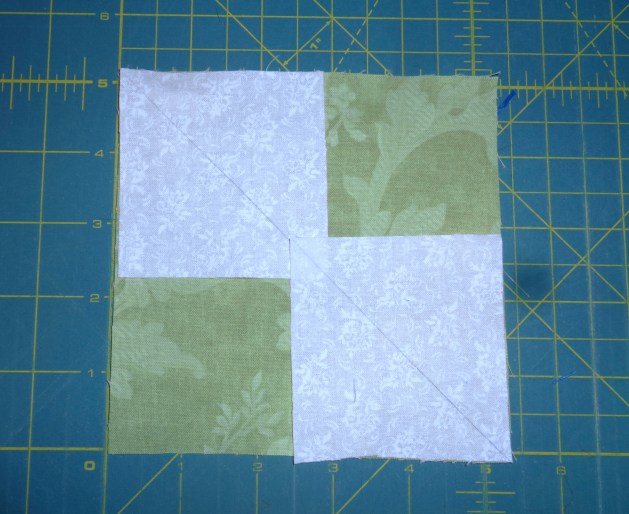
There is another method for joining the two units and let me explain why I don’t use that method. You complete the two halves so they look like this:
And then you join them with a stop-and-pivot seam.
You have to be dead-on to match points so your block doesn’t look wonky. And if the eight-pointed star block is small, you’re manipulating a lot of bulk under your needle in a small space. My method works best for me, but I encourage you to try both methods to see which works best for you.
Okay….now…what if you’ve tried these methods and you’re finding Y-seams and partial seams just really aren’t your thing? Does that mean you can never make a lovely eight-pointed star block, ever?
Nope.
If you remember, back in the first blog when we began discussing Y-seams, I threw out a disclaimer about myself – for years, I never made a Y-seam when a half-square triangle would work perfectly fine. The fact is, if your piecing is really precise, you can convert some eight-pointed star designs into half-square triangle blocks pretty easily. And since you know how to figure the yardage on HST blocks, you can quickly estimate the fabric requirements to fit your method of construction. Take a look at these two star blocks:
If you look at the original grid design of both of these, it’s easy to spot the Y-seams and partial seams.
However, if you look closer, you also begin to see these can be converted into 16-patch blocks, since the diamond shapes can be bisected evenly in the grid and the dividing line will fall evenly with the other patches on the row:
Thus, they can be converted into HST blocks which look the same even if you didn’t take the time for the Y-seams and partial seams. And as long as your piecing is good, no one will know the difference unless their nose is right against your quilt.
Please note that not all star blocks can be converted into HST blocks. You have to grid the blocks out to see if it will work. But if it can be done, it’s a wonderful thing. And even if it can’t, sometimes you can fudge it enough so that you can have a block that looks similar to the eight-pointed block you want.
In the next blog or two I want to do over how to cut pieces with odd angles. So far, we’ve dealt with squares and squares that be converted into triangles. However, there is a whole group of patches that aren’t square by any stretch of the imagination. And while templates are a wonderful tool to have to cut that group of patches out, sometimes rotary cutting is just as accurate and certainly faster.
Mention Y-seams to quilters and generally you get one of two responses – a shrug or a shudder. The shrug would indicate either a) the quilter has a solid knowledge of how to construct a successful Y-seam or b) has decided that he/she will never do a Y-seam when perfectly good half-square triangles can give you the same effect most of the time. The shudder comes from quilters who realize you can’t get through your quilting life without at least some Y-seams, have tried them, and now possess a vehement dislike for the entire process.
For those of you who aren’t aware of what a Y-seam, this is what one looks like:
It’s where three or more pieces come together at one point, and none of the seams are at a 90-degree (right) angle. I admit, the first time I attempted one of these, I decided I would opt not to have a lot of Y-seams in my future. And then I was introduced to blocks such as this:
And these:
These blocks fall into the eight-pointed star category and they’re some of the prettiest quilt blocks out there. In addition, a few weeks ago I introduced you to feathered stars:
While a great deal of the feathered star block is comprised of HSTs, the diamonds at the top have Y-seams and the squares in the corners have to be inset (sew part of the seam and pivot to finish). In the long run, the more you quilt, the more you can be assured that Y-seams will loom somewhere in the future. You may as well learn to make them correctly and at least be at peace with the process, even if they’re not your favorite technique to pull out of your quilting toolbox.
The first place to start is with your fabric. If you’ve given a hard look at some of the eight-pointed star blocks above, and you’ve read my previous blogs about angles, there’s a chance by now you’ve thought to yourself, “I’m looking at a lot of bias.” And if that’s what you’re thinking, you’re absolutely right. However, by now we know how to deal with bias. What we need to keep in mind is that the units used in making eight-pointed stars are not half-square triangles, so we can’t use the Sew and Slice method to avoid exposing the bias until the last minute. When the star units are cut out (either by template or rotary method), the bias is immediately exposed. So, let’s refresh our memory on how to protect the bias for as long as we can to avoid it stretching. The first step we want to take is, once the units are cut out, give them a shot of spray starch and press them with a hot, dry iron. The starch will help keep the bias intact. We also want to store them flat and in an area where they will not be handled a lot until we’re ready to sew them. The less handling, the better for the bias. And finally, do try to get them sewn together as soon as you can. Once they’re joined to another piece of fabric, the bias edge is no longer exposed.
The next step to consider is how you want to mark your unit. Like the Sew and Slice method with HSTs, you’ll need to mark your star block units because unlike most other quilt block seams, you’ll stop and start sewing a lot. There is no real chain-piecing with these. The start and stop points will have to be parked precisely and clearly in order to make these Y-seams go together perfectly and easily. So, a couple of things to keep in mind at this point.
Regardless of what marking tool is used, it will cause some friction along that bias edge. Make sure the star block unit is well-starched to reduce the friction as much as possible, so the bias won’t stretch. As a matter of fact, some quilters, such as Harriet and Carrie Hargrave, recommend starching the fabric or the block units to the point where they feel like paper. This is not a bad idea.
You will want a marking tool that will produce as little friction as possible. I have several go-to tools I reach for. I have used the blue fabric markers that disappear with water. I have also used Frixion pens. My favorite is this:
That’s right. A mechanical pencil. Why this? A couple of valid reasons. First, depending on the marking method I chose, the mechanical pencil leaves a narrow line on my fabric, so my seams stand a better chance of being exactly ¼-inch. Second, if I chose to use the “dot” method of marking, the pencil lead will slip through any template hole quite easily or be more precise if I mark the star block unit with a ruler. This will become clearer when we get into the actual construction process of the block.
With those thoughts in mind, let’s move into how we make one of these beautiful blocks. Keep in mind that Y-seams aren’t really that hard to make correctly. However, they do require a bit more concentration and precision than chain piecing. So…you may want to turn off the Netflix and save the glass of wine until later.
As I mentioned before, with Y-seams, there are distinct points where you start and stop sewing. These points must be marked on your fabric for precision’s sake. There are only two different marking methods that I recommend – marking the seam or making dots. Let’s deal with marking the seam first. This method requires a marking tool and a quilting ruler that has a distinct quarter-inch mark down its side. Actually, my favorite ruler to use with this is the Add-A-Quarter ruler that I demonstrated in my paper piecing blogs. Here’s how this method works:
Take the star block unit and draw quarter-inch seam marks all the way around the edges.
Where the lines intersect to form an “X” is your starting and stopping point. There are some pros and cons to this method. The good part about this method is it’s super easy to see your stopping and starting points. The not-so-good points about this is you would need to make sure the quarter-inch line drawn on the fabric is exactly a quarter inch away from the fabric edge. There is little wiggle room with this. The other con to this method is your running a marking tool along a bias edge. If you’re not careful, you can stretch the bias with this process regardless of the care taken or the marking tool used.
The ”dot” method is literally just that – where the seams would intersect, you simply make a dot with your marking tool instead of a line, like this:
If you’ve rotary cut your pieces, you’ll need to use a ruler to measure in ¼-inch from the corner of the block unit and place the dot there. There’s also this tool from Jinny Beyer, called the Jinny Beyer Perfect Piecer.
This tool has lots angles and these angles have lots of holes in them. It’s easy to line these up with your block unit piece and mark your dot at the quarter-inch spot.
The Perfect Piecer is available on Jinny’s website www.jinnybeyer.com. I like this gadget so much I have two. I keep one near my sewing machine and one in my hand sewing basket.
Lots of these eight-pointed star blocks are used quite frequently in quilting. As a result of this popularity, companies that make quilting templates frequently have Y-seam sets available for you to purchase.
This is a really great option. These templates offer uniform accuracy and like the Perfect Piecer, have pre-drilled holes to mark your quarter-inch starting and stopping points. If you have a real love for blocks such as Hunter’s Star, check around the internet. Quilt supply sites such as Marti Michell, Missouri Star, and Nancy’s Notions have a good variety. If you use the Perfect Piecer or some of the other templates, it will quickly become apparent why a mechanical pencil is a good marking tool – their lead fits easily into the pre-drilled holes.
There is one more technique you can use to indicate the stopping and starting points that doesn’t involve actually marking your fabric – simply finger press the corners where the sides meet, raw edges together, like this.
I will offer a bit of clarity with this method. First, it’s not quite as accurate as the other two techniques, and you want to do this right before you sew. Otherwise the crease will relax. I have used this method with loosely-woven fabric or really small pieces that I don’t dare stretch the bias.
Like making HSTs, QSTs, or FGUs, you will want to try all three of these techniques and decide for yourself which one works best for you. I would suggest making three identical 12-inch eight-point star blocks and use a different marking method with each. This way you’ll see which one your most comfortable with, and the larger block units make the Y-seams easier. (Note here — If I am making super small Y-seams — such as in some of the 4-inch Dear Jane blocks — I hand piece them. You have more control over the stopping and starting points, hand piecing allows for the greatest accuracy, and the blocks will lie perfectly flat.).
As we begin assembling the units into a block, there are a few steps we can take to make the construction easier and more accurate. These are little things, but they go along way with Y-seams.
Switch to a smaller sewing machine needle. I’ve found a 70 or 80 works best with Y-seams.
Decrease your stitch length. This isn’t paper piecing, so I’m not talking about lowering the stitch length super low. Big Red’s default length is 2.2. For Y-seams I lower it to 2 or 1.8. The reason we want smaller stitches is so we won’t overshoot the stopping point.
Decrease your speed. Y-seams aren’t something you can make fast. Accurate stopping and starting are the most important factors for ease of construction and nice, square, flat blocks.
Learn to love your “needle down” button, if you’re machine has one. This will keep the fabric from “wiggling out of place” under the presser foot when you come to a stop.
Since we’re not making a complete seam (sewing from one edge to another), we will need to either sew a few stitches as we start and then reverse stitch to lock them, or use the tie-off (knot) option if your machine has that. This should be done at the start point and the end point. When sewing regular seams, the stitches are locked as the seams intersect at the endpoints. Y-seams don’t intersect, so the endpoints need to be knotted off. This keeps the stitches from popping open as we joint the unit pieces together.
Stop sewing about ½-inch away from the endpoint and either slow down even more or literally take it a stitch at a time. If the unit piece is small, I use the needle up-and-down button and make one stitch at a time until I get to the endpoint.
Now let’s get to the actual sewing process. We’re making a Lemoyne Star Block.
First you join two unit pieces, right sides together.
Place the pieces under your presser foot, making sure that the stitches begin at the marked starting point. Knot stitch or reverse stitch to lock.
Stitch until you get about ½-inch away from the endpoint.
Slow down even more, being careful to stop exactly at the endpoint and knot off.
Continue adding units in the same manner until there are four star points sewn together. Set this aside and repeat for the next four star points.
Make the two-piece unit and press the seams open. Then make the next two-piece unit and press those seams open. Then join the two units together to make the large four-piece unit.
We need to press the seams and there a couple schools of thought on Y-seam pressage. Some quilters press the seams to one side, per normal. I don’t. I’ve found that puts all the bulk to one side and when you join the setting blocks and triangles to the star points, that bulk on one side make construction difficult. I personally find pressing the seams open to work best.
Now that we have the two parts of the eight-pointed Lemoyne Star completed and pressed, set those aside until next week.
Make the two units, but don’t sew together just yet!
I’ll show you how to add the corner squares and the large triangles as well as talk about 60-degree angles in the next blog.
Borders are (usually) the last pieces added to a quilt top. Loosely defined, they are strip(s) of fabric used to frame the quilt top. I also want to set the parameters of this blog. Since this year’s theme is “Level Up Your Quilting,” I am assuming all of the basics do not need to be explained in great detail – in other words, I’m working with the idea that you have several quilts under your belt. So, with this column, I’m presuming:
You know what a border is and realize a quilt can have more than one.
You know the proper way to sew on a border – it’s more than just cutting some super long strips of fabric the desired width and then cutting off the excess that hangs off your quilt top.
You realize there are multiple ways of making a border.
You see the potential in borders and avoid making them out of long, plain fabric strips.
The issue I have with a lot of quilt borders – whether the idea comes from the quilt designer or the quilt maker – is they’re just strips of fabric. So often at quilt shows, you come across a gorgeous quilt. The applique is divine, or the piecing is so perfect. The colors sing in harmony like the Brooklyn Tabernacle Choir. The quilting is appropriate, and the stitches have perfect tension.
Annnnndddd then you take a look at the borders. They’re long strips of plain fabric. Of course, they harmonize with the quilt center, but they’re just…plain. To me, it looks the quilter spent a ton of time on the quilt center, paying attention to all those little details and then just ran out of steam when they got to the borders. They surveyed their left-over scraps, decided what yardage they had the most of, cut some strips, sewed them on, and moved onto the quilting.
It’s really tragic. Really. All that time spent on a gorgeous quilt top and then frame it with plain strips of fabric. If I was a quilt center, I’d be offended.
So this blog assumes you know what a mitered border is and how to correctly put on a quilt border. I am taking for granted you’re aware there are multiple border treatments which can be used to spice up those strips of fabric and complement the quilt center. This is what we’re discussing today. I want to show you some options for those borders. You’ll see lots of illustrations that I hope give you lots of ideas. The very first thing I want you to understand and embrace is the quilt pattern is only a map. There are lots of ways to get to your destination. In other words, if the pattern calls for strips of plain fabric for the borders, you have the perfect right to change it up. Borders are a blank canvas…paint your dreams on them. This means, of course, that these borders will take additional time. But they’re worth it. Keep an open, creative mind and remember it’s alllllllll about the finished product – not the clock or calendar on the wall.
The easiest way to add some life to your borders is to put some applique on them.
Flowers for my Wedding by Judy Neimyer
With this method, the borders are literally still long strips of fabric; however instead of remaining plain, the quilter can applique vines, leaves, buds, birds…well, the choices are endless. My favorite type of applique borders has the applique pieces infringing on the quilt top instead of remaining just on the borders. This is a good way to pull the colors of the quilt together – use the scraps left over from the piecing (or other applique blocks) for the applique pieces. If you’re unsure about how to space things out or if your worried the layout may look off-balance, then off-set your applique. Put it in two opposite corners. This is actually my preferred way to applique borders. It just seems to add a different rhythm to the quilt.
However, as much as I love applique, I’ll do know that it’s not everyone’s favorite technique.
Let’s posit this scenario, because this is exactly where I’m at in a quilt that’s currently under my needle. Remember a blog or so back when showed you this pile of fishy blocks? I’m making a quilt for my DH and I really hope to have it ready for him by Christmas. Through some internet searches, I found a panel with trout and bass on it and I knew he would love it. He’s a big fly fisherman. It was perfect.
After the panel arrived, I had to determine a layout, and I wanted something that would complement the panel. I didn’t want the quilt to look like I just threw the panel in the middle of the quilt and then added borders until I made it as big as was needed. I didn’t want applique on it since this quilt will live in his den and may need to be washed semi-often. I played with graph paper and EQ for a while until I found this layout already uploaded into my EQ software.
I liked most of it but knew I would substitute some of the blocks for other designs. I want to walk you through the process to show you how you can change and design your own borders to complement your quilt.
The above quilt layout is a Medallion Quilt. A Medallion Quilt has a center block and everything else revolves around that center block. Literally. See this quilt?
Medallion Quilt by Lori Smith
It’s a Medallion. The center square is the main event and it has borders which complement – but do not overpower – the center square. The center square in a Medallion Quilt can be pieced or appliqued, but it’s the star of the show and everything else has a supporting role. Keep this definition in mind, because as we get to the end of 2020, the Medallion Quilt idea will get some serious play time.
This is not the type of fabric panel that could lend itself as the entire center block. Some fabric panels such as this one:
May have an idea or two for this for the granddarlings. I purchased two panels.
Can do that. But not this one. I knew it would have to be cut apart, and the largest fishy square would serve as the center block. I followed the layout directions and added three plain fabric borders around it – two narrow light green strips and a wider dark green strip. Since the panel is so “busy” (it has lots of movement and color), the solid colors helped calm it down just a bit. I also loved this panel for that reason – it has tons of color and I was able to pull every fabric I needed from my stash.
This brought my center medallion up to 21-inches square. I set it aside and began to work on the next round of squares – the star borders. I made each of them and then laid them out.
The center of this square in the pattern is 30-inches (each of the star borders is 30-inches long). When the 21-inch center medallion is placed in the middle of the star borders, there’s a definite space issue the original quilt directions won’t help me with at all. It’s up to me to figure out what to do next. There are a couple of ways I could approach this. The first way is to find the middle of the star borders (which is at 15-inches) and put a pin in it. Then find the middle of the center block (10 ½-inches) and put a pin in it. I can match the pins and measure the excess on the end of the star border – which is about 4 ½ -inches. Or I could math it out and find the difference and work with that: (30-inches – 21-inches) / 2.
30-21= 9
9/2 = 4 ½
Either way works, but it’s always nice when you know your stitching and the math works out to the same answer. Then you know you’re really on the money.
I have 4 ½-inches to play with. I could add more fabric strips, but I just did that around the fishy center. Since the 30-inch borders are stars made out of HSTs, I could echo that and A) make a wide 4 ½-inch border of HSTs or B) I could divide the 4 ½-inches in half and make two 2 ¼-inch borders. I could run one row of 2 ¼-inch HSTs next to the narrow green border and then have a 2 ¼-inch solid fabric border between that and the star border. And while I’ll be the first to admit if I’m dealing with HSTs, I like them larger (I wouldn’t mind making 4 1/2-inch HSTS), to have two busily pieced borders right up against each other kind of sets my teeth on edge. It just looks too busy. So maybe option B would work?
Nope. See, remember my center is 21-inches square. My hoped-for HSTs of 2 ¼ -inches will not divide evenly into 21. The product comes out to 9 1/3-inches.
Oy-vey.
Thus, came my option C. While 21 isn’t divisible by 2 ¼, it is divisible by three – 21/3=7. I will have one border of 3-inch HSTs and then a border of 1 ½-inches of solid fabric. Let me insert here that I could really play with the 4 ½-inches in a lot of ways. As long as the sum total of my borders add up to 4 ½-inches, I’m golden.
After, I’ve added the HST border and the strip of solid fabric, the center now looks like this and is exactly 30-inches square. The left and right border strip go on perfectly. Now I must deal with the top and bottom border. Let me also say at this point, you can put the top and bottom on first and then deal with the left and right sides. Most of the time it really doesn’t matter which way you proceed. I’ve just always done the left and right and then the top and bottom. While that 30-inch star border measures the same as the center, there is now added width because of the side borders, which means I need cornerstones. Each star border is 10 ½ -inches wide, so that means I’ve added an additional 21 inches to the center square. When you add that width and subtract the seam allowances (30 + 21 – ¼ – ¼ ), that makes the center now 50 ½-inches wide. Since the top and bottom borders are 30-inches long, I’m going to have to four cornerstones that are 10 1/2-inches square unfinished.
To further complicate matters, I’m using part of the panel as cornerstones and these fishy squares only measure 8 3/4-inches square. Never let anyone tell you I pick the easy way around things. Again, we could lay that 8 3/4-inch fishy square against that 30-inch star border and eyeball it, or simply cut super-wide strips and then begin to cut them down until everything matches. But why go to all that trouble when you could simply math it out? It’s easy – take the final unfinished size needed and subtract the unfinished size of what you have. So, 10 ½ -inches minus 8 3/4-inches is 1 ¼-inches. Divide 1 ¼-inches by 2 (for two sides), and that is 7/8-inch. Add ½-inch for seam allowances and the total is 1 3/8-inches. I will need to cut my strips 1 3/8-inches. I will cut those strips out of the background fabric so they will appear to “float” and the star strips won’t look chopped up.
Once the fishy cornerstones are added to the star borders, and the star borders are sewed onto the quilt center, it looks like this:
Before the math….
After the math…
Not too bad, if I do say so myself. And I mathed correctly – everything fit beautifully.
At this point, the quilt top measures 49-inches x 49-inches. Forty-nine is only divisible by two numbers, seven and itself. This makes my future layouts a little tricky. However, I can add a 1-inch narrow border (narrow borders are sometimes called floaters) and bring the center’s total to 50, which is divisible by a lot of other numbers. I’ll make this floater out of a solid strip of fabric for two reasons: First, it’s really difficult to make a pieced 1-inch anything, and second, that solid piece of fabric will complement the piecing.
After I added the 1-inch floater, the pattern design called for a 2-inch border. Continuing to echo the center square, I opted for the dark green for the 1-inch floater and the 2-inch adjacent border to be out of the light green. After this, the center was a nice 56-inches square. Since 56 can be divided by two, four, seven, and eight, there’s a lot of options for the next pieced border. However, the design calls for one more 1-inch floater on the other side of the 2-inch border. This additional floater will bring the center to 57-inches square. The tricky part with this measurement is 57 is divisible by itself, three, and 19. The last pieced border on this quilt top is a square-in-a-square border (this is also called the economy block). I would have to make 76 three-inch square-in-a-square blocks in order to make things come out evenly at this point.
And while I love my husband, I ain’t making 76 three-inch squares for a fish quilt that’s going to spend all of its life on the couch in his den. Nope. There’s gotta be a better way. So, let’s play with adding another 2-inch border. This will bring the center to 58-inches square. Fifty-eight is divisible by 2 (29), and 29 (2). That won’t work either, because that still would mean making a ton of 2-inch squares. Adding a 3-inch border means the center would be 59, and 59 is a prime number, meaning you can only divide it by itself and 1. But if I add a 4-inch border, that would bring the center to 60 and I can make ten 6-inch square-in-a-square blocks for each side and it would be wonderful.
Or I could leave off that last 1-inch floater and make the square-in-a-square border butt up against the 2-inch border.
This is a design decision and the primary reason I’m dragging you through my process with this quilt is to hopefully help you realize that a pattern is merely a starting point. Once you are confident with your quilting math, the sky is really the limit. You can take a design and tweak and alter it to fit what you want it to do. If I were making this quilt for myself, I would add that square-in-a-square border to the 2-inch light green border and call it a day. But this quilt isn’t for me, it’s for Bill. This is not a show quilt. This is a quilt he’s going to pull off the back of his couch to nap with on Sunday afternoons. It’s a quilt he’s going to reach for if the power goes out. It needs to be bigger for him (because he’s taller than I am), so the 4-inch border wins out, because with this quilt, use supersedes the design.
This is how it looks with the 4-inch border. I chose the brown fabric to pull the inner star borders and the outer strip borders together.
Next up, according to the layout, is that square-in-a-square border. Since the quilt is now 60-inches square, and I’m making 6-inch blocks, I’ll have to make forty squares (10 squares per side, and I’ll use solid blocks from the background fabric for four cornerstone blocks).
I found this fabric in my stash for the square-in-a-square block:
It works perfectly for that block and pulls all the colors in the panels and borders together. A word about the batik background fabric.
This fabric is actually quilt backing. I purchased it for another quilt, and it just didn’t work right with that particular top. But it works wonderfully with this one – just not as a backing!
After all the square-in-a-square piecing, I added another solid border to calm the quilt down. I opted for a narrow, 2-inch border, pulling the brown fabric out again. This would be the last time I used this fabric. It’s used three other times in the quilt and that’s enough.
The next border would be the last, wide border. It would need to be at least 4-inches finished to balance out the 2-inch border it’s beside. The pattern called for a solid fabric border, but I had to decide if I wanted to do that or go with a final pieced border to continue to pull the viewers’ eyes out to the edges of the quilt.
I opted for the pieced border. I know it’s hard to see really well in this picture, but I pieced the border, using large, rectangle pieces of several of the fabrics used in the quilt. This border is a great way to use up scraps and it serves to pull all the colors together. As soon as it comes off LeAnne the Long Arm, I will bind it in the same material I used in the middle of the square-in-a-square block. I already have the binding and the label made. Go me!
My It’s Always a Great Day to Fish quilt finished at 108-inches square. I’m pretty sure Bill will love it. Still, there are a couple of thoughts I want you to come away with from my show-and-tell blog. First, borders are a blank canvas for your quilt. If you aren’t comfortable changing up the blocks in the center of your quilt, let your talent showcase itself in the borders. Applique them. Piece them. If you have better quilting skills than I do, make them solid pieces of fabric and then quilt the life out of them. Just don’t allow them to look like they’re an afterthought — a period to the exclamation point of your quilt’s center. Second, if you know how to “math” your quilt, the sky really is the limit. Panels will not be predestined to be framed with round after round of plain borders. Orphan quilt blocks of different sizes can be set into a quilt that is lovely and wonderful. Don’t fear the math. It’s not hard … and unlike abstract disciplines like algebra and calculus, this math makes sense. If it seems a little overwhelming, take it a little at a time. And always, always remember the pattern is just the starting point. In the end, you control how your quilt looks.
If all goes according to my plans, this blog will post on June 10, 2020. At this point, North Carolina should be well into Governor Cooper’s modified phase 2 opening schedule. I say modified, because in the original phase 2 plans, places of business such as gyms, bars, and dance studios should have been able to open. They were not allowed to do so. But that is neither here nor there. What I want to really talk about today is how COVID has changed and will change the face of quilting and our quilting reality. Some of the changes I like. Some of them I don’t. Either way, this is a pretty personal blog (consider it part of knowing me better). It’s definitely an opinion piece, but keep in mind this is coming from someone who has quilted for well over thirty years and has done a reasonably good job on watching for trends and troubles in the quilting arena for the past 15 years.
It goes without saying COVID has changed everyone’s life. No matter if you’re shopping, grabbing a meal out, or going to the doctor, the entire way of doing everything has been totally upended. And I was able to deal with this upending for a while. Until…
Until it took weeks for my daughter (who has had cervical cancer) to get her last Pap Smear results back. Her appointment was in early April. We did not get her test results back until Thursday, May 22.
Until I got up and began to do office work on a Sunday because I couldn’t remember what day of the week it was (I’ve worked from home since March 9).
Until I got sick and tired of not finding items my family needed at the grocery store when we needed them. Please note: We did not hoard. We did not purchase things like paper towers or toilet paper or hand sanitizer in bulk because we were keenly aware others needed more than our two-member household. But when I can’t find a four-pack of Charmin for Bill and myself after I’ve shopped at four stores, something is wrong.
I’ve said before that I am stick-a-fork-in-me done with a lot of this. And while, yes, I realize what I’ve written in the preceding paragraphs is a rant (I own it), my frustration does nothing to negate the fact that COVID has changed everything from the way we eat out, to the way we work, to the way we shop, to the way I get my hair and nails done. But to add to my … frustration… about the situation, COVID has also messed with my Holy Grail of quilting and to be frank…well…that pisses me off. Quilting is my place of solace. Quilting and quilters are my lifelines to sanity in my world of an insanely high-pressure job. Fabric and everything that comes with it calms me at the end of my day, when most hours in that day have been stressed, pushed, and more hectic than I can adequately describe.
I am tired of living in fear of this virus. For years I lived my life in the shadow of “What Might Happen.” I refuse to do that ever again. I am over this over-hyped virus anxiety. Do I believe the virus is real? Yes. Do I do things to avoid coming in contact with it or spreading it to others? Yes. I social distance, wash my hands several times a day, and wear a mask. It’s not that I’m unaware of COVID and its possible repercussions, it’s that I’m virus-fatigued. You would stand a much better chance of me acknowledging new information about COVID if it would stop being all the news all the time.
However, let me tell you something I do know. I was born in 1961 (do the math if you want to know how old I am…I’ll wait). My generation – the folks that I grew up with – have seen and dealt with some major events throughout our lives. We’ve lived through:
The start of the Cold War
The Bay of Pigs
The Construction of the Berlin Wall
A Presidential assassination and at least two other assassination attempts on other Presidents
Watergate
The resignation of a President
The assassinations of Robert Kennedy and Martin Luther King, Jr.
Putting a man on the moon
Integration and Civil Rights when seemed both would tear our country apart
Women’s rights and finally getting a woman on the Supreme Court
Challenger and Columbia
The Collapse of the Berlin Wall
The End of the Cold War
Vietnam
9/11
More wars in the Mideast than I can keep up with
A recession and The Great Recession
Corrupt political leaders
Gas rationing
What I’m saying is this: My generation has lived through times which have upended our way of life. We’ve done this several times. And you know what? We’ve gotten through it. We’ve pulled ourselves up, worked together (most of the time), and developed solutions which have allowed us to raise our families, educate ourselves and our children, and create a society that – for all its faults and problems – is one most people would risk their lives to have. Maybe it’s because our parents didn’t hover. Our parents (for the most part) were the children of World War II society. Our grandparents instilled in our parents the desire to make sure the next generation (us) had it better. That we grew stronger. That we were smarter and better educated. But they sure as heck didn’t hand it to us. They allowed us to struggle our way through some really difficult situations. But the struggle instilled in us this supreme belief: No matter what was in our way, we could overcome it. I have absolutely no doubt in my mind we will do the same thing to this virus…
If everyone would quit whining and work together. Seriously.
How does this virus and all of its press and social media coverage affect our quilting? Besides the obvious shortages of some supplies (think ¼-inch elastic for masks – lots of us quilters are making masks), shopping was the first major area it touched. For a while some North Carolina brick and mortar quilt stores couldn’t open. Once they were deemed “essential” (for mask making), they could re-open. But it was primarily curb-side service. Once our Phase 2 came into play, retail businesses could “get back to normal,” but with strict social distancing, mask-wearing, deep cleaning, and hand sanitizing stations in place. It’s a different retail world out there right now. Most quilt stores are not huge establishments like Hancocks of Paducah. The average quilt store owner is lucky if they have a couple of thousand square feet of shopping space. This means only so many customers are allowed in the store at a time. Which may also mean you come with a list so you can shop quickly and don’t browse too long. The owners must let other customers into the store in a timely manner. In my mind, all this adds up to more on-line shopping and possibly even more brick and mortar quilt shops closing (I personally know two long-established stores that closed this week). And there goes another piece of our quilting culture. But at least we can still buy supplies.
For me, the next quilting boat COVID sunk was guild meetings, bees, sit and sews, and classes. Right now, none of these are meeting. I imagine once we’re given the okay to meet in large-ish groups again, guilds will plan their meetings. I am using the High Point Quilt Guild as an example because that’s the group I’m most active in. I’m also on the executive board so I kind of have an idea of how things may work. In one way our guild is blessed. We’re small (but mighty). We have around 40 members, of which about half show up at meetings. So, the next meeting we’re allowed to have (hoping for July here – we had our last meeting in March) I anticipate we will have approximately 20 folks. Fortunately, the fellowship hall we meet in is large enough to handle at least 30 members and keep social distancing in place. We’re blessed. However, I imagine serving refreshments may be out for a while. It will probably be BYOS (bring your own snack). But what about larger guilds or guilds that have smaller meeting rooms? Will they look for another meeting place? A task certainly easier said than done. Or will they split their guild into two groups, with the groups alternating the months they can meet, and Facebook livestream the meeting for those who aren’t meeting that month? There’s not a whole lot of options out there for large guilds. This has me worried because Quilt Guilds are a huge part of our quilting community. The charity work they do, as well the education and preservation of quilting arts, is phenomenal.
Quilt bees and sit and sews will also probably need to restructure. Most of these groups aren’t too terribly large, but they generally meet in peoples’ homes. Many of these groups may need to find alternate meeting places until the virus dies out or we get a vaccine. Many, I’m afraid, may disband all together. And that’s sad. Really, really sad. And while I do think that quilt shops will continue to have classes, I imagine the class size will be limited due to social distancing rules. The shops may need to have more classes to accommodate those who want to attend. If a normal class size is 10, but social distancing dictates the store can only have four students plus the instructor in the room, offering the same class in two different time slots may be the answer. Of all the issues the virus has touched, classes may be the most workable.
As COVID swept across our landscape, quilt show after quilt show cancelled – both small and large. And this is understandable. While a lot wasn’t known about the virus, we did know it spread easily. If you’ve been to any quilt show (especially large ones such as the Paducah AQS Show or the Houston International Quilt Show and Market), it’s a fact the foot traffic through the quilts and vendor areas is shoulder-to-shoulder. Given the social distancing guidelines, we know we can’t do this in the future. At the present, the only solution I can see for larger quilt shows is to spread the attendance out over more days. I have a good example to back this up.
I live in High Point, North Carolina. If you Google High Point, NC, one of the very first facts you’ll find is we are the International Furniture City. Twice a year, once in the fall and once in the spring, we host the Furniture Market. Literally thousands and thousands of furniture buyers from all over the world descend on our city to purchase all the latest in home dec. Due to COVID, we couldn’t have the spring market. However, the market and city leaders decided the fall market must go on…but differently. They extended the normal market time from five days to nine, thus allowing more time for buyers to get in and out safely. Of course, there will be other stringent measures put into place – mandatory mask-wearing, temperature checks, hand sanitizing stations, and announcements reminding folks about social distancing.
It will be different, but the show will go on.
I think the larger quilt shows may have to implement similar measures in the future if no vaccine is discovered for several more months. Smaller, local, guild quilt shows may face an entirely different scenario. I imagine the first issue will be actually finding a venue that A) will let you have a quilt show and B) be reasonably enough priced to let the group stretch the show out to another day if necessary. This is super-tricky for guilds, who can tell you no venue is cheap and all of them can be hard to come by. Usually, foot traffic at local shows is much less than at large ones, but part of paying for the show comes from the number of vendors you have on the floor. If the vendors themselves not only have to social distance and have the space in their booth to allow their customers to social distance, you have to ask how many vendors can we put on the floor space available? How much will this impact not only the number of quilts that can be shown, but also the number of vendors we can have? And how does this affect our net profit?
And worst of all, is it even worth it to have a show? Most guilds (mine included) raise the bulk of their operating funds from their bi-annual shows. If possibly adding an extra day or limiting vendors bites away too much of the bottom line, guilds will have no choice but to look at other fund-raising options.
Lastly, let’s talk about quilt retreats. I’ve always encouraged my readers and every quilter I know to attend at least one quilt retreat in their lifetime. Some retreats are huge. Again, we may have to extend dates and rotate one group in when another group rotates out. We may have to limit the number of people that attend. Or we may have to offer several retreat opportunities throughout the year. Smaller retreat groups may not be affected at all, unless they cannot find a place to meet. I do think that quilt classes and quilt retreats will be the areas least affected by life post-COVID.
Like everything else, the quilting landscape has now changed. And despite my earlier rants, some of these changes I like. As a former teacher, I’ve always manically wiped down things because cold viruses can live on surfaces, light switches, doorknobs, etc., for a good while. I’m completely on board with that. And as far as making events less crowded, I’m good with that, too. At times I’ve felt nearly claustrophobic at large quilt shows due to the press of people. I’ll also add that washing your hands several times a day prevents a lot of viruses from spreading – not just COVID. And I have absolutely zero problems wearing a mask. I also have a hunch – based the number of sewing machines and yards of fabric sold during the Stay at Home orders – we may have a new bunch of quilting converts descending on guilds in the future. I surely hope so.
But letting fear run and ruin the rest of your life? I’m not good with that. For my mental health, my quilt life must return to some semblance of normal now. Shopping may be different. Meetings might be different. But if we wait until our quilt lives can return to complete normalcy, we may be waiting a long time. I’m not willing to do that.
The last issue I want to discuss is the politics of this entire event. I realize I’m probably dipping my toe in some boiling water at this point but please hear me out before clicking out of the blog. If there is any area that absolutely should not be politicized, it’s quilting. Quilts, quilting, quilters…they’re all an oasis for me. All three soothe my soul and make me happy. Unfortunately, the more I read on social media and interact in other arenas, I’m finding this no longer probable. Quilts, quilters, and quilting have always been my safe space. Political arguments may occur on the news (it never stops here), on some social media platforms, and in other group settings, but most of the time these differences haven’t raised their ugly heads in my quilt groups – either in person or on-line. If differences of opinion have been raised, usually those differences have been respected. I’m afraid COVID has split the camps even more divisively, even in my Holy Grail of Quilting. I’m putting this advice out here from Thumper:
It’s okay to have different opinions. That’s part of what makes quilting and America great.
It’s not okay to be ugly to someone who has an opinion that’s different from yours.
When this blog is published, it will be sometime around the first week of June. But if you remember my writing habits, you realize I’m writing this in May – as I like to work several weeks in advance. So, if it’s somewhere around the first week of June, and North Carolina is still opening per Governor Cooper’s phase program, we’re now in the second phase. Let me put something out right here:
COVID-19 sucks.
At this point, I haven’t had it and neither has anyone in my family, although I have a sneaky suspicion I may have had it around the last of January. Remember my family’s trip to Disney World after Christmas? We all came back with a “bad upper respiratory illness.” Did the doctors call it COVID? Nope. But at that time, no one here was using that terminology. We were all sick, it took weeks to get over, and we were all feeling terrible. During the time we were at Disney, social distancing was non-existent. It was crowded, cold, and had visitors from all over the world. According to CDC reports, COVID could have been in this country since late November. So maybe….
Anyway, I really want some normality back in my life. See….this is my life right now.
Can you spot Sam in the doorway? Notice the confused look on his face? He’s thinking, “Why is Mom home so much now?”
Summed up in two pictures, this is pretty much my existence. I’m telecommuting for work and making masks. I thoroughly dislike working from home. I can never find where I put things, there’s always something else at the main office I need, and I miss people. I’ve made over 500 masks, and while many of my quilting buddies are getting tons of UFOs finished, I’m not there. I feel driven to fill a need (masks), and don’t have the hours in the day open for sewing. All of this (as well as the sometimes daily hunt for basic needs like toilet paper), is making me feel off-kilter and anxious.
In short, I’m stick-a-fork-in-me done with this.
However, there is one process that gets me through some tough, trying times: A list. I realize this sounds lame, trivial, and on some level, asinine, but it works for me. For those of us who have been lucky enough to see Frozen 2, the running theme throughout the entire, wonderful movie is “When you don’t know exactly what to do about a situation, just do the next right thing.” And that’s what lists have done for me during this season of COVID 19. I don’t have to think. I don’t have to worry. I just do the next right thing on my list. Somedays it’s not real complicated. Empty the dishwasher. Finish the laundry. Take the chicken out of the freezer to thaw for dinner. Make a dozen more masks. Other times it’s more complicated. See if the doctor will do a virtual appointment. Fill out the PPP papers. Get ready for the workers comp audit that will be done via Zoom. Buy a sympathy card for a friend whose father died from COVID (because there is no visitation or viewing or hugging during this time).
I’ve been a list-maker for as long as I can remember. It keeps me focused and on-task. For quilters (or any other artist or crafter), they serve a two-fold purpose. A list can tell me what I need to purchase to complete a project. It also can put subtle pressure on me to finish certain steps so I can complete a quilt in a timely manner. I don’t have to wonder what to do when I step in my studio – I just “do the next right thing.” To me, a list is a gift. It’s a road map. It’s a GPS. I may have to think to make the list out, but at least after, all I have to do is follow it.
List making is also an art. Too much to do on the list can make you feel too much pressure to get it all done. And that can result in not wanting to do anything, because you realize you’ve just set yourself up for failure. There’s only so many hours in a day and not all of them need to be spent marking items off a list. There has to be balance. There has to be grace.
And sometimes there needs to be the grace to throw the list to the wind, because suddenly priorities have shifted. Planners…plodders…people like myself who break down large commitments into smaller chunks of “doable” ideas love to live by a list. But if we lack the ability to know when the list itself becomes the least important thing, then we haven’t grasped the concept of mercy and grace.
So, what does all this have to do with quilting? Arguably, lists are great for quilters. They keep us on task. They help us avoid starting yet another project before finishing the last one (okay…sometimes they do this). They keep us from going off all willy-nilly in fabric stores and websites purchasing things we don’t need (okay…sometimes on this one, too). They help us keep up with guild obligations. They are wonderful quilting companions.
Yet, sometimes, when life and circumstances throw us curveballs we never, ever expected, those lists become lifelines. Do the first thing. Then the second. Get through the day. Get through the week. Get through forty days and then fifty. Then two more weeks. Two months. Time marked by the rising of the sun, a list, and sunsets – that’s what it’s been like at my house.
I’m looking forward to the day I don’t have to look at rising COVID numbers and can find toilet paper and hand sanitizer at the grocery store. I’m waiting in anticipation to the time I can find ¼-inch elastic at Hobby Lobby, Joanne’s, or almost any sewing website. I can’t wait for guild meetings and in-person Sit and Sews. I think I will faint with joy the next time I hear, “Booth or table?”
I know some of you are feeing sort of the same way, and I wanted you to know, I get it. I really do understand because I’m right there with you. So, for perhaps just a little while longer, make your list. Give yourself grace. Social distance. Wash your hands. Wear a mask. Make a mask.
And hold on tight to the thought that we will make it through this.
“There is nothing like looking, if you want to find something. You certainly usually find something, if you look, but it is not always quite the something you were after.” ― J.R.R. Tolkien, The Hobbit, or There and Back Again
This morning, I went on a quest. I went looking after a fact, a process that led me down the Google rabbit hole and didn’t let me back up for nearly three hours. What was I looking for? A number…an estimate…a guess of just how many quilt blocks have stars in them. Know what I found?
Nothing.
Oh, I found star blocks aplenty, but as far as a firm number of exactly how many of these there are, no one was offering even an educated guess. The closest I got to a figure was Pinterest – which had at the time of my search — 5,275 images of quilt blocks with stars on them. Not satisfied with this, I opened my EQ 8 and searched for star quilt blocks. This time I came up with 570 quilt blocks with stars in them.
Annnndddd I found out that North Carolina has its own “official” star block!
North Carolina Star
Talk about being star-crossed.
Within the ranges of star blocks, there seemed to be just as many names for these blocks as there were blocks themselves. And besides having a hard time pinning down numbers and names, the history behind star blocks is muddled. One of the first printed mention of such a block is found in 1884 in Farms and Firesides Magazine. And the article featured this star block:
This block has several different names, but it’s primarily known as the Sawtooth Star. I imagine it was given this moniker because the starbursts around the center square reminds the viewer of the jagged teeth of a saw. In this blog, I want to keep things as simple as I can, so I’m lumping star blocks into four different categories:
Sawtooth Stars/Variable Stars
Feathered Stars
Diamond Stars
Set-in Stars
We’re not working with diamond stars or set-in stars right now. I haven’t discussed the techniques used in those blocks yet. We will get there, I promise, and those will come later. We also will not touch on foundation pieced stars or stars made by English Paper Piecing.
Variable Star
Feathered Star
I lump Sawtooth Stars and Variable Stars (and to a degree, Feathered Stars) in the same category because of their construction elements. While none of those star blocks look exactly alike, the construction process is similar – which is why I put them all in one category. All of these blocks are comprised of squares, half-square triangles, and flying geese units. With the Variable Star blocks, there is also the large square in the middle that you could design in a variety of ways (which is why I think it is called the Variable Star). Sometimes you can even throw in a Quarter-Square Triangle unit.
By now, if you’re a regular reader of my blog, you can see what I’ve been leading up to over the past several weeks. After spending some serious time learning about the construction of HSTs, FGUs, and QSTs, now it’s time to begin to put them to practice. Let’s start by throwing some of the blocks in a grid.
Gridded Sawtooth Block
When we put the Sawtooth Star in a grid, we can see that it’s really a star in a nine-patch setting. It consists of flying geese, four small squares in each corner, and a large square in the middle.
Gridded Variable Star
As grid out a Variable Star, we find out it’s a nine-patch, too, even though it may not look like it. Four-patch units make up the corner squares and the middle square has been converted into its own nine-patch unit made up of a four-patches (to echo the corner squares), squares and rectangles. Flying geese are used at the top, bottom, and sides.
Gridded Feather Star
Now let’s really kick it up a notch and look at a Feathered Star. It’s is a little more complicated, but it’s one of my favorite blocks, especially when they’re set on-point. At first glance, you may think it’s a nine-patch, but it isn’t. The diamonds at the tip of the star are set-in diamonds. The large triangles on the sides and squares in the corners are also set-in. What I want you to notice about a Feathered Star block is this: It’s primarily made of half-square triangles, triangles, and squares – all techniques we’ve worked to perfect and we know how to correctly handle the bias. So while this complicated-looking block will have to wait until we work with set-in seams, I want you to be aware that as of this moment, you already successfully possess 90 percent of the skillset needed to correctly and confidently make this block. Don’t be put off by its difficult looks. Although I will be the first to admit when attempting this block, I would paper piece it because the half-square triangles are so small.
Setting the Feathered Star aside, (that is another block for another day) because we know the Sawtooth Star and the Variable Star are nine-patches, we’ve just opened up a world of creativity. By now you should know how to execute perfectly wonderful half-square, quarter-square, and flying geese units. You know how to make four-patches and nine-patches. You also should know your preferred technique to make these units. Theoretically, we should be able to take the either star block and make it look either traditional:
Or a little more exciting:
Because star blocks are used so often in quilt designs, it’s important not only to know how to make them well, it’s also essential to think about how color can completely change up your design look. Take the Sawtooth Star Block for instance.
This is the traditional look:
If we picked modern quilt colors, we get this effect.
If we use a two-color scheme, it looks completely different.
And if we reversed the background color and the star color, we get another completely different vibe.
Now let’s play with scrappy.
As you can see, color choice and placement can give a completely different look to a block. When you’re considering fabric for these stars, just remember that “cool” colors (blues and greens) will look as if they’re receding into the background while warm colors (reds, yellows, and oranges) will “pop” out from the background.
Both of these quilts are Sizzle, a 2019 BOM from The Quilt Show. It was designed by Becky Goldsmith. The top quilt features predominately cool colors and the bottom one is primarily warm colors. Similar though the patterns are, note how differently the warm and cool colors not only affect the appearance, but also how you feel about each quilt.
So, in the future if you’re working with a star block like this:
You may want to use cool colors on the parts of the stars that appear further back and use a warmer color in the parts that appear closer to the viewer. Just remember the rule about purples and lime greens – even though technically they fall in the cool spectrum, when placed next to a warm color, they tend to “heat up” a bit.
Lastly, let’s consider how most effectively set star blocks. Working with this block:
Let’s put it in a traditional horizontal row setting with sashing and cornerstones.
This is a nice quilt. But look what happens when you construct your sashing out of the same fabric as the background in the star blocks:
And look at what happens when you completely remove the sashing:
Can you see the secondary design?
To me, the appearance of the star blocks radically change in the last two quilt settings. Now let’s do the same thing, but let’s set the blocks on point.
Traditional:
Sashing the same color as the background.
Sashing completely removed.
Can you see the secondary design on this one?
On-point setting for the star blocks with connector blocks.
On point setting with the star blocks used as the connector blocks.
To wrap this blog up, it’s important to remember that quilting is like any other thing you want to learn – the more you do it, the better you become and in order to do the more advanced steps correctly, you first have to learn the beginning steps really well. Over the past several blogs we’ve discussed how to make half-square triangles, quarter-square triangles, nine-patches, four-patches, and flying geese. For most of these units, we’ve looked at several different techniques for each of them. It’s important for you to find out which technique works for you. On top of this, we’ve worked through the different mathematical formulas involved in estimating the yardage needed for these techniques.
In other words, you should be well prepared to move onto the next few blogs about a few more advanced techniques – Y-seams and 60-degree angles.
We’ve talked a lot about triangles this year – setting triangles, corner triangles, half-square triangles – we’ve parlayed around the three-sided form in lots of aspects. We’ve discussed how to make them, how to cut them, and how to trim them. We’ve learned how to handle bias, that spray starch is a life saver, and (hopefully) by now you’ve discovered which is your favorite way to make triangles. Then we took this information and combined it with some math so we could learn how to estimate the yardage we need for our own quilt.
While we were playing around with estimating yardage, you saw me put the blocks into grid form with EQ 8. Knowing if a block is a four-patch, nine-patch, sixteen-patch, or-even-bigger patch is the first step in deciding how much yardage you need, and going through this process, we only used HSTs. However, this week I want you to grasp the concept that there is more than one way to fill in those units in your quilt block – they don’t have to be HSTs, although those are used quite often in design work. Today I want to talk about two other backbone-units used in quilt blocks – the Quarter Square Triangle (QST) and Flying Geese.
A picture is worth a thousand words. This is a QST:
It’s a square comprised of four triangles. Here are some quilt blocks that use these:
And there are some quilt blocks made entirely of them. These blocks are sometimes called Hourglass Blocks. Like HSTs, the design possibilities are endless. There are some other pros about these block units, too:
They’re only a tad more difficult to make than HSTs. As a matter of fact, you begin with HSTs.
The “Sandwich Method” of construction can be used.
You never have to deal with bias edges.
There are no special tools you need to purchase, although you may want to purchase a square ruler when trimming the block to size.
You can make them larger than required and then trim them down for complete and utter accuracy.
It’s easy to estimate yardage.
They don’t need to be paper-pieced, so no papers to be removed.
Like HSTs, you can make two at a time.
There are a few cons:
Using this method with three or four fabrics creates mirror-Image blocks, and most patterns require identical blocks.
The blocks must be marked on one of the backs.
So, while the pros outweigh the cons, there just may be a few issues you have to be particularly careful about.
You can take nearly any block that you can grid out and use a QST in one of those grid units. They can be turned and rotated to look the way you desire. Then you can use the QST formula to make them. It’s really EASY – simply take the finished size of the QST and add 1 ¼-inches to it. Cut one square this size from two different fabrics. Let’s try it.
This is the lovely Ohio Star Block. I’m using this block for a couple of reasons. First, I have a lot of quilting friends that are from Ohio. Second, this is about the easiest QST to work with. This block finishes at 6-inches and has four QSTs. When we grid this block out:
We know that each grid unit is 2-inches, finished. Now let’s apply the QST formula to see how big to cut our fabric squares.
2-inch finished blocks + 1 ¼-inch seam allowances = 3 ¼-inches. We need to cut our fabric squares 3 ¼-inches.
To make the QST, we cut two 3 ¼-inch fabric squares out of two different fabrics.
Now we proceed to make HSTs, using the Sew and Slice method. Draw a diagonal line from one corner to another on the back of the lightest colored fabric square.
Stitch ¼-inch away from each side of the line.
Cut the square apart on the diagonal line drawn on the backside of the block.
Tada! Two HSTs. Press the HSTs seam to the darker fabric.
On the back of one of the HST units, using a ruler and pencil, draw a diagonal line from one corner to the other. This line bisects the original seam.
With right sides together, alternating light and dark fabrics, align the outside edges of the two units and nest the seam allowances together.
At this point, I use a couple of pins to hold everything together. Then you proceed as you normally would to make a HST. Stitch ¼-inch away from the drawn diagonal line, then cut apart along the drawn line.
Tada! Two QSTs.
Notice I pressed the final seams open to reduce bulk.
If you have used the formula that adds a 1 ¼-inch seam allowance to the finished block unit size, all you have left to do is trim off the dog ears and continue on with the block. But if you’re like me and would rather make your blocks a bit bigger and then trim them down, here’s the formula to use:
Size of finished block unit + 1 ½-inches for the seam allowance. So, taking our 2-inch finished block unit, here’s how that would look:
2-inch finished block unit + 1 ½-inches for the seam allowance = 3 ½-inch square. I’ll cut my fabric squares at 3 ½-inches and then proceed to make my HSTs. Once those are done, do NOT cut those down to the correct size. Continue on to make the QSTs. Once those are made then you cut them down to the correct 2 ½-inch size, unfinished.
To trim these oversized units, find the center of the block until by dividing the unfinished size by 2. In this case we divide 2 ½ by 2 and get 1 ¼. Find the intersection of this number on your square ruler and place this point over the center of your block, aligning the 45-degree line with one of the seam lines. Trim the excess fabric from two sides.
Turn the block so that the other two edges are in position to be cut. Align the midpoint at 1 ¼-inches on the ruler with the center of the patch. The cut edges should like up with the unfinished block size of 2 ½-inch mark on your ruler. Trim the final two edges.
This technique works well until you change up your block to something like this:
And since the triangles in the QSTs are different fabrics, this time the QSTS require a bit more planning, but it can be done! The steps are the same as the QSTs above, we just have to plan our fabric placement a little more carefully.
First, let’s find out the finished size of our QSTs. In this case, the we’re keeping them the same size as our previous block – 2-inches. So, let’s do the math.
2-inch finished block + 1 ¼-inch seam allowance (or 1 ½-inch if you want to make them larger and cut them down) = 3 ¼-inch (3 ½-inch).
We will need to cut out two different pairs of fabric squares –
One 3 ¼-inch (3 ½-inch) block of blue fabric + One 3 ¼-inch (3 ½-inch) block of white
And
One 3 ¼-inch (3 ½-inch) block of blue fabric + One 3 ¼-inch (3 ½-inch) block of green fabric
Then proceed as we did above.
The primary issue you’ll need to keep in mind with this particular technique is it produces mirror image blocks. Sometimes you can use them, but sometimes you would have to discard one of the pair. If there are lot of identical QSTs in the quilt and you can’t think of anything creative to do with the discarded QST, it may be a good idea just to opt with cutting the individual triangles out and sewing the QST together that way. Otherwise you’re wasting a lot of fabric and money.
It’s important that QSTs are taken into consideration when designing your blocks and your quilts. It adds a little bit more zing to how things look.
The other “backbone” block we’re looking at today is Flying Geese.
And while I’ve made probably literally thousands of these, it wasn’t until a few years ago when I found the construction method that worked for me, that I stopped dreading making this block. That’s right. For years I dreaded making this block because they always seemed to come out wonky, the wrong size, or I would chop the beak off the goose. Once I discovered a few techniques that prevented all of these issues, I became good with the Goose.
The first step I want to go through with Flying Geese is to graph a couple of blocks out. First let’s look at this Flying Geese block:
When it’s shown in a graph, we discover each of the geese is actually made from two HSTs.
It’s the fabric placement that makes the Flying Geese unit (FGU). If you choose to use HSTs to make the FGU, there are some trade-offs. You don’t have to worry so much about cutting the beaks off, but if the HSTs aren’t lined up just right, the beak will not be centered. If you make FGU this way, the Sew and Slice method can be used, which should make estimating the yardage easy for you by now.
A Chevron Block I made for my guild’s 2020 Mystery Quilt. It looks like rows of flying geese, but it’s simply carefully arranged HSTs.
Now let’s take a gander (get it… goose…gander?) at the other type of Flying Geese block.
When this block unit is shown in a graph, we can see that it’s not made from HSTs. It’s comprised of a large triangle in the center and two smaller triangles on either end.
When you look at those three units, the first thought that may go through your mind is “That’s a lot of bias to deal with.” And if that’s what you’re thinking, you are absolutely right. If you cut three triangles out to construct this Flying Geese Unit, even if you heavily spray starch them, the odds are that the bias will stretch and your unit will come out the wrong size, wonky, or stretched hopelessly out of shape. When I began quilting in the early 1980’s, I was taught to make three triangle units and sew them together. This was the start of my animosity towards Flying Geese. I knew little to nothing about bias then and nearly all of my units had something wrong with them. I avoided Flying Geese at all costs.
Then I learned about paper piecing and for years I paper pieced them. This worked well, but if there were large FGUs in the quilt, that was a lot of additional fabric (because remember in paper piecing, you’re trading fabric for precision). While I was assured of intact beaks and perfect size, I was paying for a good chunk of extra fabric. Thus began my search for other ways to construct my FGUs. And while I found several different methods, I still resort to paper piecing these if they are A) small units or B) they are the Circling Geese Units.
Circling Geese Block.
The first option in FGU construction is Flip and Sew method. I mentioned this method when we were working with Snowball Blocks in the blogs concerning on-point quilt yardage and connector blocks, but didn’t explain the method. It’s not difficult to do and it’s easy to figure yardage, so it’s a win-win. For this method, first take find the width and height of the finished FGU. Flying Geese Units are rectangles, so while the methods of estimating yardage and construction are the same, you have to remember that for at least one step of this procedure you won’t be cutting out squares, but rectangles. Let’s say we’re making FGUs that finish at 2-inches high by 4-inches wide.
For the “Goose” part (the large triangle in the center) you take the finished width and height and add ½-inches to each for seam allowances. So, you would cut the “Goose” unit 2 ½-inches x 4 ½-inches.
For the “Sky” part of the FGU (the two small triangles on either side of the large triangle), we will start with squares instead of triangles, which means we’re not dealing with any bias. These squares will need to be the height of the FGU plus ½-inch for the seam allowance, and in this case that means the squares should be cut at 2 ½-inches. On the back of these squares, draw a diagonal line from corner to corner.
Line the one of the sky squares up on the goose rectangle like this:
And sew on the drawn diagonal line.
At this point, I flip the lower half of the square up and lightly finger press it to make sure it looks okay.
If it doesn’t I rip the stitches out, re-position, and sew again. If it looks fine, I trim the upper half of the square off, leaving a ¼-inch seam allowance.
Then I press with a hot dry iron and shot of spray starch.
Position the second square like this:
And proceed the same way as you did with the first square.
At this point, your FGU should look like this.
It’s super important that there is a ¼-inch seam allowance at the top of the large triangle. If you don’t have this, there’s a chance you’ll cut off the top of the triangle when you join your FGUs together (also known as chopping the “beak” off of the goose).
The way to avoid this as you’re sewing your units together is to look for the “X” the “sky” triangle seams made. When joining the FGU, make sure to sew slightly above the center of the “X” (my preference), or in the middle of it.
Way too many stray threads in this picture! In my defense, it was late!
Untrimmed Units
If you’re designing your own quilt blocks, you may wonder how to proportion an FGU. It’s a little more challenging since we’re working with rectangles. How do you know how tall and wide to make these? It’s not hard. The height is exactly half the width. Take for example a block unit width of 4-inches, finished. That means the height is 2 inches. The FGU would be 4-inches wide x 2-inches tall. If you need to calculate by height instead of width for some reason you would multiply instead of divide. If the space you need to fill is 2-inches tall, then you would double that to find the width – 4 inches. This formula keeps the FGU proportionate, but it’s not a hard, fast rule. You can play with the space and proportions to fit your needs, but the FGU won’t look like a “traditional” one. But that’s okay – we’re all about creativity.
There is a way to make the FGUs a little bigger and cut them down. Simply add ¾-inch to the finished size instead of ½-inch. So, for our 2-inch x 4-inch finished unit, we would cut the rectangle out at 2 ¾-inches by 4 ¾-inches and the squares out at 2 ¾-inches. The only issue you must be careful about with making the units larger and then cutting them down is the “beak.” If you trim too much, you stand a chance of cutting the tip of the triangle off.
Thus far we’ve talked about paper piecing and the Flip and Sew Method for making the FGU. There is one more way to make these units and this by far is my favorite way to construct them. There is no bias and no fabric waste. As a matter of fact, this technique is called the No Waste Flying Geese Method. This makes four FGUs, two at a time. Once again, no actual cutting of triangles is involved. And unlike the Flip and Sew Method, we only cut out squares. The math for this is a little different, too. Let’s go over that and then we will move onto the actual construction.
Still working with our 2-inch by 4-inch finished rectangle, we take the width (4) and add 1 ¼-inches.
4-inches + 1 ¼-inches = 5 ¼-inches. Cut a 5 ¼-inch square out of the “goose” (large triangle) fabric.
Now for the “sky” (smaller triangles). To get this, take the height of our finished FGU (2-inches) and add 7/8-inches to it.
2-inches + 7/8-inches = 2 7/8-inches. We cut the smaller squares 2 7/8. And you will need four small squares of sky fabric for each large square of goose fabric you cut out.
As you can see, this is easy math and it makes estimating yardage easy, too. But now comes the fun part – the construction. To me, making FGUs this way is a little bit like magic.
Place two of the small squares, right sides together, on opposite corners of the large square. The squares will overlap a little in the center and that’s okay. They’re supposed to with this technique.
Draw a diagonal line from corner to corner through the small squares and pin them to the large squares.
At this point, things work a little like the HST Sew and Slice method. Sew a seam ¼-inch away from both sides of the drawn line.
Cut along the drawn line.
At this point, your FGU looks like this: Kinda looks like wonky hearts doesn’t it?
Take one of these units and place a small square on the corner of the large triangle. Draw a diagonal line on the small square and pin it to the “goose” fabric. I know some of you don’t like to pin, but I’ve found with this method, if I don’t pin, my fabric shifts too much, especially if I’m chain piecing.
Again, sew a seam ¼-inch away from both sides of the drawn line. Cut apart along the diagonal line. Press towards the small triangles.
To trim the block, find the center point of the height of the unfinished block and line up that measurement with the 45-degree angle on the square ruler.
With these unfinished 2 ½-inch x 4 ½-inch blocks, the center point is 2 ¼-inches. Trim across the top and right-hand sides. Rotate the block and trim the remaining sides. You won’t be able to use the 45-degree angle, so line the point up with the ¼-inch mark on your ruler, with the trimmed edges aligned at the 2 ½-inch and 4 ½ ruler lines. Trim the block to 2 ½ x 4 ½-inches.
Some words of wisdom (or warning) at this point. From time to time when making FGUs, your block may be off. There are lots of things that contribute to this – weight of thread, your needle bobbles, your fabric shifts, the cat jumps up on your sewing table (not that Sam would ever do anything like that…). If your block is off a bit, never, ever cut the tip off your triangle. Shift your ruler up or down to ensure that point stays intact. This may mean your block is slightly larger or smaller, but you can always ease it into the block when you sew your pieces together.
I like to mix my FGUs up. The standard “idea” about these geese is the prominent fabric is the “goose” fabric and the “sky” fabric is a lighter color. But look at the difference it makes when you reverse these.
I also like to take my left-over scraps and make my “sky” blocks out of different fabrics. This really helps pull a scrappy quilt together.
Let me also throw this fact in here — there are specialty rulers designed for nothing but flying geese. You can google that quilting tool and literally dozens of options appear. However, I’m one of those people who won’t buy a ruler if I can’t use it for more than one thing. If I purchase a specialty ruler for one technique, you can bet your bottom dollar, it’s a heck of a ruler because as a rule, I don’t do that. This is why FGU specialty rulers aren’t in this blog. I want to use rulers and tools that you should already have in your quilting space.
Now you have two more block units to add to your design tool chest. There are lots of construction methods in your quilting arsenal, too. And you know how to estimate fabric. Any thoughts on where this may be taking us?
This week we’re back to estimating fabric yardage again, but now we’re looking at on-point quilts. If you have not read my two April blogs dealing with estimating yardage for a horizontally set quilt, it would be a good idea to go back into the archives and read those first. I’m glossing over some of the details of the process in this blog because I spent so much time on them in the two previous blogs. In general, on-point quilts take a bit more material than horizontally set quilts, due to setting blocks, side triangles, and corner triangles. If sashing and additional borders are included, the yardage increases again. Personally, I love an on-point setting. There’s just so much to work with. And while estimating the fabric yardage goes through much of the same steps as a horizontal row quilt, there are two additional steps we have to deal with – the side triangles (also called the setting triangles), and the corner triangles. Not only are both types of triangles different sizes, they are also cut differently. I’ll show you how to work with these later on in the blog.
Step One: Analyze the Main Block
We need to determine what kind of block this is. Is it a four-patch? A nine-patch?
By looking at the block’s graph on EQ8, we know it’s four block units across and four block units down, so it’s a sixteen-patch (4 x 4= 16). The block is also 10-inches finished. We have to know how large to make each block unit, so let’s divide 10-inches by 4 units per side. This give us 2 ½-inches. Each block unit in our 10-inch block will need to finish at 2 ½-inches square. We also can see that each block unit is a half-square triangle. This is good, because despite how much more complicated this block appears when compared to the Birds in the Air Block we used in the other blog, it’s actually really easy to estimate the yardage. Let’s get to it!
Step Two: Make a list of all the different types of HSTs in the block
Four HSTs in blue and white
Four HSTs in purple and white
Four HSTs in yellow and white
Four HSTs in blue and purple
There are twelve 10-inch squares in the quilt, so we know that the amounts we figure for each HST will be multiplied by 12 to give us the total.
In order to preserve the bias, we will also use the Sew and Slice method to make the HST units. This means we can get two HSTs per block unit cut from our strips.
For the blue and white HSTs, we know they need to finish to 2 ½ inches. In order to use the Sew and Slice method, we need to add 7/8-inch to 2 ½-inches. This gives us 3.375 or 3 3/8-inches. Couple of personal issues I deal with at this point. First, I hate dealing in eighth-inch increments on a cutting mat. The lines are small and at my age and eyesight, it’s super-easy to end up with a bunch of inaccurate cuts. Second, I like to make my HSTs larger and cut them down. So, I am rounding that 3 3/8 up to 3 ½-inches. This will allow me to trim for accuracy and make the math much easier. Since there are four blue and white HSTs per block and there are 12 of these blocks in the quilt, that means I have to make 48 blue and white HSTs for this quilt. Working with 40-inches of usable fabric and cutting 3 ½-inch blocks, we divide 40 by 3 ½ and know we can get 11.42857 squares per 3 ½-inch strip. Round that down to 11. We also know we can get two HSTs per 3 ½-inch square, so we can divide the 48 needed by 2. We need to determine how much blue fabric we need for twenty-four 3 ½-inch squares. To find this out, divide the 24 squares needed by the 11 squares we can get per strip. This gives us 2.181818 – or three 3 ½-inch strips. Multiply 3 ½ by 3 and then divide by 36 inches per yard to get the amount of blue fabric required – 3 ½ x 3 = 10 1/2
10.5/36 = .291667
or 1/3 yard of blue fabric. Put that amount on your fabric chart. I will also add 1/3 yard to the white fabric on my chart, since the other half of this HST is white.
There are also four purple and white HSTs in a block, so the math is just a repeat of what we did for the four blue and white HSTs (I told you this block was super-easy).
4 purple and white HSTs x 12 blocks in the quilt = 48 purple/white HSTs
2 HSTs per 3 ½-inch block cuts the 48 needed in half to 24
24 squares/11 squares per 3 ½-inch strip = three 3 ½-inch strips
3 ½ x 3 strips needed = 10.5
10.5/36 = .291667 or 1/3 yard
We need 1/3 yard of purple fabric and another 1/3 yard of white fabric, since the other half of the purple HST is white. Taking what we know and moving it forward to the yellow and white HST, since all of the numbers are the same, we know we need 1/3 yard of yellow material and another 1/3 yard of the white. Be sure to add all of this to your fabric chart.
The purple and blue HSTS that form the pinwheel in the middle of the block are estimated the exact same way, but remember to add an additional 1/3-yard to the blue and an additional 1/3-yard to the purple.
Make the HSTs and trim them down to the needed 2 ½-inches.
Step Three – Design your setting blocks
At this point, we need to return to our design concept. Do we want sashing between the on-point blocks? Do we want our setting blocks to be plain or do we want to use some connector blocks? Do we want sashing and pieced blocks? This is a personal decision, but I want to work with sashing and pieced blocks. I will use the traditional snowball block and will use non-pieced sashing, just to keep things easy right now. If I decided to piece my sashing, I would simply treat the sashing like a quilt block and estimate the fabric amounts in that same way. So right now, let’s take a look at the snowball block and work with the design of it to figure out how much yardage we need.
With this block, we’re looking at a lot of open space in the middle and blue triangles in the corners. However, when we try to “grid” this block out to find out if it’s a sixteen patch (like our primary design block), we get this:
Not a whole of help, is it? Let’s look at what we know. Since the primary design block finishes at 10-inches, we know that the snowball blocks will need to finish at 10-inches, too. That’s the easy part. But we want the triangles in the corners to match the triangles in the HSTS. We don’t want them too small or too large. What we must do at this point, is divide 10 by the number of grids on the side of the primary design block, which in this case is four – 10 divided by 4 = 2 ½. The triangles will need to fall into that 2 ½-inch grid allotment.
I’m using the Flip and Sew method to make the triangles, which is the easiest way to do corner triangles on a snowball block or flying geese. Instead of cutting triangles out, we’re cutting out squares, sewing on the diagonal, and then trimming the extra away. This method doesn’t expose the bias, so it keeps everything from stretching out of shape. To do this, we need to take the 2 ½-grid allotment and add 7/8 to it. This gives us 3 3/8. And as much as I hate working with eighths, I’m going to have to do it at this juncture because I can’t make these larger and trim them down like I did in the HSTs in the primary design block.
There are six snowball blocks, with four blue triangles in each corner. The math for this estimate will work like this:
6 snowball blocks x 4 block units for each corner = 24. We need to cut twenty-four 3 3/8-inch blocks.
Working with 40-inches of usable WOF, divide 40 by 3 3/8 and that equals 11.85185. Round that down to 11 – we can get eleven 3 3/8 blocks per strip of fabric.
Divide the number of blocks needed – 24 – by the number of blocks we can get per strip – 11—and that comes to 2.181818. Round that up to three.
To get the blue yardage needed, multiply the 3 strips by 3 3/8. This equals 10.125. Divide 10.125 by 36-inches in a yard and we get .18125 or ¼-yard. Add an additional 1/4-yard to the blue fabric on your chart.
The white fabric is a bit easier to math out. We need six 10 ½ inch squares, which will finish to 10-inches. Divide 40-inches of usable WOF by 10 ½ and we get 3.809524. We can get three 10 ½-inch squares per strip of fabric. We need six blocks, so we know we need to cut 2 strips. Multiply 10 ½-inches by 2 to get 21. Divide 21 by 36 and that comes to .583333 or 5/8-yard. Add an additional 5/8-yard to the white fabric on your chart.
Step Four – Sashing and Cornerstones
I think I want to make my sashing 3-inches, finished. The first question I must ask before I estimate yardage for this, is does 3-inches conform to the Golden Ratio? I’ll have to math it out to be certain. We multiply the size of the finished block – 10-inches – by the GR – 1.618. This gives us 16.18, which we divide by 4 (since the block has four sides). Now we have 4.045 or 4-inches. That would be the widest we could make it. When figuring the smallest sashing we could make, we come up with (10 x .618)/4 = 1.545 or 1 ½-inches. Since 3-inches falls between those extremes, I’m good to go.
We will need to cut 48 pieces of 10 ½ x 3 ½ strips of blue fabric. To determine this yardage, we need to:
Divide 40-inches of usable WOF fabric by 10 ½ (the length of the sashing strip) = 3.809524. We can get three 10 ½ sashing pieces per cut.
Divide 48 by 3 to see how many strips to cut = 16 strips
Multiply 16 by 3 ½ (the width of the unfinished sashing strip) = 56.
Divide 56 by 36 (the number of inches in a yard) = 1.555556 or 1 ½-yards. Add 1 ½ yards to the blue fabric category on your chart.
Since the sashing is 3 ½-inches wide, the cornerstones will need to be that width, too. If we look at our design, we can see we need 31, which we need to break down into 17 squares and 14 triangles. Let’s see how to cut the triangles first, because we already know how to do the squares.
I will be introducing a new number here — 1.414. What is this number? Consider it kind of the Golden Ratio for triangles. Technically it’s called the Root Mean Square (RMS) and it’s used to determine 45-degree angles. It’s also used when determining voltage, but that’s another blog for another day. Simply think of it as kind of the Golden Ratio for triangles. I’ve also heard it called “Quilter’s Cake.” To use this, we take the finished size of the block needed and multiply it by 1.414 and add 1 ¼ -inches for seam allowances. So, let’s use this to determine the triangles needed in the cornerstone setting.
We know the finished size of the cornerstone square is 3-inches. Multiply 3 by 1.414 and we get 4.23725 or 4 ¼ -inches. Now add 1 ¼-inch to 4 ¼-inch and we get 5 ½-inches. We need to cut 5 ½ -inch squares and then sub cut these twice on the diagonal for our triangles. I’m going to park this little fact right here: There will come a time in this quilt design when we divide by 1.414 to get our corner triangles for the quilt center. The reason we multiply by 1.414 and get a larger number this time is that we need to cut these triangles with their long side on the straight of grain to avoid as much stretching as possible. With an on-point quilt, any side triangles – whether they be in cornerstones or setting triangles – are multiplied by 1.414 before adding the 1 ¼-inch seam allowance.
Now for the math part. We will need to cut 5 ½-inch squares and we know we need 14 triangles. Since we get four triangles per 5 ½-inch square, divide 14 by 4.
Cut the sashing triangles and the setting triangles twice on the diagonal,
14/4= 3 ½ — Let’s round that up to four 5 ½-inch squares. Then we divide 40 WOF by 5 ½-inches to see how many squares we can get from a strip of fabric:
40/5.5 = 7.272727. We know we need one 5 ½-inch strip of fabric. When we divide that out for yardage (5.5/36) we get .152778 or 1/8 yard. I’m making my cornerstones out of yellow fabric, so I add that to the yellow yardage.
That takes care of the triangles, now we have to work with the squares, and this should be pretty straight forward by now:
We need seventeen 3 ½-inch squares.
40 WOF / 3.5 = 11.42857
We can get eleven 3 ½-inch squares per strip, so we need two strips of yellow I order to get our 17 squares.
2 strips x 3 ½-inches = 7 inches
7-inches/36-inches in a yard = .194444 or ¼ yard. Add ¼ yard to the yellow fabric.
Step Five – Setting Triangles and Corner Triangles
If you look at this diagram of the quilt at this point, you can see we have to add some triangles along the sides and corners for our top to have even edges, so we can add borders. By looking carefully at the diagram, we can see that the triangles along the sides are larger than the triangles at the top and bottom corners. And since we’ve cut our triangle cornerstones, we are already acquainted with the math formula we need to get the side triangles right (these are also called setting triangles and often the two terms are used interchangeably).
The finished block size of our primary design block as well as our snowball blocks is 10-inches.
10 x 1.414 = 14.14 or 14 1/8-inches.
14 1/8 + 1 ¼ seam allowance = 15 5/8. We will need to cut the square to make the setting (side) triangles 15 5/8-inches. We need 10 setting triangles. Since we can get four triangles per 15 5/8-inch block, we divide 10 by 4 and get 2.5. We round that up to three –we need three 15 5/8-inch squares. To figure out how many squares we can per strip of 40-inch WOF, we divide 40 by 15 5/8. This gives us 2.56. Round that up to three. We will need to cut three 15 5/8-inches wide. Multiply 3 x 15 5/8 and that gives us 46.875 or 46 7/8 inches. I will round that up to 47. Divide 47 inches by 36-inches and we get 1 1/3-yard. Since I’m making my side triangles out of purple, I’ll add the 1 1/3-yard to the purple.
The left and right, top and bottom corner triangles are cut differently and estimated differently than the side triangles. Let’s work with the estimating first, and then I’ll explain how the cutting process works. These triangles are smaller than the side triangles, so instead of multiplying, we divide. Take the size of the finished blocks and divide by 1.414, and then add 7/8-inch for the seam allowances. In this case, these figures look like this:
10-inch finished block/1.414 = 7.072136 or 7 1/8-inches.
7 1/8-inches + 7/8-inch seam allowance = 8-inches. We need to cut our squares at 8-inches. However, instead of cutting this square twice on the diagonal, only cut it once. With this being the case – getting two triangles per 8-inch block, we need to cut two blocks to get the four needed triangles. So, let’s estimate the fabric needed.
40 WOF inches / 8 = 5 – so we only need one 8-inch strip of fabric.
8 / 36 = .222222 or ¼-yard. I need to add an additional ¼-yard to the purple fabric.
We cut these squares once on the diagonal so that the short sides of the triangles will be on the straight of grain and (hopefully) won’t stretch out of shape, as they are on the outside edges of the triangle.
Step Six – Borders
The first border added to this quilt is a solid border. It will be 6-inches in width and the vertical strips will measure 85 ½-inches and the horizontal strips will measure 67 1/8-inches. I think the blue fabric would look really nice in this position, so let’s estimate the material needed. Like our horizontal row quilt, we worked with a couple of blogs back, we will cut the borders WOF. Proceeding as normal….
Multiply 85 ½ x 2 (because we need a left and right vertical border) = 171-inches of fabric needed
171 divided by 40-inches of usable WOF = 4.275. We will need five strips of 6 ½-inch fabric.
5 strips x 6 ½-inches per strip = 32.5 inches of fabric
32.5 divided by 36-inches in a yard = .902778 or 7/8 yard. I would round that up to 1 yard and add that yardage to the blue fabric on your chart.
For the horizontal top and bottom border, we know at this point, the quilt measures 67 1/8-inches.
Multiply 67 1/8 x 2 = 134.25 or 134 ¼-inches of fabric is needed
134 ¼ divided by 40 WOF = 3.35625. We need four strips of 6 ½-inch fabric.
4 x 6 ½ = 26 inches of fabric
26 divided by 36 = .722222 or ¾ yard. You could leave this yardage or round it up to a yard. I’m rounding it up to one yard more of blue fabric and putting that on my chart.
This is how I plan on designing the last border:
I like this arrangement for a couple of reasons. If you can’t find the perfect focus fabric for the border, this design would still pull all the quilt’s colors together, and t uses up scraps. In addition, if you are making a quilt from solid colors, this is just a perfect finish. You could piece this border in color blocks just about any way you want to – it depends on how you want the quilt to look. And by now, you should certainly have the math skills to do it. At this point, the left and right side of the quilt measures 85 ½-inches. I want this last border to measure 8-inches wide, which will go nicely against the 6-inch solid blue border. I really wish I could throw in some magical math formula that could show how I came up with the proportions I designed, but in all honesty, I just played with sizes until I came up with something I liked. The purple part of the border is actually two pieces of fabric, each 29-inches long (unfinished). The yellow blocks are 15-inches long (unfinished). I did not want any of these blocks pieced, as I feared it would affect the quilt’s appearance too much. Therefore, the math works a little differently with this part.
Each of the purple strips is 29-inches x 8 ½-inches unfinished. I need four of these.
8 ½ x 4 = 34-inches
34-inches divided by 36-inches = .944444 or 1 yard. Add that to the purple material.
The yellow blocks are 15-inches long and I can get two per 40 WOF strip. So, I need two 8 ½ -inch strips of yellow.
2 x 8 ½ = 17-inches
17-inches divided by 36 inches = .472222 or ½ yard. Add that to the yellow fabric.
Now for the top and bottom borders. These are 83 3/8-inches. Since these aren’t the same size as the left and right borders, we can’t use the same size blocks as we did on the vertical borders. The first step I took with the top and bottom borders was to go ahead and figure in the blue cornerstones. Those are square, so each of those finish at 8-inches x 8-inches. Let’s estimate that yardage.
There are four cornerstones, so:
4 x 8 ½ = 34-inches
This means I can cut all four cornerstones from one 8 ½-inch strip.
8.5 divided by 36 = .236111 or ¼-yard. Add that to the blue fabric.
The purple blocks are 22 3/8-inches, finished. When we add the ½-inch seam allowance, this measurement comes to 22 7/8-inches. Once again, we will have to cut four 8 ½-inch strips for these blocks.
4 x 8 ½ = 34-inches
34-inches divided by 36-inches = .944444 or 1 yard. Add one more yard to the purple fabric.
The yellow blocks are 11 ¼-inches finished. Add ½-inch seam allowances to that and it comes to 11 2/3-inches. We can cut two of these per 8 ½-inch strip, so all we need is two additional 8 ½ strips of yellow.
2 x 8 ½-inches = 17-inches
17-inches divided by 36 = .472222 or ½-yard. Add this to the yellow fabric.
Now it’s time to add up all the fabric requirements to get the yardage.
I won’t go back over backing or binding, because those two items are estimated the same way for either on-point quilts or horizontally-set quilts. If you have questions, read back over Mathing the Yardage I and II that I posted in April.
It’s my hope that even though these blogs have been math-heavy, you realize the math isn’t hard. What I really, truly want is this to set you free as a quilter – to know that you have the skills and the ability to look at a quilt, take a quilt pattern and alter it, or design your own quilt – and estimate the yardage. Now go! Be fearless with your quilting and don’t fear the math!
This week I’m dealing with a topic that most quilters love to discuss — fabric. Initially, the plan was to continue estimating fabric for an on-point quilt. We just finished up the process with a horizontally set quilt, and it was natural to just jump to the next step and deal with setting triangles. However, as I read back over those two blogs, I discovered something: That was a lot of math. And even though it was pretty simple stuff, there was a lot of numbers tossed around. I realize while math doesn’t really bother me much, I’m could be in a minority. So, while we will “math out” an on-point quilt next week, this week, we’re taking a break from number crunching and will talk about fabric – more specifically your stash.
I’ve quilted for nearly 34 years. In that 34-year time span, I’ve been to a lot of quilt shows, shop hops, and quilt/fabric stores. I’ve inherited stash from quilters who have passed away or had to stop quilting. I have bought serious inventory from quilt/fabric stores going out of business. Yet, by some quilters’ standards, my stash is modest (for those of you who aren’t acquainted with the word “stash,” it’s the extra fabric quilters hoard store to use later). I know some quilters that have floor-to-ceiling-come-to-Jesus stashes. I’m not one of them despite what my family says. The last quilting statistics I read about such stockpiles suggested the average fabric stash is worth about $6,000.00. And I believe every cent and yard of it. Fabric has become more expensive in the past ten years because world-wide cotton crops have not done well. One of the reasons I love to go Lancaster, PA is the range of quilt shops there and the reasonable prices. I can pay for the trip in what I save in fabric.
I do try to carefully cultivate my fabric. While on occasion, I will come across some fabric I just love and will purchase the entire bolt, that is the exception and not the rule. Through the years I have developed a purchasing plan for my material. This plan allows me to use what I purchase regularly and keeps me from busting my budget. And nothing gives me a bigger thrill than looking through my stash and finding everything I need to make a quilt.
The very first thing that must be considered when cultivating your stash is your storage space. When I began quilting, my sewing machine was in my kitchen because that was the only space available. The house we lived in then was much smaller than our present one and had no extra rooms. This was actually an ideal situation because my daughter was just a few months old and the location allowed me to keep an eye on her while she played in the family room (which was literally three feet away), and gave me access to our kitchen table (where I cut everything out). But this set-up meant my storage space was limited to two file drawers and one cabinet. My time was also limited, between having a small child and a job. Fat quarters became my go-to fabric purchase because I only made small projects due to time and material limitations. These took little storage space and I could procure a wide variety without breaking my budget (which in the mid-eighties was admittedly tight). If your storage space is small, you may want to limit your purchases to fat quarters or other small pre-cuts or to only the amount of fabric a quilt pattern calls for. You don’t want to over run your storage space. This makes it difficult to keep it organized and hard to see what you have. Nowadays, my storage space is much bigger – I have a large studio and a storage closet – so my stash is greater. I store fat quarters and up to one-yard cuts on small bolts and my flat-folds are stacked on shelves. Fabric destined for a particular project is kept together in boxes along with the pattern and is labeled. This works for me – and it’s a process I came to after years of trial and error. Survey your storage area and research a plan that will work for you.
After you’ve mapped out your storage area, the next issue to wrangle is what to buy. The longer you quilt, the more opportunities you’ll have to go to fabric sales and shop hops and participate in fabric exchanges. Quilt shows – especially large ones – are easily overwhelming. If you don’t go in with a plan or a pattern, you may end up coming home with material you’re not sure what to do with, so it ends up in the back of a drawer or closet. If you shop with a pattern, it’s easy to come away with what you need. But if you’re in a situation when you don’t have a pattern in hand or you’re just not sure what to buy, it’s always great to have a purchasing strategy for two reasons. One, you won’t overspend on fabric you won’t necessarily use, and two, if the sale is a really good one, you will invest minimal cash in resources that will be used to its fullest capacity. It’s this second reason we’re focusing on with this blog – what I call investment fabric resourcing. Listed below are the types of material I purchase regularly when presented with a fabric resourcing opportunity:
Solids
Admittedly, solid fabrics are not my favorite. I like prints because they give movement to a quilt. However, solid colored fabrics make up the backbone of quilting and quilt shops. One of the first pieces of information I pass along to beginning quilting students is to obtain a color wheel – either a physical one or one on their phone.
Use this tool to help you purchase solid fabric. For instance, if you’re at quilt shop or purchasing from an on-line site, and they have all of their solid green fabrics on sale in March for St. Patrick’s Day. It’s a sale you really can’t pass up, because it’s all $3.99 a yard. But you’re not sure what color to purchase with the green fabric for a quilt. If you take a color wheel and find the greens, you will see yellow and blue are next to it and reds are across from it. All of those colors will work with the greens. The colors on either side of the color you’re considering and the one directly across from it will harmonize together.
Another good suggestion is purchase some of your favorite colors. This sounds like a really simple idea – and in many ways it is – but it’s a good thought to keep in mind. If you’re making quilts, you’re going to find a way to work in colors that appeal to you. For instance, I can count on one hand the number of the quilts I’ve made that have a lot of brown in them – approximately three. But purple? I work it into every quilt I can. Same thing with blues, pinky-reds, and yellows. Buy the colors that make you happy and I can guarantee you’ll use the fabric up.
A deep red I’ve used as a “zinger” in a Christmas quilt
One of my favorite ways to use solid colored fabric is to utilize it as the “zinger” fabric. In most quilts I make, there’s one fabric that’s used to give it a little extra “sparkle.” Nine times out of ten, I use a deeply saturated solid fabric for this. It’s used sparingly and evenly over the quilt top, usually in smaller patches where a print would lose its integrity because the space is too small to frame it.
So, when I get a chance to shop for solid fabrics, I use a color wheel and look for my favorite colors in deeply saturated tones. With this in mind, let me introduce you to my favorite solid colored fabric line: Painter’s Palette by Pineapple Fabrics.
I love this fabric more than Kona. It pieces like a dream, but it’s so soft that it’s wonderful for hand applique or hand piecing. If you’re interested, you can find it at Pineapplefabrics.com. I recommend you order their color card – it’s exactly the color of the fabrics. I’ve never been disappointed
Painters Palette Color Card
Backgrounds or Neutrals
Let me state this first and get it out of the way: I realize that nowadays, what’s considered a background or neutral can be nearly any color. I acknowledged that about seven years ago when the Best of Show at Paducah used bright yellow as the neutral. However, for this blog, we’re using the term neutral and background in its purest forms – all varying colors, shades, and hues of beiges, ecrus, grays, blacks, and whites. If you’re at a fabric sale and can’t find anything you need or like, you can’t go wrong with a few yards of a neutral. Neutrals and backgrounds will always be used.
Personally, my favorite background or neutral always has either tone-on-tone or a fabric with some kind of background figures. Solid ones almost look too stark (in my opinion), unless you’re making a modern quilt or an Amish one.
Some of my low-volume fabrics
Another background or neutral you may want to add to your stash are the low-volume fabrics. These are generally neutral colored fabrics that have another colored figure printed on them, but the spaces between the figures is fairly large and the print is so small that the material “reads” solid (looks solid from a distance). Low-volume neutrals are quickly becoming my favorite neutral.
Prints
Prints are my favorite quilting fabric. They offer color and movement, in addition to nearly endless variety. Prints fall into four categories:
One of my favorite small print fabrics. You can tell how small the print is in relation to the quarter. This is such a fun fabric! So many colors!
Small Prints – These prints are so small that they they can almost look like a solid from a distance. The above print is too colorful to appear as a solid.
Medium Print Fabric. Again, compare the quarter to the print.
Medium Prints – I tend to categorize these into fabrics with designs that are no larger than a quarter.
Large print fabric — the figures are humongous compared to the quarter, but it’s such a fun print!
Large Prints – Fabrics with prints that are larger than a quarter. These are typically used in border work, but if you have large blocks with large units, they work great in those. What’s even more fun is when you can fussy cut a large print to use in a block unit.
Fussy cut large print fabric in the center of the star block
Blender Print – I love blender fabric! It’s just so versatile. Loosely defined, blender fabric is a tone-on-tone fabric (though typically not a traditional neutral), that can pull two or more of the quilt fabrics together. It can look like a solid from a distance, or it may offer a bit of contrast, although the colors will be in the same family. I like them because they tend to give movement to a quilt.
Blender fabrics. This particular print is one of my favorite lines — I love the movement that the vines and leaves give the fabric.
Within these four categories, you will probably want to have some of the following: Polka dots, checks, plaids, geometric prints, stripes, and florals. I have found that stripes and checks really make interesting binding, especially if they’re cut on the bias.
A bit of my carefully cultivated stash. Notice the Alamance Plaids on the far right. I’m an Alamance County native and these hold a special place in my quilting heart.
Holiday Prints
I put holiday prints in a separate category from “regular” prints because not everyone purchases them. I am one of those people. While I do have a few Christmas, Halloween, and Easter prints, I tend to purchase colored fabric that reminds me of the season (greens, reds, blues, blacks, acid greens, oranges, purples and a bevy of jelly bean colored material). I’ve never been one to buy yards of fabric with Santa Claus, Jack O Lanterns, and the Easter Bunny on them. In my mind, the seasonally colored fabric could be used even after the season, where as any material with a direct holiday print would be limited in use.
However, if you’re one of those folks that love holiday prints, let me caution you to keep this collection balanced (small, medium, and large prints, as well as blender fabric). I would also keep this group small in comparison with the rest of my stash, since it is really limited in its use.
Precuts
Some of my precut collection — fat quarters, layer cakes, and charms.
To have or not have precuts in your stash is a personal choice. Some quilters love them and others…not so much. When they first began to appear on the shelves of my LQS, I was skeptical. I finally (after much thought and internal debate) did purchase a jelly roll on sale and brought it home to try.
And was completely underwhelmed. While the fabric selection was stellar, I found the cutting to be inaccurate. Not all the strips were exactly 2 ½-inches, and some were off as much as a quarter inch. But fast forward to 2020, and it’s a completely different ball game. The cutting is accurate (for the most part), the selection is through the roof, and there’s a great deal of variety – charm squares, layer cakes, jelly rolls, cinnamon buns, mini-charms.
If you find yourself increasingly cutting 5-inch squares or 2 ½-inch strips, you may want to consider adding these precuts to your stash. If you like patterns that call for precuts, definitely add them to your stash as you find them on sale and in the colors you want. However, if you’re not sure where you stand on precuts, then I would hold off. If you find a pattern that calls for 2 ½-inch strips of a neutral, you may find it a better budget deal to purchase a jelly roll in neutrals rather than buying yardage of several different ecrus, grays, or whites. I personally have found doing this is less expensive and a time saver – no cutting involved.
You gotta love a neutral jelly roll.
Personal hint here: I’ve always found jelly rolls to be “linty” when they’re unwrapped. To avoid hundreds of stray threads all over my floor and sewing machine, I’ve learned to open them outside and run a lint roller over the top and bottom of the roll before I begin to sort the strips. While this won’t get rid of all the lint, it does go along way to dispose of most of it.
With all of these in mind, how do I know how much to buy to build an effective stash?
This question has several issues to consider, and even then, there’s no really right answer. Most of it has to do with you, your quilting space, and what kind of quilter you are. When you’re purchasing fabric for a quilt, it’s really easy to round up the yardage and purchase “just a little bit extra” – round that half a yard up to a yard, etc. So the first two concerns to be addressed concern money and space – can I afford the extra fabric and do I have space for it? It makes no sense to bust your budget and it’s equally unwise to overflow your storage space. If you can’t afford it and/or don’t have a place to put the extra, the answer is “No” – don’t buy the additional fabric.
But … if you have the money and the storage space, you should ask yourself, “How much do I love this fabric?” I truthfully have used a fabric I’m not crazy about in a quilt simply because it worked well in the color scheme. Given a choice, once that quilt was done, I would never use or look at that fabric again. This would not be a wise choice for my stash. If, in the process of purchasing fabric for a quilt, there is a blender, solid, focus fabric, or print that you love, a half-a-yard extra or so would be a good addition to your stockpile.
If you’re not purchasing material for a quilt, but simply shopping a sale, it’s always a good idea to bulk up on traditional neutrals, solids, and blenders – especially in the colors you love. It’s also a wonderful idea to inventory your stash before you go to a sale – not a hard review, but know what areas are lacking. If you need blenders, shop for those. If you need small prints, look for those. My yardage suggestions are just that – the guidelines that work for me. If I’m purchasing for my regular quilting stash, I will buy between one and three yards. Since I applique, I’m constantly on the look out for fabric that will work well for flowers, leaves and vines. For material with applique potential, I generally buy one-yard cuts.
However…with focus fabrics or that once-in-a-great-while event when I fall head over heels in love with a print, I purchase five yards. Why five? Two reasons – no matter what size quilt I make, five yards will cover the yardage need and probably the binding, too. The second reason is a manufacturer will rarely ever re-print a line of fabric once it’s sold out. Buy it now or regret it forever. And if I love it enough to buy five yards, I will quilt it all up, I promise.
To sum it up, you’re the one that will have to determine the size of your stash and what it consists of. The type of quilter will also play into this – do you only piece or do you applique, too? Do you make primarily bed quilts or wall hangings or small quilts? Those characteristics play into the size and monetary value of your stockpile. I encourage every quilter who has fabric storage room, to balance that stash and shop wisely: Have a list, shop local, use sales and coupons. But I also will leave you with this – if you see a fabric you love, just buy it. Pay full price and have no regrets. Life, as it has shown us lately, is too short to wait on some things.
Are you dealing with Stay at Home orders from your state government?
Are you washing your hands?
Are you wearing a mask out in public?
Are you making masks?
Are your bored out of your gourd?
Are you sick and tired of cooking?
If you have answered “Yes” to three out of seven of those questions, this blog is for you.
I am okay at this moment. I’m okay, my DH is okay, my kids and grandkids are good, my mom is fine (although bored to tears and back again). The business that the DH and I own is considered an essential trade, so we’re still working, although I am working from home.
Let me tell you a little something about working from home: I hate it. While my office isn’t exactly an oasis in the middle of a demolition and environmental empire, it’s my office and not my dining room table converted into a makeshift work area. On one hand it’s great – I can go to work in my pajamas! On the other hand, there is no separation between work and home and I’m keenly reminded exactly why, years ago, that the DH and I decided to run our business out of another location and not smack-dab in the middle of where we live.
Another thing I haven’t mastered is the restaurant issue. There are only two people in our household, so most nights (pre-COVID) we ate out. There was really no reason to cook for just two people. Now I am confused. Not so much with the not- being -able -to- eat- in- at- a restaurant issue, but this whole ordering thing. Before when take out was desired, we either ordered ahead on-line or called it in. Now I have to find out if the restaurant is still open, when I can place the order, and how I pick it up (Is it curb-side? Do I go in?). Some of our favorite places to eat are only open on weekends. Some aren’t open at all. I just pray that they all make it through this mandatory Shelter at Home edict.
A lot of my friends are quilting like crazy. Every now and then my phone pings and I get pictures of completed UFOs or new projects they’ve started. And I’m glad for them. I, however, am not among those folks.
I am making masks. And that’s who I really want to talk to this week – the mask makers. I’m not jonesing to make any quilter who isn’t making masks feel badly. But for those of us who are undertaking that project, this blog’s really for you.
There are dozens of mask patterns out there, and you hear the pros and cons for each. I chose the pattern off of Craftpassion.com because I felt it gave a little more secure coverage. By this time in mask production, I imagine you’ve found the pattern that works best for you, and you’ve got your mask-making down to an assembly line construction process. I have. I prep my fabric over Friday and Saturday. I cut out on Sundays and sew the outside fabric and interfacing halves together as well as the linings. Then on Tuesdays through Fridays, I make masks. On a good night I can make 20. I’ve currently made a total of several hundred. Part of those will be shipped out to Baptist Hospital. The others are earmarked for family and friends and others who have medical conditions that warrant a mask.
It’s not hard work, but it is wearing. I think about who I’m making those masks for and where they’ll be used. But the burden that weighs me down is the why. Why I’m making them. The reason. And the fact that we all may be wearing masks for a while. Which means on some level, even after the hospitals and other medical facilities have all of them they need, we may still be churning masks out (although probably not to the degree we are now). Are you feeling this burden, too? If you are, I wanted you to know you’re not alone.
During World War I and II, women (and some men) knitted socks, made bedding, and rolled bandages. Now during the COVID battle, we’re once again picking up fabric and thread, and fulfilling a need for our fellow humans. This time the enemy can’t be seen, but he is there…lurking…not really caring if we’re democrat or republican, jobless or essential, or what our socio-economic background is. He attacks without discretion. And just like those before us that did all they could to combat the enemy, if making masks helps, I’m in.
So, if you’re among the mask-makers, take heart. Although you may be one solitary figure at your sewing machine, there are thousands and thousands that are sewing along side of you in spirit. Soon (hopefully) we can file away our mask patterns, stop shopping like mad women and men for ¼-inch elastic, and go back to our quilts. I sincerely hope it’s sooner rather than later.
But until that time, sew on, fellow mask-makers. You’re not alone. I’m right there with you. Their lives are worth our time and fabric.