Categories
Uncategorized

The Last Word

I know it feels like I’ve beat the topic of drafting quilt blocks to death, but trust me, I do have a purpose in mind.  Bear with me as we give this topic one more week and then I promise we will move on.  It’s simply important to me that I give you every tool I can so you can change any quilt block you want.

By now we know that drafting frees you as quilter.  Armed with a pencils, graph paper, erasers, a calculator, and a basic knowledge of how to grid out a quilt block, the sky is literally the creative limit for most quilt blocks.  This same knowledge can be transferred over to a quilting software program (such as EQ), if you decide to draft your blocks with this method.  Some of this information will be review for those of you who ready my blog on a regular basis.  Some of this information will be new.  Just bear with me to the end.

The process can be problematic when you’re working with blocks from heirloom or antique quilts. With older quilts, it can be difficult identifying the block and the grid, especially if the quilt top is complex. If this is the case, the first step is to figure out the base grid.  The base grid is a grid we’re really familiar with, such as the Nine-Patch. 

Traditional Nine-Patch

In this block

Double Nine-Patch

the Nine-Patch is doubled (and it’s called the Double Nine-Patch).  When we look at this block, we can see the 3 x 3 Nine-Patch grid.  This one isn’t too difficult to grid out, and you’ll find this block used in some Double Irish Chain quilts.

Double Irish Chain Quilt

But if we look at this block:

Card Trick

This is also a Double Nine-Patch, but some of the patches are divided into even smaller units 

To determine the patches needed to reproduce a quilt block, simply follow these four steps:

  1.  If you’re working from a quilt top, isolate the block on the quilt you want to reproduce.
  2. Visualize the grid used.  Look for a repeating pattern across the block and then count how many times the pattern is repeated.
  3. Measure the block to get its finished size.
  4. Draw the block out on the graph paper.  As you’re drawing each patch, remember to add seam allowances. 

However….by now you have (I hope) a lot of knowledge about graphing and gridding in your quilting tool box.  So….what if you want to draw an original block?  The steps involved are similar to the ones used in drafting a block from an antique quilt top, but there are a few additional ones.  But before we get into the actual process involved in  drafting an original block, let me throw out a few tips:

One, get several sheets of graph paper.  A few weeks ago I told you about printablepaper.net.  Go to this site and print off several sheets of the type of graph paper you use.  Normally I use the eight squares to the inch graph paper, but when I’m designing a block, I use the four squares to the inch.  I use this kind in designing because the squares are bigger and I can get a better idea of how each unit in the block will look. 

Two, think about the base units first – such as half-square triangles, four-patches, flying geese, etc.  Draw these in the grid squares first.  Be easy on yourself.  If you’re using pencil and paper instead of a computer program, be aware you may have to erase and redraw several times before you get the block exactly the way you want it.  Also, be aware the size of the finished block is often determined by what pattern is used.  When designing an original quilt or modifying an existing pattern, adjustments can be made for a specific size.  However,  the grid for the block used may determine the finished size – for instance, it’s easier to make a finished 9-inch nine-patch than a finished 10-inch nine-patch.  The pieces are simply easier to cut.

Keep in mind computer programs make this a lot easier.  Quilting software allows you to explore multiple block options quickly and without re-drafting.  They’re a huge time-saver if you find yourself doing a great deal of original design work.  Fabrics and colors can be added and then taken out.  Block units can be re-drawn or eliminated.  Even applique blocks can be drafted out with the software. 

Three, remember not all quilt blocks can be gridded out.  If it’s a block with tight curves or odd shapes, it may not work on a grid system.  These blocks may need to be appliqued or paper pieced.  And some  blocks may require more than one technique.

Four, always test your fabric choices.  Always, always, always.  After you’ve graphed out the block to your satisfaction, select your fabrics and then make a test block.  There are a couple of ways to do this—you can cut the block units out (unfinished size) and sew them together or you can cut the block units out finished size and lay the units on the grid.  If you chose the second way, glue the fabric to the paper graph.  After you’ve made the mock-up block by either method, place the block several feet away (a design wall is perfect for this) and look at it critically. At this point, if I’m still not sure about fabric/color placement, I make several copies of the block on my copier, trim the paper away from the block image, and lay those out to try to get a better feel for the way the quilt top will actually look.  These are easy to move around and see if secondary patterns will emerge. 

Five, if you plan to use your copier to make photocopies of the pattern, check it for accuracy.  Be aware that copiers can distort images.  Before using any photocopies as templates for piecing, make a test copy of the block at 100%.  Measure the original and the photocopy to ensure they’re the same size.  And try not to change copiers when making additional copies.  Keeping the same copier will assure you of consistency in the quality of the copies. 

Using the Grid Method for Your Own Blocks

Many, many quilt blocks are based on a grid or can be broken down into one.  By now you know a grid organizes a design and makes cutting and piecing sequences easier to understand and perform.  As you begin to draft your own block, there are several commonly used grids to keep in mind.

Two x Two Grid – A grid of four undivided or divided squares such as a Four Patch or 2 x 2 squares offers almost unlimited design options.  Take a look at this Windmill Block.

Windmill Block
Broken Dishes

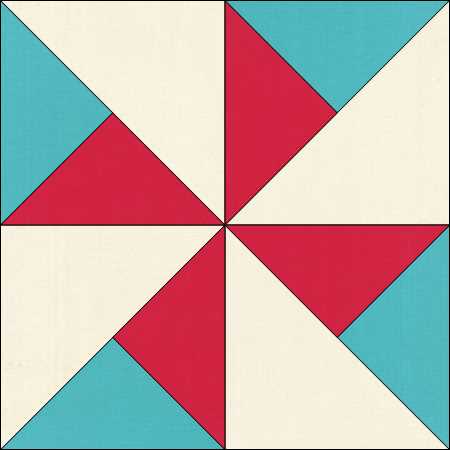
Four three-triangle units on a grid of 2 x 2 squares form this block.  Half-Square Triangle units placed on a subdivided grid form a Broken Dishes Block.

Squares and half-square triangle units on a subdivided grid form the Northumberland Star.

Northumberland Star


Three x Three Grid – A common block/block unit in quilt making is the Nine-Patch, which is on the 3 x 3 grid.  This grid, just like the Four-Patch, can vary in the number of squares it uses, but that number always needs to be divisible by three.  The Friendship Star

Friendship Star

Is a good example of a block on the 3×3 grid.  Jacob’s Ladder

Jacob’s Ladder

Is also on the 3 x 3 grid, even though it incorporates Four-Patch units.

Five x Five Grid – This grid is one of the most versatile. The five squares across and five down setting gives not only great options, but a center focal point.  Examples of this block are:

Cake Stand

Checkered Star

New Mexico  — which is a variation of the Checkered Star, but is formed with four Nine-Patch units and four three-bar units that replace the square in the center.

Seven x Seven Grid—If you want to draft an intricate block, this is the grid to play with. Bear’s Paw (or if you live in an area that was settled heavily by Quakers, this may be known as Hand of Friendship in your quilt circles) is a great example of a 7 x 7 grid.

Bear’s Paw

You have sashing and half-square triangles and squares to form Bear’s Paw.

Tree of Paradise is also a 7 x 7 grid which consists of squares and half-square triangles radiating from a rectangle in the center.

Tree of Paradise

After you determine the grid you’re using to draft your own block, now you need to think about the center point.  This isn’t difficult, but it is important to keep this fact in mind:  Even-numbered grids allow for symmetrical designs.  Odd number grids can be oriented around a center unit.  For example, in a Four-Patch grid, the corners of the units meet at the block’s center and is its center point.  An example of this type of block is the Sawtooth Star.

Sawtooth Star

On the other hand, a Nine-Patch grid has a block unit as its center point.  The Ohio Star is based on a 3 x 3 (Nine-Patch) grid.  The center of this block

Ohio Star

Is a square.  This square could be gridded out into another Nine-Patch unit, a Four-Patch unit, or serve as a great spot to showcase a focus fabric or a little applique. 

You have a lot of gridding knowledge in your quilting toolbox now.  Don’t be afraid to pull it out and use it to your benefit.  And the more you grid, the easier it becomes.  It won’t be long until you will be able to look at a quilt block and know what kind of grid it falls into.  And with some determination and practice, you will be altering blocks to suit your needs or designing your own blocks before you know it.

Until next week, Level Up Your Quilting!

Love and Stitches,

Sherri and Sam

Categories
Uncategorized

Simplifying Difficult Quilt Blocks

See this block?

Dear Jane H2

This is a block from the Dear Jane Quilt (if you don’t know what that is go here https://benningtonmuseum.org/library/walloomsack/volume-11/stickle-jane-the-stickle-quilt-in-war-time-1863.pdf).  Admittedly Dear Jane is not a beginner quilt.  While there are some pretty simple blocks in the quilt (thank goodness), most of the blocks are challenging.  And then there are few like the one above that are just plain hard.  In the traditional Dear Jane blocks, the unfinished size is 4 ½-inches, which complicates the construction process even more – small blocks, small seams, small workspace.

In short, this block was my nemesis.  There may have been a sizeable contribution to the family swear jar due to this block.  I worked and re-worked the block at least four times before I was satisfied with the results.  When I began Dear Jane, I wasn’t a novice quilter.  At this point, I had quilted almost 25 years.  And while I readily admit I didn’t quilt as much then as I do now, I had serious needle-and-thread experience under my belt. 

So, the entire process got me thinking…there are a lot of lovely quilts out there I want to make, but most of them are fairly challenging.  While I enjoy less complicated blocks, one of my quilting goals is to come away from a project having learned something new, and that’s what harder blocks offer.  But since I tend to do most of my quilting at night after a long day at work, I don’t want anything that completely taps out my mental resources by 9 p.m.  With these thoughts in mind, I began to come up with my strategies for simplifying the construction process of difficult quilt blocks. 

With any quilt – easy or hard, small or large – you need a plan of action.  And sometimes your plan of action may be different from the pattern’s directions.  This is why I always recommend everyone read the directions thoroughly before they cut one inch of fabric.  Take the directions, sit down with a cup or glass of your favorite beverage, and allow yourself to read through them completely and slowly.  Mark them up with a pencil and highlighter.  In particular, look for these items:

  1. Familiar Units

Look for readily identifiable block units such as Four-patches, Nine-patches, Half-Square Triangles, Flying Geese, and Quarter-Square Triangles.  This is an important step for a couple of reasons.  First, it makes a complicated quilt block less scary.  Seeing something familiar you know you can make and make well takes the intimidation out of the process.  Second, if this block unit is one you frequently make, chances are you know your favorite construction process – which may not be the one used in the pattern’s directions.  If the two are different, you could possibly need to re-estimate the yardage requirements.  This is another reason to read the pattern through before purchasing or cutting the fabric. 

  •  Clearness and Conciseness

As a former science teacher, I’m a stickler for clearness and conciseness because I taught chemistry.  And teaching chemistry meant having labs.  And having chemistry labs meant those lab directions had to be crystal clear – or else you could run into trouble.  As you read the pattern directions, underline or highlight the parts you don’t understand, but don’t dwell on them too much until you read all of the directions through.  As you move through the pattern, the parts which aren’t too clear may become more understandable as you read the rest of the directions.  I ran into this issue when I made my first Judy Niemeyer quilt.  Judy has very detailed cutting and “bagging” directions.  I understood the directions, but I pondered at the detail, until I began actual construction.  Suddenly all that preparation made perfect sense as I could grab a bag of fabric pieces and the papers and just sew to my heart’s content. 

However, if the directions still aren’t understandable, I strongly advise you to Google the pattern.  Quite often, especially if the designer has an active web page, they will post clarifications and corrections on the site.  You may also find other quilters who have made the pattern and written about their construction process (this is how I survived my first Dear Jane Quilt).  Or you may find out that other quilters have attempted this pattern and decided the time and effort wasn’t worth it – which is also good to know before you purchase fabric and cut it up. 

The next step is to see if there’s any way you can simplify the difficult parts of construction. Determine if there’s an easier way to make those tricky units.  If there are Y-seams involved and you dislike those, could you re-draw the block and make half-square triangles do that work?  If there are partial seams, can you do a quick block re-graph and eliminate those?  Remember the pattern directions aren’t the 10 Commandments of Quilting.  They’re suggestions.  Good suggestions, but just like a GPS, there’s more than one way to get from point A to point B. 

Once you’ve read the directions and determined what you can simplify, you still may question the feasibility of making a bed quilt out of the pattern.  You may wonder if the time, effort, and expense are worth it.  If you’ve reached this point, I strongly suggest you make one block out of scrap fabric, constructing it the way you’ve now planned out.  If your plan of action works, then dive in and make that quilt!  If it “sort of” works or doesn’t go as planned at all, it’s time to re-group.  Ask yourself the following questions:

  1.  Would construction be easier if I make the blocks larger?

If you’re one of my regular readers, you certainly know how to do enlarge blocks  by now, with or without quilting software.  If you’ve missed by blogs on graphing, look through my June and July 2020 posts for more information.  By making some difficult blocks bigger, sometimes the tricky construction process becomes easier.  For me, if I have to make Y-seams, the larger seam area makes it easier to be accurate.  Same thing with partial seams.  Even enlarging some smaller blocks by as little as an inch can ease construction headaches. 

  • Can I make my fabric choices do part of the work for me?

In some quilts, this is an obvious decision.  See this sweet little quilt? 

I’ve made two of these as Christmas gifts for my grand girls.  If you think I took the time to applique Minnie and Mickey and the Eiffel Tower, not to mention those pointy stars, you’re sadly mistaken.  The middle of the quilt is a panel. Panels can be great time savers and can work just as well, if not better, than a traditional quilting method.  And remember the Fish Quilt I’ve made for the hubs as part of his Christmas?  The fish are also from a panel.  Panels are a great way of working the focal point of the quilt without investing lots of time and fabric in teeny, tiny applique pieces.  Just make sure you don’t simply sew lots of plain border strips around the panel to make the quilt as large as you need it to be.  Throw in some great piecing to set that panel off and dazzle your viewers.

The ombre print family is another way to make the fabric take the brunt of the work.  For instance, take a look at this fabric:

Gray Ombre Fabric

It’s a nice print, but if used correctly, it becomes a stellar background choice and adds lots of character to a quilt without a lot of work:

Sometimes this idea can be so brilliantly executed that the viewer is none the wiser that you took this step.  The very best example of this is a Double-Wedding Ring quilt my friend Gail made.  She found a striped fabric that she used for all those curved ring pieces and it looked exactly as if she had taken tons of time to piece each ring.  Think outside the box with your material choice and see if you can make the fabric do at least part of the work in a complicated piecing or applique project.

  •  Would applique work better for part of the project instead of traditional piecing?  I will be upfront at this point and tell you that if you don’t like to applique, don’t even think about this suggestion.  It would only complicate matters even more.

But if you don’t mind applique (or are hopelessly addicted to it like I am), this may be an option.  With this suggestion, I’m thinking about blocks such as this:

And this:

These are blocks with lots of bias and lots of curves, which can be difficult to piece without stretching the bias totally out of shape.  Applique may be an easier and better way to handle the bias.

If you’ve read through the directions and exercised your construction options and still aren’t sure about committing to the project, make a few blocks out of scrap fabric.  In other words, take the pattern for a test drive before handing out the cash for a down payment (the fabric).  Be sure to use the construction methods you’ve decided on.  At this point, you will probably decide if the changes you’ve made will work for the entire quilt top.  And if you decide a bed-sized quilt would just be too much of a headache, but you still love the pattern, try a wall handing or throw quilt.  That would be the best of both worlds – you have the quilt pattern you love in a size that won’t drive you nuts.

And last but not least, count the expense the complexity may cost you.  If you’ve made construction changes and are happy with those outcomes, go for it.  But if you’re not, and you plan on making the quilt as the pattern directs you, be sure it’s worth your time, patience, and cash.  And sometimes the time and patience exact a higher cost than any fabric.  Be aware you may have to put the quilt in “time out” for a few days at a time just to clear your quilting mind.  Have something easy waiting in the wings you can work on while you’re taking a few days off from the harder quilt.  One of my favorite coping mechanisms is asking a quilting friend to make the same quilt with me.  It’s really good to have another quilter to bounce ideas off of, not to mention it’s a lot of fun.

Complex blocks and quilts are worth the time and effort.  Both can teach you a lot if you let them.  Just be aware there are coping mechanisms which can be used to make the progress easier.  Don’t be afraid to utilize them.

Until next week, Level Up Your Quilting!

Love and Stitches,

Sherri and Sam

Categories
Uncategorized

Drafting Complicated Blocks

Today I’d like to address a top which isn’t discussed among quilters much any longer.  It’s kind of like the blog on graphing I did a few weeks ago  —  it’s one not heard much today, but once you know how to do it, it can really free up your creativity on so many levels.  What is this ancient, almost-lost quilting art?

Drafting.

If push came to shove, could you draw out your own quilt block and determine how much fabric you need and how to cut out the blocks?  We did this once before with Road to Oklahoma, which was an easy block with four patches and triangles.

However, what about a more complicated block like the LeMoyne Star?  Could you take this block and make it smaller or larger to fit your needs?  Right off the bat, I know lots of us (including me), would quickly open our Iphone to a quilting app or boot up EQ and resize it.  Quilters have a lot of options today, which makes our quilting experience easier.  There are tools like this available:

Quick and Easy Block Tool

This handy-dandy little catalog of quilt blocks has nearly every popular block in it plus the fabric and cutting requirements for several different sizes for each block. 

If you have an Iphone, Ipad, Android, or Android device, there are apps which can help.  My current favorite one is Quiltler2 Lite.  It has most of the popular blocks and you can resize them on your phone, as well as play with color placement and preview what they would look like set on-point. 

And of course, my favorite tool is this:

I use EQ 8 at least two or three times a week.  You can resize blocks to be larger or smaller, in 1/8-inch increments if needed.  You can import fabric lines or scan in your own fabrics.  It’s versatile and Electric Quilt updates the software consistently.  Add-ons (additional software, such as Dear Jane), are reasonably priced and are a point-and-click-and download away.  Plus, their customer service is stellar. 

However, as wonderful as all of these are, they do have some drawbacks.  The Quick and Easy Block Tool has only 102 quilt blocks in five sizes each – three, six, nine, twelve, and fifteen inches square.  If you fully rely on this tool, you’re limited in both size and type of block.  I’ll also be the first to tell you phone apps can be difficult to use.  I don’t think many are designed by quilters, because they’re either extremely limited with what you can do with them or all the technical bugs haven’t been worked out of them yet.   They don’t update often, either.  And as much as I love EQ, it is CAD based, which means there’s a learning curve involved.  I will give EQ this – they have wonderful tutorials and it doesn’t take you long to get it up, running and working for you.  However, as of this blog, it doesn’t run on an Ipad or Android tablet, which means you’re tied to your laptop or desktop when you use it.   

Most disturbing about all of these is I’ve found errors. Not so much in EQ, but I have found erroneous data in other block tools – especially the phone apps.  If you’re relying on any of these tools for fabric requirements and cutting directions, you need to have the ability to check behind them if something doesn’t look right.  And that’s one of the tools this blog will give you – the know-how to check behind them if something doesn’t seem correct. 

While drafting blocks which have basic units in them is fairly easy, those with Y- or partial seams can be a little daunting.  Block units such as a four-patch, half-square and quarter-square triangles, log cabins, and flying geese can be drafted out quickly and without too much thought.  Other units, such as 45-degree diamonds, are more challenging.  Since the LeMoyne Star has those diamonds, plus some squares and triangles, coupled with the fact if I’ve used this block in previous blogs for construction purposes, I  decided this would be the block we’d play with to shrink it down and then enlarge it.  And unlike the tools listed in the first part of this blog, the items you need to do this manually should be ones you have around the house:  pencil, graph paper, ruler, and eraser. 

Let me be a little specific about the graph paper.  I use graph paper that has eight squares to an inch because it makes it easier for fabric cutting (you can get the needed measurements down to the nearest 1/8th of an inch, so it will match up with your rotary ruler and mat), as well as make it easy to allow for ¼-inch seam allowances.  This type of graph paper doesn’t require a trip to an office supply store.  You can jump on the internet and go to printablepaper.net.  This site has any type of graph paper you need, and it’s a download, point, click, and print away.  This particular site has almost any kind of quilting or craft graph you need. 

Let me show you how to do this.

Step One

Draw a square of the finished size block you need.  If the block you’re drafting is larger than 8 ½-inches you will have to tape a few sheets of graph paper together to accommodate the size of the square.  For this blog, I will draft a 7 ½-inch finished LeMoyne Star block.

Step Two

Draw diagonal lines from corner to corner in both directions.

Step Three

Find the measurement from the center point of the diagonal to one corner.  In my block, this measures 5 ¼-inches.  Now take this measurement and measure both vertically and horizontally from each corner.  Mark with dots or tick lines.

Step Four

Connect the dots as shown in the diagram. 

At this point, I erase the diagonal lines.  It makes things less confusing.

Step Five

Now connect the dots like this:

Step Six

And finally, connect the dots like this:

Believe it or not, in all those lines, lies my 7 ½-inch finished LeMoyne Star.    Look at this diagram where I’ve outlined it with a black Sharpie. 

Now I can measure the three block units used (45-degree diamond, triangle, and square), add the appropriate seam allowances and know that for each block I’ll need:

Four 2 ½-inch squares (the size of the square, plus ½-inch for seam allowances)

One 4 ¼-inch square cut twice on the diagonal for the triangles (the triangle would work best cut as a quarter-square triangle, so we add 1 ¼-inches to the longest diagonal side, cut a square this size, and then cut it twice on the diagonal – this allows the straight of grain to fall on the outside edges so the triangle won’t stretch). 

Eight 2 5/8-inch diamonds.  For this we cut a strip of fabric the width needed and add ½-inch for the seam allowance.  Then use the 45-degree markings on our ruler to cut the diamonds. 

You use this same process to enlarge or shrink an 8-pointed star. 

Okay, okay, I can hear the groans and the questions from here…with everything techie out there for quilters, why is this important?

Because math is important.  And the knowing how to do the math correctly may just save your quilting sanity.  Apps and software – as good as they are (especially the software) – can’t do everything.  If you’re putting together a quilt top from orphan blocks which are all different sizes, you may just need blocks that are say … 11 1/16-inches finished.  Know what kind of software can get that kind of exact measurements? 

None.

Not even EQ8.  It will  round it to the next 1/8th of an inch.  Which doesn’t sound a lot for one block – and it isn’t.  But if you have six  11 1/16-inch blocks in a row, that means that your row will end up being ¾-inch off when you go to attach it to the next row.  That’s nearly an entire inch.  It may take a little while to work out the math when you start, but by the time you get to the end, your row will be even and your sanity will be intact.

It’s also important to have the ability to check behind the software or app.  We’ve become so accustomed to accepting whatever a computer or phone app tells us is correct, we seldom check behind it to make sure it’s right.  The longer you quilt, the more you will cultivate an instinct…an ability to know when some pattern or measurement just isn’t going to work correctly.  I call it the “Hinky Instinct.”  You just know when something doesn’t seem as if it will work correctly – it’s “hinky”.  And the longer you quilt, the stronger this instinct grows.  So, if an app or software measurement doesn’t seem correct, it’s far better to check it at the beginning than to get 10 blocks made and then determine they’re the wrong size.  Knowing how to do the math just helps you keep your quilting sanity, as well as be good stewards of fabric, time, and stitches. 

That said, the formula and diagrams I’ve given you aren’t the only way to draft a block.  Back in the early 1980’s when I was taught how to draft a block, we used protractors and compasses.  Before I proceeded to teach you how to use those, I put in a text to my wonderful sister-in-love, Deanne, who happens to be a high school math teacher.  I asked her if those tools are still used in high school geometry.  I assumed that if they were, the protractor and compass would still be something you could pick up at Walmart or Office Depo.

The answer was no.  They are no longer used in high school geometry.  Not knowing if those were readily available, I opted not to show you how to draft with those tools. 

I also want to leave this with you:  If you’re either constantly re-sizing blocks or having to come up with filler blocks, then go ahead and plan to purchase EQ 8.  This isn’t a perfect software program by any means, but it’s a really, really good one and will save you a great deal of time.  That, coupled with the fact you can print templates, foundation piecing, or rotary cutting instructions, will make your quilting life so much easier.  Yes, it’s a bit expensive starting out, (it’s $239.95 on their website for the full EQ 8 version, however, there’s also an mini-EQ that’s $89.85), but it comes with automatic software upgrades.  And if they ever develop an EQ 9, you simply pay for the upgrade, not the entire software program.  Trust me – you won’t regret the purchase.

Standard disclaimer applies here:  I’m not in EQ’s payroll and I don’t get free merch for recommending them.  I’ve used the program for years and love it to death.

Until next week, Level Up Your Quilting!

Love and Stitches,

Sherri and Sam

Categories
Uncategorized

Give Me an Inch….

In a previous blog, I mentioned I have been receiving email from my readers at a pretty good pace this year.  Most of the time I do try to respond to each person who takes the time to write me, or follow up on the comments left at the bottom of my blog.  However, there are times when I get asked the same question several times, and then I decide it’s blog worthy.  This is one of those times and today the topic is rulers.

Which on the surface, seems like a pretty … well… boring subject.  But hear me out.  There’s more to rulers than inches and centimeters.  But before we get started, I want to throw out this disclaimer:  I do not receive any type of sponsorship from any of the brands I’m discussing today.  I’m not on their payroll.  They don’t send me free merch for mentioning them in my blog.  I pay for these products just like you do, so my endorsement for any particular brand comes from the fact  I use the products and really do love them.  It’s an honest appraisal.  I also don’t spend an enormous amount of money on rulers, so their prices should be accommodating to the average quilter’s wallet.  In addition to those disclaimers, let me also tell you for the most part, I don’t purchase specialty rulers.  There are a couple of exceptions to this, and yes, those rulers are in the following list, as well as the reasons I feel they’re worth the money.  But in all truthfulness, this:

Is the only single-task tool in my studio.  Everything else is a multitasker.  Especially rulers.

One the questions asked is what brand of ruler I use the most.  My favorite brand of ruler is Creative Grids for five reasons.  First, they’re manufactured from clear plastic, which makes them really easy to see through.  And this plastic is durable and tough.  If you’ve used a rotary cutter long enough, you know at some point in time, you’ll  nick your ruler.  Creative Grids rulers  don’t scratch or nick easily.  Second, they’re extremely accurate.  I know you’ve seen this picture:

None of these rulers match the inch increments on the mat, and for the most part, each other – even if they’re the same brand.  I’ve never found this to be the case with Creative Grids.  They have always been consistently accurate. 

The third reason I like them are these little dots:

These are fabric grippers built into the ruler.  No need to apply Ruler Magic, sandpaper dots, or those clear, plastic disks. 

Fourth, Creative Grid rulers are made in the USA, which is important to me.  I’m supporting an American-made product.  And lastly, the versatility of the company is wonderful.  They were the first (and I think the only) company to come out with an acrylic mask template during COVID.  And besides making rotary cutting rulers and templates, they also make long-arm rulers, which is pretty important to folks like myself who own a long arm. 

I’ve broken this blog into two sections.  The first section deals with the five rulers I think every quilter should have in his or her studio.  The second section deals with rulers I use nearly every day, but aren’t necessarily…necessary. 

The Rulers Every Quilter Needs

  •  The Square-Up Ruler(s)

Every quilter needs at least one really good square ruler.  These rulers are used to trim your blocks to the accurate unfinished size.  Ideally, in a perfect quilting world, I would have one in each size block I construct.  But it’s not a perfect quilting world and purchasing a square ruler in every size block made  would be outrageously expensive.  What I suggest is that you buy a square-up ruler in the size block you make most often.  If you make a lot of different sized blocks, a 9 ½-inch square ruler is a good one to keep on hand, as it lends itself to a lot of different sized blocks.  Whatever brand you decide to buy, make sure it has the diagonal line that runs through the center of the ruler.  This helps you accurately trim your block.   And here’s a heads-up for those of you who see T-shirt quilts in your future – the 12- or 16-inch (or even larger) square up ruler is completely worth the cash.  Trust me. 

  •  A Long Ruler

This ruler should measure at least 18-24-inches long.  And in my opinion, since this ruler is used to cut borders, narrow strips, and square-up quilt sandwiches before binding, the longer the ruler is the better. 

My favorite long ruler is this one:

It has all the diagonal lines I need if I want to cut 60-degree triangles or 45-degree diamonds.  But my favorite part about this ruler is the lip at one end. The lip allows me to lock the ruler against the edge of my cutting mat.  This keeps the ruler from slipping as I make long cuts.  It’s  4 ½-inches wide and one of the few non-Creative Grids rulers in my studio.  I make a lot of 4 ½-inch fabric strips, so this ruler gets utilized a great deal – you can tell by the way the markings are finally wearing off.  However, I also have a 24-inch ruler in a 2 ½-inch width which also gets used a lot.  My advice is think about how wide you’re cutting most of your fabric strips and see if you can purchase a 18- 24-inch ruler in that width. 

  •  A Really Wide Ruler for Cutting Really Wide Strips

Let me insert a point of clarification right here.  The longer you quilt, the more you’ll be faced with fabric strips in different widths.  The most common widths are 2 ½-inches, 4 ½-incshes, and 6 ½-inches.  So, while this may be a ruler you can put off purchasing immediately, eventually you will want one to cut borders accurately.  And if you’re like me and prefer to cut your borders on the lengthwise grain, a long 6 ½-inch ruler is perfect.  However, I also have this short, wide Creative Grids ruler I use every day. 

It’s perfect for working with Fat Quarters and making diamonds or 60-degree triangles. 

  •  A Small Ruler

These come in different lengths, but my two favorites are these:

The longer ruler is 3-inches wide and the shorter ruler is 4-inches in width.  I won the longer ruler and purchased the shorter ruler at a guild yard sale (it was $1.00 – and had the sandpaper dots on the wrong side!).  They’re both the perfect size for trimming up the edge of a unit or block when a larger ruler would just be too bulky to deal with.  Creative Grids has the Itty Bitty Eighths Ruler. 

This ruler is great because the 1/8-inch markings are clearly printed.  This may not sound like a major selling point if you’re a beginner quilter, but after you’ve made a few quilts, you begin to encounter directions such as “Make forty 3 5/8-inch squares.”  Those eighth-of-an-inch markings suddenly become super-important for accuracy.  The Itty Bitty rulers come in varying lengths (the one pictured is the long one), but the small one, coming in at 3 x 7-inches, is the perfect small ruler. 

  •  A Half-Square/Quarter Ruler

I realize some folks may want to throw this into the specialty rulers section of this blog, but hear me out.  Quilters make so many HST units, a ruler which aids in this construction is one of the basics IMHO.  Creative Grids offers two HST rulers, but those are in my specialty rulers section, because they can perform other tasks than HSTs.  The ruler I’m putting in this list of Rulers Every Quilter Needs is Eleanor Burns’ 9 ½-inch Square Up Ruler. 

I use this tool every week.  It’s clearly marked and made of heavy duty acrylic.  What I absolutely love about this ruler is you square up the HST before you press it open, which is so much easier than the traditional method of trimming.  I’ve also used it to square up 9 ½ blocks on occasion.  I  like the way they handled marking this ruler, too.  The half-inch increments are on one side and the 1-inch increments are on the other, thus eliminating any point of confusion when trimming down HSTS.  You simply make your HSTs by the Sew and Slice method or traditional method, and while they’re still like this:

You trim them down to the correct size.  So easy!

Now on to the second part of this blog:

Rulers Quilters Will Probably Want at Some Point in Their Quilting Career

This list is comprised of six rulers and one ruler tool.  The rulers I mentioned in the first part of this blog are ones I would encourage anyone to purchase as soon as they realize they really love to quilt.  Those rulers are pretty essential and are definitely multi-taskers.  The rulers in this list can also perform more than one job, but aren’t as essential as the ones in the first list.  These are the rulers you use your coupons for, wait until they’re on sale, or ask for at Christmas or your birthday.  Will you use them a lot?  YES.  Do you have to have them the minute you decide you’re a quilt enthusiast?  No.  These simply make your quilting life easier and your piecing more accurate. 

  •  The Binding Tool Ruler

There are several different binding tools/rulers in the marketplace, but this by far is my favorite.  It’s made by Creative Grids and comes with the wonderful grippers already built it.  You will love those fabric grippers if you cut your binding strips across the width of fabric, and you will really love the grippers if bias binding is in your future.  As an added bonus, the instructions for bias binding are printed on the ruler, so there’s no mad search for directions.  It’s also marked for cutting 2 ½-inch strips and 2 ¼-inch strips. No matter what your binding width preference is, it’s here.  And since it’s 20-inches long, it can easily double for a long 2 ½-inch ruler in the first list (it’s a multi-tasker).  Another added plus:  It has how many inches of each width of binding you can cut from different yardages.  This specialty ruler is listed on the Creative Grids website at a suggested retail price of $21.49.

  •  One-half Inch Ruler(s)

My ½-inch rulers are Omnigrid and came from Amazon for a very reasonable price of $14.16 (I’m a Prime member, so I pay tax, but not shipping).  I also chose the pack of three instead of the single ruler, which was a little over $8.00.  In my pack there was one 12-inch ruler and two 6-inch rulers.  The primary reason I purchased this narrow ruler was it made it super-easy to see if my ¼-seam allowances were consistent.  Press the seam open, lay the ruler on it, and if the seam edges match up with the ruler, the seam has  perfect ¼-inch seam allowances (1/4 + 1/4 = 1/2).  Quick, easy, and accurate.  I find these indispensable for making accurate 45-degree diamonds or 60-degree triangles.  Consistent seam allowances are a must for those, and these little rulers are just the perfect tool to have. And while this is how I primarily use the ½-inch rulers, I’ve also used them for trimming small blocks, block units, and drafting quilt blocks on graph paper.  The 6-inch size is perfect to keep with your hand sewing for drawing ¼-inch seam allowances or measuring the seam’s accuracy.  These always stay in a container near my sewing machine – except for the one that’s in my hand sewing project box.

  •  Add-a-Quarter Ruler

This handy-dandy tool is by CM Designs and retails for roughly $11.00 – $12.00.  It comes in three sizes:  6-inch, 12-inch, and 18-inch.  I don’t have the 18-inch – as a matter of fact, I didn’t know one existed until I began writing this blog – but I do have the 6-inch and 12-inch.  And I can tell you I reach for the 12-inch Add-a-Quarter far more often than I do the 6-inch one.  It’s just the perfect size for just about any paper piecing you desire – both traditional and English paper-piecing.  The ¼-inch lip is perfect for adding the margin to the fabric for EPP.   I’ve used it for adding seam allowances to applique pieces, traditional paper piecing templates, and as a straight edge for cutting or drawing.  It also has the inches marked along one side, so it doubles as a ruler.  My Add-a-Quarter stays on my small cutting mat near my sewing machine.  I use it that often. 

  •  Fons and Porter Triangle Trimmers

I introduced these little tools a couple of blogs ago, and while technically they’re not rulers (no inches or centimeters are marked on either of them), I use them so often they’re never off my large cutting mat.  These are essential for trimming the points off of triangles or diamonds before you sew them together or to another block unit.  The blunted edges of the triangles allow you to join the patches together accurately and effortlessly.  Bonus:  You can use them as templates and the grain lines are printed on the triangles.  I currently have Twinkling, Twinkling under my needle and it has thousands lots of tri-rec blocks.  These trimmers have saved my sanity.  So, not only can you use these to make 45-degree triangles and 60-degree triangles, you can trim the dog-ears off any triangle and make piecing them together much easier. 

  •  Jinny Beyer Perfect Piecer

You may remember this ruler/tool from my blogs on 8-pointed stars.  Since I found this little jewel some years ago, I have loved it and every time I use it, I find something else to  can do.  You can accurately mark the stopping and starting points of any angled diamond, triangle, square, or rectangle seam.  You can mark ¼-inch seams for hand or machine piecing.  You can use it to draw any angle you need to.  I have two of these – one stays near my large cutting mat and the other in my hand sewing box.  And while Jinny has closed her brick-and-mortar store, you can still purchase one of these in her on-line shop.  It’s truly worth every red cent. 

  •  The 45-degree and 90-degree Triangle Quilting Ruler

This wonderful ruler is by Creative Grids, and this is the half-square triangle ruler I told you earlier I am putting in the “Rulers Quilts Will Probably Want at Some Point in Their Quilting Career” category.   As much as I love Creative Grids, I did not know this ruler existed until a couple of years ago when I read the book Jelly Roll Quilts by Pam and Nancy Lintott.  This exemplary tool lets you make 45-degree half-square triangles and 90-degree quarter triangles out of jelly roll strips!!!  Talk about opening a whole new box of quilting options!  To test this ruler, I made a Seven Sisters Quilt out of a half a jelly roll and this ruler, and the thing went together like nobody’s business.  The math required for this is built into the ruler, and of course it comes with directions.  However…if you scan the QR code on the ruler, you get the video tutorial from Creative Grids.  The suggested retail price is $25.99, which makes it on the pricier end of my ruler recommendations.  But if you like jelly rolls and are a little frustrated at the current options, this ruler is what you need to get yourself out of the jelly doldrums.  It can be used with non-jelly roll fabric, too.  Like all Creative Grids rulers, it has the fabric grippers. 

  •  Ruler Magic

Okay, this  is not a ruler but  it is something you can use on all your non-Creative Grid Rulers.  While there’s always sandpaper dots or the clear, plastic disks you can put on your rulers to keep them from slipping, Ruler Magic does the same thing, but it’s not permanent.  It is an adhesive, and you put a few drops of this on the wrong side of your ruler and wait until it dries clear.  After that, you can use any ruler without fear of it slipping and sliding out of place.  To clean, it rinses off with warm water and a bit of scrubbing.  I have a bottle of this  and it stays on my cutting table.

Okay, so I was given an inch and I’ve taken almost 3,000 words to tell you about my must-have rulers and the rulers I really like.  Once the quilt bug has bitten you hard, I’d encourage you to get the basic rulers mentioned first, and then look into the others.  Other than this:

I encourage you to never buy any quilt ruler or tool that can only do one task.  Quilting notions aren’t cheap.  They need to be well constructed and offer several options for use. 

Until next week, measure twice, cut once, and Level Up Your Quilting!

Love and Stitches,

Sherri and Sam

Categories
Uncategorized

How to Sew An Almost-Perfect Quilt Block

Writing this year’s blog has been so much fun!  I’ve gotten emails from readers who are asking questions about topics and that just thrills my soul!  Keep them coming!  If you have a question, please feel free to email me at sherriquiltsalot@gmail.com, but be sure to send me a message in the comment section of the blog so I know to be on the lookout for it, or search my spam file if it doesn’t show up in a timely manner.

After I posted the blog about gridding out quilt blocks, I had some readers throw me some questions about piecing blocks and how do I work through that process.  So, this is what I will address today.  Let me state up front, that each quilt block is a little different.  How you approach constructing the same block under different circumstances will vary, and learning which approach works best takes time and experience.  For instance, how I approach constructing some blocks out of batiks may be different than how I would with quilter’s cottons.  Often how I press the block depends on the size of the block and how I plan to quilt it.  Since I now quilt 99 percent of my own quilt tops, I try my best to reduce bulk as much as I can.  How I decide to piece my quilt’s rows together gets thrown into the mix, too, as well as which sewing machine I’m using to piece.

This makes the following guidelines more generalizations than hard, fast rules.  These are the steps I nearly always take as I piece quilt blocks.  And hopefully, as you read through them, you’ll see why I have thoroughly discussed some techniques to nearly ad nauseum. 

  •  I wash my fabric and dry it the same way I plan to dry my quilts.  I get that many quilters don’t do this any longer, and truthfully, I have about beat this topic to death.  And I realize that with Color Catchers, many quilters feel this step is unnecessary.  However, I still do this for two reasons. The first reason is the most obvious – washing the fabric before starting the piecing process just about guarantees no crocking or bleeding when the quilt top is washed.  It also guarantees no shrinking.  The second reason isn’t quite as obvious – I like sewing with clean fabric.  You never know how material is stored or how clean the manufacturing process is, especially if the fabric is made anywhere other than the good, ol’ United States of America. 
Faultless is my friend.
  • I starch all my fabric (pre-washed or not) before I cut it.  And I use spray starch, not Best Press or anything like it.  I do use Best Press for a few quilting techniques, but this is not one of them.   Even if you’re using fabric straight off the bolt, I think you still need to starch it.  Why?  The starch adds stability and control.  I really like to starch the fabric a couple of times, so that it almost takes on a paper-like feel.  This adds a great deal of accuracy to the cutting process – the fabric won’t shift as much as it normally would.  However, let me throw this fact in here – I don’t starch it before I store it, especially if I’m using traditional spray starch or sizing.  The starch or starch-like products tend to attract bugs (think moths and silverfish).  I pre-wash my fabric as soon as I bring it home, but I hold off starching it until I’m ready to cut out my quilt. 
  • I make sure my ¼-inch seam allowance is accurate.  Despite the simplicity of this statement,  this is often the hardest thing to get right.  And it’s usually the culprit if your blocks turn out too small or too big.  On top of that, every machine you own may be a little different, so what works on one machine may not work on the next.  I’ve written about this topic in the blog: https://sherriquiltsalot.com/2018/01/25/the-myth-of-the-quilting-holy-grail/.  Check it out, and here’s a head’s up – the ¼-inch seam isn’t the holy grail of quilting.
  • I use pins.  Lots of them.  All the time.  I have never understood quilters who didn’t pin.   They wear that as almost a badge of honor – “I don’t pin.  I don’t have time.  Besides, if you press your seam allowances the right way, you don’t need to pin.”

Seriously?  May I examine your seam intersections?

I pin at the beginning of a seam.  I pin at the end of a seam.  And in between.  If you don’t have an integrated dual feed foot, the top piece will get pushed by the presser foot ahead of the bottom piece (think of snow and a snowplow).  This will shift your fabric and cause the top and bottom seam not to line up correctly.  Pinning the seam keeps everything even and matched up.  And if by chance you’re chain piecing, you may want to lift the presser foot just a bit and position the top edge with each unit.  Otherwise, the top fabric will scoot down at the very beginning, even though you pinned it ask me how I know. 

  • Use strip piecing methods whenever you can.  And with this technique, let me add, use the techniques that work best for you.  These quick and easy(ier) techniques are not only more efficient, but also tend to be more accurate.  This is why it’s so very, very important for you to discover which method works best for you when you make flying geese, four-patch units, nine-patch units, half-square triangles, etc.  When you know which technique works best for you, it’s easy to analyze the pattern to see how to alter it to make it faster and more accurate for you.
  • Make sure seam intersections are aligned and pin them well.  I pin most intersections with a pin inserted at an angle. 
  • This way I catch both sides of the seam allowance and I can keep the pin longer before the sewing machine needle approaches it.  If I have an intersection where there are diagonal seams that need to match, I use a setting pin and a pin on both sides of the seam allowance. 
  • I’ve also glue-basted difficult seams. 
  • As your seam allowance is approaching the needle, make sure it’s facing towards the needle.

Like this:

If the seam allowance is facing away from the needle, chances are you’ll have a gap at that intersection.  If the seam allowance is facing the needle, you’ll get a nice, snug intersection with no space because the presser foot is pushing the top seam allowance into the bottom seam allowance. 

  •  Use that seam ripper.  Don’t be in too much of a hurry or be too lazy to reach for the ripper.  If there’s a big mistake go ahead and unsew it, then sew it back correctly.  If I have some tiny mistakes, the rippage will depend on how much the blunders bother me.  If I can leave the quilt block alone overnight and then pick it up the next day and the goof doesn’t trouble me or look nearly as bad as it did yesterday, I leave it in.  Nothing is perfect – even the best-sewn quilt blocks. 
  • Trim each block unit to the exact size.    To me, accurate cutting is even more important than the ¼-inch seam allowance.  Cutting and trimming are the first steps in your blocks looking gorgeous.  So, when you’re cutting out your fabric, starch it, take your time, and cut as accurately as possible.  After you’ve sewn your block units, make sure they’re trimmed down to the required unfinished size.  Check each of these units before sewing them into your block.  If each block unit is the correct size, then the block will be the required size. 
  •   Press carefully and thoroughly as you go along.  Be sure to press (up and down movement) and not iron (back and forth movement).  Steam is a personal decision – but if you use it, be careful if the block or block unit contains a lot of bias.  Press seams open or to the side as you make them.  The flatter the seam is, the better (no tiny tucks at the seam).  This makes unit and block assembly trouble-free.  It also makes the block look better and be much easier to quilt.  Press each unit and then press the block when it’s assembled. 

These are my top ten guidelines for accurate quilt blocks.  While pretty basic, they all go a long way in making your quilt blocks look perfect and also make construction easier, too.  And don’t save these for just the complicated quilt blocks in your life.  Use them for all the quilt blocks you make. 

Until next week, Level Up Your Quilting!

Love and Stitches,

Sherri and Sam

Categories
Uncategorized

Gridding Quilt Blocks

In several of my past blogs, I’ve thrown out the phrase “grid out the block,” or something similar.  I honestly had not thought anything else about the term, and assumed (wrongly, as I soon learned), that most every quilter out there in my blogging universe knew what I was talking about.

Well, not everyone did.  I’ve gotten some emails, messages, and a few comments from folks who let me know they weren’t sure exactly what I meant, could I explain it, and did they have to use quilting software to make a grid.  I’m more than happy to explain it and no, no quilting software is needed.   I admit software such as Electric Quilt 8 makes the gridding, drawing, or re-drawing of a block easier than working with a pencil and paper, and the new technology does make it faster.  But when I began quilting in the early eighties, EQ didn’t exist.  As a matter of fact, I don’t remember hearing about it until around 2001 when I took a quilt class at Hancock Fabrics in Greensboro and the teacher mentioned EQ4.  However, computers and software aside, all you really need to grid out a block is paper, pencil, a ruler, and a good eraser.  And these were the tools I used when I started piecing in 1985. 

At this point let me step up on my quilting soap box for a few minutes.   When I began seriously quilting, I was 25 and the year was 1987.  Computers as we have them today, didn’t exist.  Even in an educational setting, I don’t remember entering grades into a computer until some point in the 1990’s.  As a result, I was taught by other quilters how to use a compass, protractor, ruler, and some basic math and geometry to draft my own quilt blocks.  These skills were used just as much as the lessons given on accurate piecing, hand sewing, and quilting.  Do I think the drafting lessons made us better quilters?   Not necessarily.  I’ve had quilting students who could out piece me by a mile in certain quilts.  But I do think we quilt veterans may have a leg up on younger quilters because we were taught to dissect a quilt block in order to make it larger, smaller, or change it to make it uniquely ours.  We didn’t necessarily need a pattern to make the quilt we wanted.  We could design it ourselves with a pencil, paper, and calculator.  We could estimate yardage.  All this takes more time than purchasing a quilt pattern, but it wasn’t long until we could forego a pattern altogether and make whatever we wanted.

I’ve taught quilting since around 2007.  It’s always been a desire of mine to have a class who wanted to go back to the nuts and bolts of quilting in the same manner I was taught.  And I’ve had absolutely zero takers.  It seems everyone wants to learn to make a certain quilt in a certain pattern in the same colorway as the pattern designer used.  The closest to the nuts and bolts I can get is to offer a class in a sampler quilt.  At least this allows me to hit basic skills in one quilt block and other skills in the next block.  I just think it’s terribly important for every quilter to look at a pattern or another quilt and know how they want to make it and be comfortable changing the design to suit them.  This is why I strongly encourage everyone to learn what technique works best for you – such as which is  the best way for you to make flying geese, half-square triangles, or 45-degree diamonds – and know how to re-estimate the yardage if you need to.  It would delight my soul if folks who read my blog became comfortable designing their own quilt and have the skill set to do so – with or without the quilting software.

I’ll get down off my quilting soapbox now and proceed with the gridding.

The first question I need to answer (per emails and messages) is what does it mean to grid out a block?

As I’ve mentioned in previous blogs (especially the ones on estimating fabric yardage), the first step in both estimating yardage and altering a quilt block is determining what kind of numerical block it is.  Is it a four-patch?  A nine-patch?  A sixteen or thirty-two patch?  The best way to do this is to sketch the block out on a piece of paper.  This paper can be graph paper, plain copy paper, notebook paper, a napkin – to get to the basics the type of paper used doesn’t matter.  When you begin to alter the block, it does matter because you’ll want to draft the block out the exact size.  But for right now, let’s look at this block: 

Road to Oklahoma

This is a Road to Oklahoma block, and it’s 8-inches finished.  I will walk you through my process to decide what type of square it is. 

Step One:  The very first item I look for is a familiar block unit.  I do this for two reasons.  If I can find a familiar block unit, it means I’ve made that particular unit many times, and I already know my favorite way to make it.  Second, that familiar unit begins to give me an idea of what type of numerical block it may be.  With Road to Oklahoma, the very first unit that catches my eye are the four-patch units in the top right and bottom left corners.  Could this block be a variation of a four-patch?

Step Two:  Now I look at the adjacent units to see if they can be divided into a four patch:

The answer is yes.  Even though the blocks in this unit are not identical, (some are solid square of fabric, the others are half-square triangles) we still would consider them a four-patch and they would be constructed as such.

Step Three:  Can the patches in the four-patch units stand on their own?  In other words, when isolated like this:

Do they depend on the adjacent patch to complete it?  And the answer this time is no.  Even though each patch in the unit, and each unit in the block work together to make the block’s final appearance complete, each patch can stand alone.  This means that Road to Oklahoma is not a four-patch.  There are 16 individual patches in this block – four in each row and four along the side.  This makes Road to Oklahoma a 16-patch block.

This is a process.  And you may wonder why it’s important and even if it’s necessary.  Frankly, no, it’s not necessary if you want make quilts by  patterns for the rest of your quilting career. And there’s nothing wrong with that at all.  However, if you come across a quilt pattern that you’d like to either shrink to make a wall hanging or enlarge to make a bed quilt, this process liberates you from guess work and puts the creative power squarely in your hands.  Plus, if you ever decide to make a miniature quilt – you would own that category in the next quilt show.  In short, gridding sets you free.

At this point, I draw the block out on paper with its actual finished dimensions.  This Road to Oklahoma block finishes at 8-inches.  Since there are four patches across and four patches down, this means that each patch unit will be 2-inches. 

Once you have a quilt block “on the grid” you’re free to explore the “what-would-it-look-like-if-I-changed-this?” part of the creative process.  Let me show you what I mean.  Once you’ve drawn your block out, you can cut the individual units apart and move them around to see how the block’s appearance changes.  For me, I find it helpful to color my block in the same hues as my fabric, so as I shift the units around, I can get a real feel for my color placement (is it effective?) and if my new layout really works.  Let me throw in this helpful hint – once I sketch my block out in pencil, I make several copies of it, just in case I need to change my colors. 

Original Road to Oklahoma
Variation One
Variation Two
Variation Three

Of course, if you have quilting software, these steps can be done with most of those programs.  You can graph the block out, color it in, print the results, cut the block apart, and then start moving units around.  And with some software programs, you can even move the blocks around on your computer screen so you don’t necessarily even have to print them out. 

Another great feature about gridding quilt blocks is it allows you to see if you can simplify complicated blocks.  I enjoy complicated blocks.  They stretch you as a quilt artist.  But if I’m making a queen-sized quilt that has 60 difficult blocks in it, I don’t want to “stretch” quite that much.  I will immediately look to see if there is some way I can make the piecing process a little easier.  For instance, let’s go back and look at an 8-pointed star block from earlier blogs.

Lemoyne Star

This is a lovely block, but let’s be honest.  Who wants to make a large quilt with all these set-in seams?  The larger the quilt block is, the easier it is to sew Y-seams and partial seams (at least it is for me), but seriously, do you want to sew hundreds of Y-seams?  Unless I was attempting to razzle-dazzle a quilt judge, I would grid the block out and see if I couldn’t make half-square triangles do the work of a set-in seam.  Let’s see if we can do it.

This is the traditional Lemoyne Star Block
This is the Lemoyne Star Block re-gridded into half-square triangle units.

This is a type of Lemoyne Star block, and when we grid it out into HST units, it does alter the appearance a bit, but I could live with that instead of sewing all those Y-seams.  It works for this block.   If we understand gridding, these alterations are easy to make and it’s just as simple to estimate the fabric yardage.  It looks very similar and it reduces the complexity of Y-seams. 

Gridding blocks out also allows you to enlarge or shrink a quilt block to suit your design.  Granted, if you have quilting software, this is super easy.  You simply change the block’s dimensions in the software, and it re-programs the entire block – from the actual size, to the templates, to the rotary cutting instructions — and sometimes it even figures the yardage, too.  Working  with a paper grid can do the same thing, but it is a little more work.  I’ll explain the way I do it, but as with a lot of techniques in quilting, there’s more than one way to do things.  This works for me, but let encourage you to explore other options if it doesn’t work for you. 

I begin with the measurements of the original block.  Let’s go back and use the first block we began to tinker with in this blog – Road to Oklahoma.  Remember the block finished at 8-inches, and it’s a 16-patch block (4 block unit across and 4 down).  This means each individual block unit finishes at 2-inches.  Technically, we can adjust the unit’s size to come up with the larger-sized block needed.  For instance, if we enlarge each block unit to 3-inches and there are four units across and down, then our finished block will measure 12-inches, finished (3-inches x 4 block units = 12).  We can even play with fractions, if desired.  If we made the finished size of each block unit 2 ½-inches, then the finished size of our Road to Oklahoma would be 10-inches (2 ½ x 4 = 10).  It’s a pretty simple procedure:  Take the desired finished block size and divide it by four.  For instance, if you want your block to finish at 9-inches, divide 9 by 4.  This equals 2 ¼-inches.  Each block unit will finish at 2 ¼-inches.  When we add ½-inch for the seam allowances, each unfinished block unit is 2 ¾-inches.

The same method holds true if you want to shrink your block.  Let’s say we want our finished block unit to be 1 ½-inches.  Simply multiply 1 ½ x 4 and we get 6-inches.  And that’s about as small as I would want my Road to Oklahoma to be if I were traditionally piecing it.  Six inches is about as small as I would use traditional piecing for any block.  If I wanted to go smaller than that, I’d paper piece it.  And we can use gridding for this technique – I’ll show you how in the next couple of paragraphs. 

Let’s go back to our Road to Oklahoma, but let’s shrink it to 4-inches, finished.  That means each block unit in the quilt block will be 1-inch finished.  Let’s draw that out.

Four inch Road to Oklahoma

This is awfully small for me to consider traditionally piecing.  I would automatically decide to paper piece just about any block less than 5-inches square. 

When you want to paper piece a block there are two aspects we must consider:

  1.  Do the block units lend themselves to paper piecing?  There are some patches that simply cannot be paper pieced – such as blocks with curved units.  Those are tricky.  Sometimes they can be paper pieced and sometimes they can’t.  But with Road to Oklahoma, these are plain squares of fabric and HSTs, so we’re good to go.  The answer to the first question is yes.
  2. Which is the easiest way to paper piece this block – rows or columns?  This kind of falls into the category of personal preference.  And my personal preference is the simplest route because usually that gives the best appearance with the least headache.  When we look at Road to Oklahoma, if we pieced in in rows, we would have one HST per row.  We would also have one HST per column.  I personally find it easier to  paper piece HSTs in columns, so I would opt to paper piece in vertical columns and then sew the columns together into the block.  Again, this is a personal preference.  You may like rows better and there is absolutely nothing wrong with that. 
Paper Pieced Pattern for Road to Oklahoma

If I decide to paper piece my 4-inch block, I will grid out my columns and make sure I leave ¼-inch margin around them so I could paper piece.  Quilting software will give you the ¼-inch margin automatically.

Let me stop at this point and talk about how you may want to use a “type” of paper piecing even if you decide to use traditional piecing as your method of construction.  If I’m making a really complicated block – especially one that has a lot of bias – I use a hybrid method of paper piecing to make sure I’m accurate.  Keep in mind the final goal in making a block is accuracy both in piecing and in size.  Using Road to Oklahoma as a guide, let me show you what I mean and how the gridding/paper piecing is a great tool to pull out to guarantee both. 

First, I grid out the block, but I use freezer paper to do this.  If I have the type of freezer paper I can run through my printer, this makes it super-fast and super easy.  This is my freezer paper of choice:

I’ll make two freezer paper patterns.  The first is the final copy of the block – the one that is the same size as the finished quilt block.  I will cut this out, leaving a ¼-inch seam allowance around the block.   

The other copy will have each individual block unit with the ¼-inch seam allowance around it.  I will cut this copy apart into each of the individual units.  

 As I make each individual block unit, I will lightly press its freezer paper counterpoint unit on top of the fabric unit to make sure it’s sewn to true size. 

Needs a little trimming….

Then when all the units are pieced together, I’ll lightly press the complete gridded block of freezer paper on top of the fabric block to make sure it’s true to size. 

All that careful work leads to close perfection.

I know this sounds like a lot of work, and it is.  However, I only go through this process if I’m constructing blocks with a lot of bias involved, such as this: 

The freezer paper process, although it is time-consuming, assures me of complete accuracy.  And after I get several of the bias-laden blocks under my belt, I may only go through this process with ones that I feel may be really wonky. 

Gridding is a great tool to have in your quilting toolbox.  You won’t use it with every quilt or with every block, but it sure is helpful if you want to alter a block or make sure the block is accurate.  It’s also worth noting that not every quilt block will lend itself to gridding.  Blocks which have lot of curves are difficult, if not impossible to grid, like this one:

And some blocks with Y-seams or partial seams can’t be gridded out, like the Feathered Star. 

Some Feathered Stars you can alter and use all HSTs, and some you can’t.  Those are the types of blocks you must experiment with. 

Tuck this tool away and pull it out when bias units and blocks drive you crazy.  The process does take time, but it really helps!

Until next week, Level Up Your Quilting!

Love and Stitches,

Sherri and Sam

Categories
Uncategorized

Let’s Get Small (with Apologies to Steve Martin)

Those of us of a certain age remember an awesome comedian, Steve Martin.

Nowadays he’s known more for his music – primarily bluegrass, emphasizing the banjo.  But years ago – you may remember —  when Saturday Night Live was really new and really funny – he was a comedian.  And he had a catch phrase – “Let’s get small.” 

I remember just the simple mention of that phrase in a classroom setting would send my friends and me into belly laughs, much to the confusion of most of our teachers.  We loved Steve Martin. 

However, as a quilter, getting small means other things.  Small blocks.  Small quilts.  And this blog concentrates on small quilts.  Small quilts are great things.  They can be made from leftover blocks or from small blocks.  I love small quilts for both of those reasons – I can use up leftover blocks and a small quilt means I’m finished quicker.  If I’m in a quilting funk, a small quilt is often the cure.  I can cut one out, sew it up, quilt it, and bind it quickly – often all in one weekend.  There’s nothing like feeling productive to get you out of a quilting slump. 

But then you’re left with a small quilt.   What do you do with it?  That’s what this blog will explore.  It’s not just enough to finish a small quilt and feel productive.  You must know how to use it so that it doesn’t just take up space on your sewing table.    

Current small quilt serving as a table topper on my kitchen table. It was constructed from four-patches left over from my Ester Aliu Bunny Quilt.

1,  Use it as a table topper.  This is my favorite way to use small quilts.  I keep seasonal table runners on my dining room table, but my kitchen table is smaller.  A small quilt is perfect for it.  Bonus:  My oldest granddaughter (who loves to sew) looks forward to seeing how I change them out.  It gives me the biggest thrill for her to ask about the colors and piecing. 

2.  Put it on the wall.  Like other great works of art, hang it on the wall.  I hang a small quilt the same way I do a larger one —  I put a sleeve on the back and then slide the sleeve on a rod.  This is not only better for the quilt, it’s easier the change them out when you want to display another small quilt.

3.  Use a small quilt stand.  I invested in one of these when my guild had a monthly small quilt challenge.  I made a small quilt for every month and now I use the stand to display them.  It resides on top of a low bookcase in my entry way.  This makes it super easy to change out the quilts.  A small quilt stand is unobtrusive, can fit just about anywhere, and requires little assembly.

4.  Make a potholder or trivet.  Sometimes you’ll have one quilt block that’s left over and you’re not quite sure what to do with it.  It may be too small for even a mini quilt, but you just can’t toss it in the trash.  If this is the case, make it into a potholder or trivet to set hot dishes on.  Just be sure to use some Insul-brite instead of batting.  Quilt and bind as usual.

5.  If it’s super-small, make it into a mug rug.  Really small blocks may be too tiny to even make into a potholder.  If this is the case, make it into a mug rug (coaster).  If you have several small blocks, make a set of coasters and tuck it into a gift bag with a mug and some hot chocolate mix for that last minute Christmas present.

6.  Use it in less obvious places.  I’ve taken left over blocks and personalized tote bags, jackets, and vests.  I’ve also taken larger left-over blocks and turned those into pillows – which is a great way to coordinate pillows with your quilt top. 

7.  Give them away.  I’ll be upfront here — most of us have either started a quilt and then decided the quilt pattern wasn’t a good match for us or have made a quilt and had several leftover blocks.  In either situation, we have a stack of quilt blocks we’re not sure what to do with.  We don’t want to necessarily toss them into the circular file (trash can), but we really don’t want to invest anymore time or resources in them.  There are too many of them to justify constructing a mini quilt, or we don’t want or need another wall hanging.  My go-to way of re-homing these is the free table at my guild’s monthly meetings.  Usually somebody takes these home with them, seeing beauty in the blocks where I saw only hours of monotonous work. 

If that’s not an option for you, consider making a throw quilt for someone.  Even if the blocks don’t necessarily match, if you use a gray or especially a white (because if you use enough white as the background eventually everything goes together), they will harmonize and make a nice quilt for a child, or a cancer patient, or someone else who needs a tangible reminder of your love.  If the blocks are different sizes, you may have to exercise some creative layout skills, but using those blocks and then giving the quilt away as a gift will make you feel good for days.

Remember this quilt? For sure, the border fabric helped pull the whole thing together, but the white used as a neutral made all the colors sing with harmony.

 And this brings me to my last point about small quilts.  They make great gifts.  I keep a few small quilts on hand to give as birthday presents or Christmas gifts.  I can tuck one of them in a gift bag along with a container of homemade cookies and a good bottle of wine.  This makes a unique gift that is truly from my heart to theirs.

Keep these thoughts in mind as your left-over block collection grows.  I find it helpful to store these in a box in my studio where it’s in plain sight.  Every week or so I go through them and decide if I have enough to make a charity quilt or something else.  It’s a win-win –it keeps them out of the landfill and allows me to make something pretty and useful out of them.

Until next week, Level Up Your Quilting!

Love and Stitches,

Sherri and Sam

Categories
Uncategorized

Square-in-a-Square Blocks

Let’s talk about the Square-in-a-Square block.

This is what one looks like:

Traditional, classic Square-in-a-Square

If you’ve read my past blogs, you may remember we’ve talked about this block before.  You may also remember it has another name – for years it was called the Economy Block.  I’m not sure what quilters decided they were economizing with this block – was it fabric or time?  For sure, it’s a great way to use up scraps, but it also doesn’t take a lot of time to make, either.  You also may recall we used it as a connecting block in quilts.  Those triangles in the four corners make it an ideal block to join blocks together if you opt out of sashing. 

Square-in-a-Square blocks are used as connecting blocks. These SIAS blocks are Snowball Blocks.

The Square-in-a-Square is one of the most versatile quilt blocks to have tucked away in your quilting toolbox.  And it’s one of those blocks whose seeming simplicity can lull you into thinking it’s not nearly as fancy as an eight-pointed star and not nearly as difficult to make as a feathered star.  I’ll throw this in right here:  Appearances can be deceiving, and both of those aspects are never truer than when dealing with the Square-in-a-Square.  So, let’s break it down.

Jody Barrow’s Square in a Square System

If you take the time to Google Square-in-a-Square, one of the first names that pops up on the search is Jody Barrows.  She has a piecing system called Square-in-a-Square that is pretty phenomenal.  It branches out into other block units besides the Square-in-a-Square, such as flying geese.  I am not proficient in this method – I have the rulers and I’ve made few blocks using her system.  I am impressed enough to have her method on my Quilting Bucket List of goals to undertake.  If you’re curious, look her up on the internet.  She has lots of videos which explain her system (and it’s not hard to use), as well as the rulers, books, and patterns on her website.  And if you live in the Triad area of North Carolina, Gloria Stickney of Sew Fabulous is certified to teach this method.  Hopefully post-COVID, Gloria will offer classes again.  She really is a great teacher.

But if you’re unsure of just how much you want to embrace this block (no matter how versatile it is), you probably don’t want to invest in fancy rulers or books just yet.  You may want to construct this block using what you have on hand.  We’re looking at three methods today – the traditional method, paper piecing,  and my method.  Let’s start with the traditional method. 

When you examine the block, the first concept that should stand out is the center of the block.  There’s a lot of area there and we will talk about it a bit further down this blog.  But what should grasp your attention is the center holds great potential for either design work or fancy quilting.  The second thought floating through your head should concern the corners of the block.  They’re triangles.  And by now you know what triangles bring to the table – bias.  So right off the bat, we know care needs to be taken to protect the bias and to avoid exposing that bias until the last minute. 

The good news about the traditional construction is we don’t necessarily work with triangles in the corners – we can work with squares if the Square-in-Square block is a Snowball Block:

Snowball Block

We touched on this type of construction in earlier blogs dealing with linking blocks.  Instead of cutting out triangles and sewing them in the corners, we cut out squares and sew them on the diagonal.  This produces the small triangles in the corners and doesn’t expose the bias.  To learn how to construct a Snowball Block, please see my blog On-Point Planning, published May 6, 2020.

However, when we’re constructing the traditional Square-in-a-Square block, the corner triangles aren’t as small as the ones in the Snowball block.  All the sides of the center square are encased by them.  We can’t make these blocks in the same manner as we did the Snowball block. Bigger triangles mean more bias.  And more bias means the block can come out all kinds of wonky.  We can avoid the wonky by following a few simple guidelines.

  • Instead of cutting out triangles,  plan on rotary cutting squares and then cutting these on the diagonal at the very last minute.   By now it should be super-easy for you to determine what size to cut the squares.  Take the finished size of the center square and divide it by 1.414 then add 7/8-inch.  So, if we’re making a Square-in-a-Square block that has a 5-inch finished center, this is what the math looks like:

5 / 1.414 = 3.536068 or 3 ½-inches

3 ½ + 7/8 = 4 3/8 inches

We would cut two 4 3/8-inch squares and then cut them once on the diagonal.  We would need two squares of the corner fabric per Square-in-a-Square center block.

These measurements are exact.  They leave little wiggle room.  And since we know no matter how carefully we handle triangles, bias can still be stretched, it’s a good idea to make the Square-in-a-Square block a little bigger and then trim it to the unfinished size needed.  Instead of adding 7/8-inch, I add an entire inch.  So, my math would look like this:

5 / 1.414 = 3 ½-inches

3 1/2 + 1 = 4 ½-inches

I would cut my corner squares 4 ½-inches and then cut them once on the diagonal. 

  •  Before you cut the squares on the diagonal, give them a shot of spray starch, and press them with a hot iron.
  • Expose the bias at the last possible minute.  Cut the squares out and then cut only a few on the diagonal at a time.
  • If you have to stop sewing the triangles for any reason, store them flat and in a place where you don’t have to keep moving them.

Traditional Square-in-a-Square block construction is just like putting borders on a quilt.

You sew the left and right side on and press the seam toward the triangles.

Make sure the “ears” of the triangle hang off 1/4-inch from the square.
Sew the left and right triangles on and press towards the triangles.

Then add the top and bottom triangles and press those seams towards the triangles, too.

Untrimmed SIAS Unit

As you can see, no matter how carefully I handled the bias, the sides still aren’t exactly square.  But when I trim mine down to size

Trimmed, unfinished 7 1/2-inch SIAS

Most of the wonky dissipates, and the unfinished square should measure 7 ½-inches

To me, if my Square-in-a-Square blocks are small, they propose even more of a challenge.  I’m working with small pieces.  Small pieces make precision challenging.  Toss in the fact that we’re dealing with small, bias edges and the squares can go wonky in a heartbeat.  This is why, if my Square-in-a-Square blocks are less than 3-inches, I choose to paper piece them. 

Paper piecing pattern for a SIAS. This one came from my EQ8, but Google paper piecing SIAS patterns and hundreds will come up in any size your heart desires.

With small blocks, paper piecing offers the best of everything.  Precision is guaranteed.  The bias is protected.  And the blocks will be true-to-size.  The only drawback to any paper piecing is you’re trading fabric for preciseness.  Yes, you’ll use a bit more fabric than in traditional piecing, but your blocks are guaranteed to come out the right size every time with no wonkiness involved. 

The last method of construction I want to highlight is my method, which kind of a hybrid between traditional piecing and paper piecing.  Let’s go back to our finished 7-inch Square-in-a-Square block that has a 5-inch center we used above.    Working with these dimensions, for my process you’ll need:

One 7 ½-inch square of the center fabric (called the base fabric)

Two 4 ½-inchquares of the corner fabric, cut once in half on the diagonal to make four triangles

One 5-inch square of freezer paper.  The size of the square of freezer paper is roughly the size of the finished center square.

It’s hard to see the creases I’ve pressed in the base square, but they’re there!
  •  Create placement lines for the freezer paper by folding it in half, and then in half again in the other direction. For the base fabric, this can be done by either folding the base fabric in half twice and pressing to form vertical and horizontal placement lines or by marking the lines with a fabric marker on the wrong side of the fabric. 
  • Place the freezer paper square on the wrong side of the fabric, using the placements lines to center it.  Press in place. 
  • Place a corner triangle, right sides together, with the base square, making sure the triangle’s seam allowance is showing above the freezer paper and the corners extend evenly beyond the edges and pin.  A light box is a great tool to use with this step.  It really helps.  Getting this placement just right is the trickiest part.  The top point of the triangle should face the middle of the square.  If you use my method of cutting the triangles – where you add 1-inch as opposed to only 7/8-inch – the triangles are slightly oversized and there is some wiggle room.  Once the triangle is perfectly placed, make sure it’s pinned securely.
  • Flip the base fabric over so the wrong side of the base fabric is facing you and sew from this side, using the edges of the freezer paper as a seam guide. 
  • Repeat on the steps 3 and 4 in the piecing method for the rest of the base fabric, sewing the triangles on in the same order as we described in traditional piecing.  Be sure to press each triangle before adding the next, with the seam allowances pressed towards the triangle fabric. 
  • From the wrong side, trim all sides even with the base square.

At this point, you can remove the freezer paper.  The freezer paper square can be used several times before another one is needed.  You will also need to decide whether or not to trim the base fabric away from the corner triangles.  This is a personal decision.  If the fabrics used are thin, you may opt to keep the base fabric intact for added stability.  If the fabrics used have a firm weave, you may want trim the base away, as it will only add bulk.  This bulk may make the quilting process more difficult. 

Now that we’ve covered three different construction methods, let’s talk about why the Square-in-a-Square block is such a great quilting tool.  One of the reasons we’ve discussed before – it’s a great connector block.  It very effectively takes the place of sashing, and it really pulls all the fabrics used in the quilt together. 

The second reason Square-in-a-Square blocks are so great is that center diamond.  Whether you’re constructing small blocks or large ones, that middle area is an oasis for special consideration.  The quickest (and in my opinion) the easiest way to punch up that diamond is to use your focus fabric in that area.  This is a great way to pull all the colors in your quilt together and to avoid the trap of only using your focus fabric in your borders. 

If you’re using a large print in your quilt borders or your blocks, try fussy cutting that fabric for the center diamond.  This is also quite effective for making everything in your quilt look coordinated. 

The last two ideas for the Square-in-a-Square center area take a bit more time but are by far the most stellar use of that area:  piece the center or applique it.  Before you roll your eyes and decide that will take too long and it’s too much effort, let’s take a look at a few examples.

There are these pieced centers….

And here is one with an appliqued center…

Yes, these centers took a few more weeks days to complete, but that extra effort really makes a huge difference. 

The Square-in-a-Square block serves not only as a vehicle to pull your quilt top together, it also opens up lots of design options, depending on your fabric and your penchant for added details like piecing or applique.  If you own an embroidery machine or you enjoy hand embroidery, work that magic in the center diamond.  Let that area be a blank canvas for lots of ideas – including any mad quilting skills you may have.  Think of the Square-in-a-Square block as a diving board for your pool of creativity!

Until next week, Level up that Quilting!

Love and Stitches,

Sherri and Sam

Categories
Uncategorized

Quilters and Their Quilts

There are lots of jokes out there about quilters.  Most of these we come up with ourselves:

It started out as one trip to the fabric shop, and look what it turned into…

It’s all fun and games until the bobbin runs out.

Think of it as a house party with power tools.

You haven’t seen trouble until you use my fabric scissors to cut paper.

I laugh along with everyone else when anyone jokes around about us quilters.  Truthfully – for me it started out as an intellectual exercise.  My great-grandmother’s quilt, neatly folded on the bench at the foot of my bed.  How did she make it?  Why was it backed with a heavy blanket?  Could I make something like that? 

At first glance, quilting seems like an unreasonable hobby.  You buy yards of perfectly good fabric, proceed to cut it up into tiny pieces, and then sew them back together.  I questioned my own sanity the time I constructed 10-inch finished blocks with 60 pieces in them.  And we’re not mentioning Dear Jane at this point.  It wasn’t enough I made one quilt with 4 ½-inch blocks, now I’m working on my second one. Normally, my blogs are kind of “teachy.” I try to leave you with something you can carry into your next quilting adventure. This blog is a little different. With this blog, I want you to think about why you quilt and what made you start.

It’s a hobby, which like a lot of hobbies, was born out of necessity.  There’s opposing thoughts about exactly when quilting as we know it was conceived as an idea.  Some textile historians point to ancient Egyptians.  Others to the former Turkish empire.  At some juncture it hitched a ride to England (probably through the Crusaders, who may have thought it was just the perfect thing to wear under that cold armor), and it parked there for a while.  It was used in bed hangings, floor coverings, and petticoats. It also began its life in what traditionally comes to mind when someone mentions “quilts” – bedcoverings.  Eventually it followed the English settlers to America – not immediately, because the first settlers were too busy clearing land and building forts – but it came soon after. 

And we made it ours.  We took the English patterns, redesigned them (sometimes out of necessity and sometimes out of creativity), and renamed them.  We’re still doing that.  Quilters of all races and nationalities do this all the time.  One of the best things about quilting is its fluidity.  It really is a hobby born of necessity (to keep folks warm), clothed in creativity, and (with many of us), bloomed into an obsession.  I am not joking when I say I would rather quilt than eat.  It marries utility with beauty – you’re making something useful and you can combine colors and patterns to make it pretty.

However, ask a dozen quilters why they quilt, and you’ll get a dozen answers.  I began to examine my own reasons after reading an article in Quiltfolk  magazine (which, if you’re not acquainted with this publication, do yourself a big favor and look through at an edition or two).  The article was titled Exquiste Objects, and reflects the thoughts of Eleanor Bingham Miller, a quilt historian and preservation advocate.  Her essay embraces why quilt preservation and recorded past are important.  We learn as much about the quilt maker as we do the quilt.  For a good deal of the time, we quilt makers are so involved in our art that we don’t pause to find out why quilts are and were made.  For sure, a lot of quilts are made for special occasions and to fulfill needs, but there’s more to them than that.  A lot more. 

A political statement.

A block from a Civil War Quilt. Quilters in the Union States made many of these quilts and “sold” spaces for people to add their signatures as a way to raise money for the Union troops.

 A sharing of pain or joy over an event or person. 

9/11 Tribute Wall Quilt

A silent, tangible means of support and solidarity in a soul-wrenching situation.

AIDS Quilt. Over 49,000 panels make up this quilt. I have one in this quilt, made in memory of a good friend I attended Elon University with.

And of course, a creative outlet.  While the pragmatics of quilting will always be there (something to keep you warm or make a room pretty), the concepts behind the quilt are often lost to time.  You recognize this when you attend a quilt show which has a display of antique quilts as part of the exhibit.  What’s the first thoughts that run through your mind?  How did they make this?  Why did they make this?  Why did they pick those fabrics?

And unfortunately, we may never know the answers to all of these questions about all of the quilts.  I do have a sneaky suspicion our foremothers quilted much for the same reasons we do.  I can’t prove it, but if the reasons I quilt are similar to theirs, then the art is more than a creative outlet or a means to an end of a need.

Quilting helps me piece my life back together just as much as it pieces patches into a uniform whole.  Piecing is different from mending.  When you mend something, you’ve only altered the original.  When you piece something, you create something new out of parts and pieces of something else.  Suddenly five collective yards of fabric become one united new item.  It takes time and patience, but the outcome is stunning.  This has become my mantra during troubled times.  Life has thrown me more than a few curveballs.  The process of quilting slows me down and helps me think and pray through the changing times and shifting landscapes of my life.  It has become as much of a constant as  prayer and the love of my family.  It’s a touchstone, a link to my past (strong women who made it through much tougher times than I’ll ever have), and an outlet  I can pour my frustrations into. 

I’ve seldom had anything in my life that completely restores my soul and mind like quilting does.  It centers me.  It’s magic gets me through the day until I can return to my studio in the evening and quilt until bedtime.  It’s beauty and math and complexity and simplicity combined into one artistic form.  It’s order and peace in the middle of what may look like (and sometimes is) chaos.  It’s the quilters themselves who have proven to be a surer sisterhood than blood and DNA.  It’s wisdom passed back and forth over beeswax, hand piecing, and applique. It’s raw materials made into something beautiful – much the same way our Creator does to us.

The majority of my blogs teach different quilting techniques or show case quilts or quilters.  But I think it’s important to know why you do something, especially if it’s an activity you repeat.  Quilting is no different.  

And sometimes those reflections serve to make you a more aware quilter – which can only be a good thing.

Next week’s blog will be more of a “how-to” that deals with Square-in-a-Square blocks.

Until next week, Level Up That Quilting!

Love and Stitches,

Sherri and Sam

Categories
Uncategorized

60-Degrees of Separation

What does this:

And this:

And these:

Have to do with this?

Hang with me on this blog and I’ll explain.  When we think about quilt blocks, generally we think about squares.  When we talk about units within those blocks, we also tend to think about squares, but add in half-square triangles, rectangles, and triangles (you know… the big triangle in a flying geese unit).  But there other types of block units.  When we constructed the Lemoyne Star block a few blogs ago, we were working with diamonds.  I taught you how to sew the units together, but threw out two different ways of cutting out the diamonds:  rotary cutting or templates.  Templates are wonderful things to have, and if you find yourself repeatedly cutting out the same non-square block unit, you may want to invest in a good set.  I make too many types of blocks to justify the investment.  I can count on one had the times I’ve made a Hunter’s Star or Lemoyne Star quilt and have fingers left over.  So, I learned how to cut the units out with a rotary cutter. 

At this point, let me drop in a little personal quilting philosophy:

I don’t – for the most part – buy specialty rulers. 

Quite frankly, I consider them a waste of money.  Unless it’s a specialty ruler I use nearly every day, such as Eleanor Burns Square Up Triangle Ruler or Creative Grids 60/90 ruler, I don’t purchase them.  The two I mentioned I feel are worth every red cent because I use them all the time.  I’ve gotten my money’s worth several times over out of each.  Specialty rulers, as a whole, are rulers geared for one purpose and one purpose only.  There are rulers out there specifically for the Lemoyne Star.  And for the Hunter’s Star.  But you know the only thing you can make with each?  A Lemoyne Star or a Hunter’s Star.  See why I consider them a waste of money?  Unless every other quilt you’re making is one of those designs, chances are good those rulers will sit in your studio and gather dust. 

I would much rather take the time to teach you how to use what you already have.  Chances are, even if your quilting supplies are limited, you have a ruler with these lines:

Or a cutting mat with these lines. 

If you have one or both, you’re golden.  You can cut angles all day long, and they’ll be accurate and beautiful.  But first, let’s go back to geometry class.

In geometry, we study angles.  And from this study of angles, we begin to understand triangles.  Tri- comes from Greek and Latin roots meaning “three.”  So, the word triangle literally means three angles.  In quilting, generally we use 60-, 90-, and 45-degree angles. There are some exceptions, but since in this blog we’re only working with diamonds and triangles, we’ll stick with these three angles.  Two of these angles you’ve already worked with – the 90-degree angle and the 45-degree angle.  Don’t believe me? 

This is a 90-degree angle.

This is a 45-degree angle.

Know what block unit has both of these?

That’s right, a half-square triangle.  You know how to cut these and you know how to draw these.  We will work a little more with those 45-degree angles in a bit, but for right now let’s move on to that 60-degree angle, which looks like this:

Wedged in between the completely vertical line on your ruler (the 90-degree angle), and the 45-degree angle, is the 60-degree angle. You’re probably wondering where these particular angles show up in quilts.  Take a look at this one:

This quilt is called A Thousand Pyramids or Sugarloaf.  Every triangle in this quilt is an equilateral triangle – a triangle in which all the sides measure exactly the same.  An equilateral triangle is also equiangular, meaning that all three of the inside angles have the same angle measurement, which for these triangles means 60-degrees.  There are specialty rulers which will allow you to cut these triangles out.  I inherited one from a friend who had to stop quilting due to some health issues.  This is the ruler, and here’s how you use it:

Cut a strip of fabric the height needed for the triangle the pattern requires.  With this example, we’re using 6-inch wide fabric.  Put the ruler on the fabric strip, using the markings on the ruler to make sure you have the right size.  In this instance, we’re making 6-inch tall triangles.  I want to make sure that six-inch mark on the base (lower part of the triangle) rests on the edge of the fabric. 

Then I use my rotary cutter and cut around the sides of the triangle.  Once I’ve cut out this triangle, I rotate it, matching the newly cut fabric edge with the edge of the ruler and cut the next triangle out with only one cut. 


If, at this point, you’re wondering about seam allowances, most specialty triangle rulers already have that built into them.  In other words, the 6-inch triangle I just cut out exactly on the six-inch markings on the ruler already has the ¼-inch seam allowances already built into the ruler. 

Truthfully, if you find yourself making a lot of equilateral triangles, you may want to invest in this ruler.  If I hadn’t received one as a gift, I most likely would have purchased one when I found it on sale or had a coupon.  One word of caution here, unless the ruler is from Creative Grids, some ruler grippers or Ruler Magic applied to the wrong side of the ruler is a good idea – it’s easy for the ruler to slip.  Creative Grid rulers have grippers built in them.

However, if you find yourself making 60-degree triangles only rarely, you may want to opt out of the specialty ruler purchase and learn how to use your rotary mat or ruler.  If I’m using this option, after I find the 60-degree line on my ruler, I mark it with a piece of masking tape or painter’s tape. 

This may sound silly, but if you look closely at any ruler you’re using, there are a several diagonal lines marked on them.  It’s easy to use the wrong line (ask me how I know…) and really mess up your cutting.  That visual indicator is a huge help, especially if you’re cutting late at night. 

Seriously.  Use the tape. 

The first step is cut your fabric strip the same width as the desired triangle.  Then cut off the selvages.  Fold the fabric in half, with the selvages to the left and the fold to your right.

Then line the 60-degree mark up with the bottom edge of your fabric and the left-hand side of the ruler should line up with the top of your fabric strip.  Now make the first cut with your rotary cutter.  

 At this point, move the scrap out of the way.  If you think you can use it somewhere in your quilt, lay it aside.  If you don’t, just file it away in the circular file (trashcan). 

Now turn your ruler so the 60-degree line is against the cut edge.  Make the next cut.  Continue this way until, turning your ruler, until you’ve cut all the triangles you can out of the strip of fabric. 

Using the angled lines on your cutting mat is similar, but in all honesty, this is my least favorite way of cutting out equilateral triangles.  You’ll see why in a minute.  The process begins the same – cut your strips of fabric the same width as the triangles needed.  Cut the selvages off and fold the fabric in half with the cut ends to your left and the fold to your right. 

Line the strip of fabric up with the 60-degree line and the corner of your cutting mat.

Make your first cut.

Then flip your fabric over.  Line the edge of the fabric up with the corner and the 60-degree mark and cut again.  This will give you your first set of triangles.  The issue I have with this method is the fabric flipping.  It’s easy to get the fabric uneven and then the triangles will come out wonky.  To me, it’s a whole lot easier simply to flip the ruler. 

I will also throw this in here:  If you have an Accuquilt cutter, Sizzix  or a ScanNCut, those can cut equilateral triangles out, too.  I know the Accuquilt has to have a die to make the cuts, and the ScanNCut has several triangles already programmed into it – you just adjust the size.  So, if you have one of these gadgets and you don’t care for any type of ruler cutting, this may be your ticket. 

Sewing these triangles together isn’t hard at all, but like a lot of things in quilting, there are few handy-dandy hacks that can make it so much easier.  This is how I do it and what works for me, but there are other methods out there.  If this technique doesn’t work for you, try others until you find a good fit. 

Step One – I lay my triangles out.  You will notice I cut the tops off of mine.  Many specialty rulers have the blunt top, so while your rotary cutting, you can just cut the tops of the triangles off.  If you’re not using a specialty ruler, simply measure down ¼-inch from the top of the triangle and cut.  This blunt end makes piecing easier and reduces bulk – which is always a good thing.  If the end is not blunted, you have to make sure the tip of the triangle hangs off ¼-inch from the triangle beneath it so everything lines up and comes out even when it’s sewn.  Just trust me…blunt the top of the triangle. 

Step Two – Alignment is the key to success.  Make sure the triangles are exactly on top of each other and the edges are even.  Sew a ¼-inch seam and press open.  Check to make sure your seam allowances are exact.  I realize that this sounds really exacting, but with these triangles, accuracy is everything.  It’s far better to realize any errors here and correct them.  If you wait until you get to the end of a row of triangles and things are off, it’s difficult to rip out stitches and keep the bias from stretching.  And if the bias makes you nervous, just remember to hit it with a shot of spray starch and a hot iron before sewing. 

Step Three – Repeat the steps in pairs.  If you have an odd number of triangles, leave one triangle solo. 

Step Four – Now we’ll sew two sets together.  Flip the right set over the left set.  Align the point of the third triangle with the dog ear created from sewing the first set together. Align the top right corner point of the second triangle with the dog ear created from sewing the second set together.  Sew, using a ¼-inch seam and press the seam open.  Check for accuracy.  Add the last triangle using the same method, and then repeat for the other row of triangles.

Step Five – Now we’ll sew two rows together. Like the Flying Geese Units, you want ¼-inch of margin from the tips of the triangles.  This will keep the points from being lopped off.  So, before you start pinning and sewing, look at both rows to make sure each triangle tip has at least ¼-inch margin.  Then pin the rows, right sides together, placing a pin exactly where the tips meet.  I find it easiest to place a pin through the triangle tip on one row and then bring the other row up to meet the first row and push the pin through the corresponding tip.  This way, both tips will meet perfectly.  Repeat this for all the tips, then sew the two rows together with a ¼-inch seam allowance.

Press the seam open on the back.

Now that we’ve mastered the 60-degree triangle, let’s take a look at more 45-degree angles.  Typically, when a quilter works with 45-degree angles, we’re dealing with triangles.  But remember those diamonds we sewed together on the Lemoyne Star block?  Those diamonds have 45-degree angles.  And again, if you find yourself making a lot of 45-degree diamonds, you may want to invest in a good set of templates.  But if you’re like me and those are only once-in-awhile projects, it’s just as easy to use the diagonal markings on your ruler or mat to make them.  We’re going over the steps to making successful 45-degree diamonds, but sometimes quilt patterns will call for 30-degree diamonds or 60-degree diamonds. It’s good to know that no matter what degree the pattern calls for the method used for cutting these out is the same no matter what the angle.  So, let’s get started. 

Step One – First determine how big your diamond needs to be.  For the sake of illustration, we’re working with 3-inch finished diamonds.  Unlike templates that will have the seam allowance built in, we need to add the seam allowance to the finished patch if we’re using a ruler and mat.  We need to add a ½-inch seam allowance to the 3-inch finished patch, making the unfinished diamond measure 3 ½-inches.  This means we need to cut a strip of fabric 3 ½-inches wide on the WOF. 

OLYMPUS DIGITAL CAMERA

Step Two – I mark the 45-degree angle with a piece of masking tape or painter’s tape, just like I did when I was constructing the equilateral triangles.  Then I place the tape at the bottom of the strip of fabric and make my first cut.  This piece of fabric can be discarded unless you have plans for it.  But with that first cut, we’ve established the first angle of the diamond.  From the tip of the angle, measure down 3 ½-inches, and line the edge of the ruler with that measurement, keeping the 45-degree taped mark at the bottom of the strip of fabric.  Make the second cut, and you’ve got your first diamond.  Repeat until you’ve cut all your diamonds out. 

OLYMPUS DIGITAL CAMERA

You use this process whether you’re making 45-, 60-, or 30-degree diamonds. 

We looked at how to join the diamonds in a Lemoyne Block, where the edges of the diamond are joined to other triangles or squares.   But let’s look at something like this:

Isn’t it lovely?  It’s a harlequin design and it’s perfectly beautiful.  So how do you sew the edges together?  I’ll explain it and then I’ll introduce you to one of the few specialty rulers I own – which can be used for more than just 45-degree (or any other the other degree) diamonds. 

Like the 60-degree triangles, the first thing I do is lay my diamonds out.  And at this point, let me throw in the standard disclaimers.  There is bias.  Handle it carefully.  Give it a shot of starch and press it with a hot iron before sewing.  Now let’s flip the diamonds, so that the right sides of the fabric are facing each other.  There is a trick to making them line up correctly so that they sew together perfectly.  You would think with all the straight edges and corners, you’d just line everything up and sew. However, if you do that, the seams will not line up in the front.

Instead, lay the diamonds out so one end of the pieces overhangs the other by ¼-inch.  You’ll need to see “dog ears” at the bottom and at the top. Once you have those, you can sew them together with  ¼-inch seam allowance and they’ll look perfect.

Here’s where I want to introduce one of the few specialty rulers I use.  It really isn’t a ruler, so much as it is a tool.  And it’s this:

Fons’ and Porter’s Triangle Trimmer.  Remember in the earlier part of the blog when we were working with 60-degree triangles and I told you to blunt the tips, so they piece together easier?  This is the tool I use to cut the tips off the triangles.  They’re super-easy to use.  Place the diagonal edge of the ruler along the diagonal edge of the diamonds and push it until the trimmer’s cut away corner is touching the two adjoining edges of fabric.  Then trim away the triangle ear that’s still visible.

Your diamonds will now have blunted ends and are super easy to sew  together.  Match the points and edges and carefully sew with an ¼-inch seam allowance.  You don’t have to worry about the ¼-inch overhang.

Once you’ve joined the diamonds together, now you have to sew the rows together.  And once again, you need to work with an overhang.  If you line the corners and edges up evenly, when you sew the rows together, the seams won’t match up.  I use a method similar to the one I used with the 60-degree triangles.

Working with one of the rows, push a seam through one of the seams in the diamond.  Pick up the second row and push that same pin through the corresponding seam in that second row.  Continue to match seams this way, pinning through one seam and then the corresponding seam of the second row.  When all the seams are pinned, I go back and add a few more pins to make sure everything matches.

Then I baste.  I lengthen my stitch length to about 3 on Big Red and baste the two rows together.  I do this for two reasons.  First, once I baste the rows together, I can open the piece out and make sure my seams match up – which is really the primary goal in sewing diamonds in rows.  Second, if the rows don’t match up, and adjustments have to be made, basting stitches are a lot easier on the bias to remove.  Once everything lines up nicely, sew using a regular stitch length, and then remove the basting stitches.  If the basting stitches don’t show, you may opt to leave them in, just to avoid handling the bias anymore than you have to. 

One more design option I want to throw in here before we leave triangles and diamonds behind us, and that is the strip of fabric you cut them out of.  In this blog, I’ve just mentioned the width the strip of fabric should be.  But you can make that strip out of other pieces of fabric.  You can join strips of fabric together to create the strip size you need.  This is a terrific way to pull all your colors together.  I’m thinking particularly of jelly roll strips.  The sky is literally the limit with this design choice.

Always think out-of-the-box as much as you can.  And don’t be afraid of triangles or diamonds.  They’re simply another patch and another tool you can stow away in your quilting toolbox to pull out and dazzle your quilts.  Handle the bias carefully and remember to match tips and seams as your constructing your rows. 

Until next week, level up your quilting!

Love and Stitches,

Sherri and Sam