I still want to talk about borders for the next couple of blogs. Why spend so much time on that last piecing element of the quilt? Because borders, even though most of the time they are sewn on last, are just as important as the quilt center — and not just because they are one of the last squaring up chances you have.
In actuality, all borders are pieced borders. They are pieces of fabric, rectangular in shape, that are sewn onto the quilt center. But it’s what you can do with those rectangular-shaped pieces that can make your borders an exclamation point instead of a mere period in your quilt sentence.
Most (not all) quilt patterns will include the fabric needed for the borders as well as how big to cut them. And this information is going on the assumption that your borders will be constructed from one of the fabrics you purchase for your quilt. I’ll be the first to tell you that this will work fine.
It’s that “fine” you may want to examine. Anytime a woman tells you it’s “fine” you know it’s not “fine.” She’s just being polite. There will most likely be some kind of argument later.
To me, if you have a great focus fabric that just pulls everything together, and you or your quilting artist have some great quilting chops that can feather and swirl the life out of those fabric borders, then go with it. I’ve done that a time or two myself. Note this quilt:

This is my Finally at Piece with My Past. The borders are constructed from a border print that coordinated with some of the Henry Glass fabrics used. I was more than “fine” with this. It pulled everything together and my long arm artist, Shelle, did a wonderful job with the quilting. Looking back at the quilt, with the fabric selection I had found, I don’t think I would change anything.
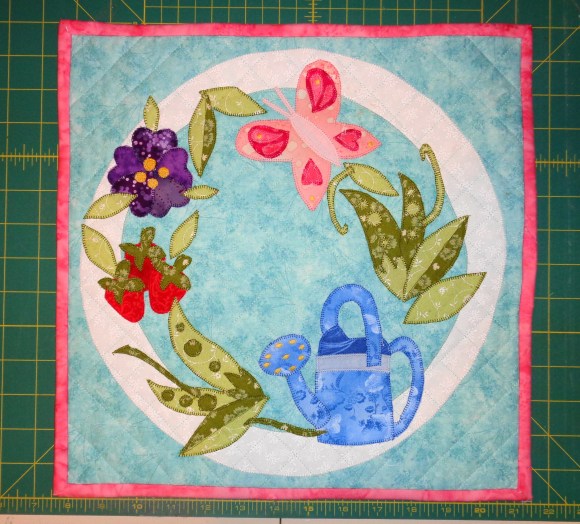
But….this quilt?

This is my Farmer’s Wife that I completed last fall. The pattern calls for plain borders. But after all that piecing and work, I think putting plain borders on this little jewel would be a slap in its face. It would be putting a period on the end of a sentence that clearly needs an exclamation point.
That’s what we’re going to begin to discuss with the next couple of blogs – how can you change up your borders to really complement your quilt and give it just one more pinch of pizzazz instead of looking like you just slapped some fabric on there because you were ready to be finished with this project?

When you’re ready to veer off into a new creative dimension with your borders, it’s important to remember to keep the dimensions you need (see last week’s blog on how to do this). Within those dimensions, a thousand creative opportunities exist and all you have to do is decide which design you want to use. The first border type I’m going to discuss is the easiest, and that’s the Pieced Border.
I think of Pieced Borders as really long, rectangular quilt squares. That thought helps me keep perspective. The pieced borders can be a simple as adding cornerstones at the top and bottom corners:

Or as intricately pieced as these.

How do you decide what to do?
First, examine your own skill set. If you’re a beginning quilter, cornerstones at the top and bottom may be just the thing to keep you moving forward without intimidating you. But if you’ve sewn and quilted for a while, don’t be afraid to mix it up. One of my favorite ways to approach borders is to echo a block that is used in the quilt. If your making a quilt center that has shoo-fly blocks in it, try echoing that in the borders, either as cornerstones or in the border itself. Echoing blocks in the border always makes the quilt seem more pulled together than just plain borders. And don’t worry if the blocks in the border aren’t the same size as the blocks in the center. The eye will pass right over that.

Here’s the way that works…
Take the finished size of the quilt top – both length and width and subtract ½-inch from each figure to allow for seam allowances. Next find a number that will equally divide into both of these measurements. Often, there will not be a perfect number that will divide equally into the length and the width, unless you’re quilt center is square. If you can’t find a number that divides equally, don’t sweat it. Just come up with the closest number you can – round up or down.
Anything ½-inch or less is not going to matter – the eye will never notice (unless you’re quilt judge). For instance, let’s say the top and bottom border could be divided equally into 2 ½-inch patchwork units, but the right and left one can be divided equally into 3-inch patchwork units. Make the top and bottom borders into the 2 ½-inch units and the left and right one in 3-inch units. Honestly, the eye will not tell the difference. It’s all going to work out just fine.
So, let’s say your quilt center is 64-inches in width and 72-inches in length and the pattern calls for 4-inch borders. There’s a lot of good piecing in the center and one of the primary blocks used was half-square triangles. You make the decision to echo that block in the border. Since the border needs to be 4-inches wide, you begin to divide that width and length to determine how many 4-inch half-square triangles you need to make. With these dimensions, 64 can be divided by four to equal 16 and 72 can be divided by four to equal 18. Now multiply 18 x 2 (right and left border) to know that you will need thirty-six 4-inch half-square triangles for those borders. Now let’s work on the top and bottom border. We know we need 16 blocks, but also remember the width is now wider because you’ve added a left and right border. So, before we come up with that number, we have to add 8 (to allow for a left and right additions of 4-inches each) to 64. Now we have 72. Seventy-two can still be divided by 4 and gives us 18. Multiply 18 x 2 and we discover we need 36 blocks for the top and bottom borders.
That is one time the math worked out easily and evenly…but as any quilter that has a few tops under their belt will tell you, it doesn’t always happen that way. Let’s take that same quilt center with the same length and width and determine we want 5-inch borders. While we can certainly divide 64 and 72 by 5, the answers are mixed fractions: 64 divided by 5 = 12 ¾ and 72 divided by 5 = 14 3/8.
If that’s making your head hurt, don’t worry. Instead of trying to figure out how to make the 5-inch squares for the border work for the quilt center, make the quilt center work for the border. Simply add narrow, solid borders to the quilt center’s top and bottom and left and right to bring the measurements out to an even 65 and 75 – both which can easily be divided by 5 for your pieced border. On the left and right, you’d add a 1-inch finished strip (so cut it 1 ½-inches to allow for seam allowances) and on the top and bottom you will add a 3-inch finished strip (cut 3 ½-inches to allow for the seam allowance), to bring it to 75. Then proceed as you did above.
These narrow strips are often used in quilt patterns. Some quilters call them coping strips. Some call them floaters. I call them sanity.
Now let’s say you have a lot of scraps left over that you really want to use. The scraps are fairly good-sized, but you want to use them up (because if they’re used up, it’s a great excuse to go fabric shopping and restock your stash). Instead of making squares, you could always make rectangles. Let’s take the dimensions of the first quilt center we were dealing with – 64 and 72. Both of these numbers are also divisible by 8. So, you make want to design rectangles, 4-inches tall by 8-inches wide as your borders. You could piece them or simply make solid rectangles out of your left-over fabric. The choice is yours.
My favorite pieced borders are checkerboards and piano keys. They use up a lot of scraps and pull the colors of the quilt together nicely.


And don’t be afraid to mix up techniques when you design your quilt borders. Echo blocks and applique motifs to make your border sing in harmony with your quilt center. Above all else, don’t limit yourself to plain borders. Consider borders a wonderful opportunity to let your creative juices flow and your imagination soar. The skies are the limit!
There will not be a blog next week, as it’s time for the Annual Fields Family Vacation. However, when I return, I want to talk about applique borders and mitered corners and then touch on one more usual border technique. All of these are a lot of fun, too.
Until later, Quilt with Excellence!
Love and Stitches,
Sherri and Sam