Categories
Uncategorized

Hand-Sewing Needles — More than Meets the Eye

There are three kinds of quilters:

  1.  Those who embrace hand sewing.
  2. Those who hate hand sewing and avoid it at all costs.
  3. And those who vacillate between the two.

I quilt with a couple of die-hard hand piecers and quilters.  I also quilt with quite a few folks who are hard-core second category machine quilters.  Me – I’m in the third category.  I love to machine piece and machine quilt.  However, a part of me also loves the process of hand piecing and hand quilting.  Handwork – whether it’s piecing, quilting, or applique – slows me down, allows me to take a deep breath, and find peace.  It’s the steady pull of the needle and thread which allows me to sort through the trouble of my day and put things (mentally) in order.

That said, I want to talk about hand sewing needles today.  No matter how much of a die-hard machine quilter and piecer you are, there will come a point where you must put a stitch or two by hand into something.  The job is easier and more enjoyable when you have the right needle.  There’s a lot of information in this blog, so sit back, get a cup of something warm and caffeinated, and make some notes.

Let me also put this disclaimer in right here:  Much of this blog is my opinion about hand sewing needles I’ve used.  What works for me may not work for you.

The popular opinion among die-hard sewing machine enthusiasts who would rather do anything other than hand stitch is this — the needles don’t really matter if you’re only occasionally sewing a corner closed or stitching on a label.  I beg to differ.  The right kind of hand sewing needle is just as important as the right kind of machine needle.  It makes your job easier and it vastly improves the quality of your work.  I’ve employed some kind of hand sewing for 35 years – both in garment making and quilting.  Just as there are different sizes and types of needles for machine work, there are different sizes and types of hand sewing needles.  We’re discussing this, but first some general information about all hand sewing needles.  And for future reference with this blog, when the term “needle” is used, it refers to hand sewing needles only.

Needles are packaged in cardboard envelopes or these really cool clear containers.

With either type of packaging, somewhere on it there’s information about the needles  and it’s important to know what the information means.  First, there’s usually the type of needle – sharps, tweens, milliners, etc.  If you know exactly what type of needle you need, this is where you start.  However, after the name, there’s usually a number (or several numbers), and this is where it can get confusing if you don’t know how to interpret the numbers.  The larger the number, the smaller the needle.  The smaller the number, the larger the needle.    I know that sounds completely counter intuitive, but this is the way hand sewing needles work.  For example, a size 12 needle will be finer and shorter than an 8 – which will be thicker and longer.  It’s the eye and tip sizes of these needles which determine what kind of thread can be used and what fabric they work best with.  Eyes can be small and rounded or long and open.  Points can be sharp, blunt, or be classed as “ballpoint.”  All of these facts should be taken into consideration when pairing a needle with both thread and fabric.

Below are some general categories of needles, what they’re used for, and their characteristics.  If you Google hand sewing needles, you can get a lot more information.  I painted this blog with kind of broad strokes.

Sharps

These are general purpose, medium-length needles.  They’re used for garment making and other types of general sewing.  These come in all different sizes and it’s a good idea to have a pack which has several sizes in it for all your sewing needs.  If you focus in on a size you consistently use, you can also purchase a pack of sharps in just one size.  These are medium-length, have a sharp tip, and a small eye. 

Sizes:  2 – 12

Ballpoints

Ballpoints have a slightly rounded tip, which makes them ideal to use with knits – the needle will pass through the fibers rather than pierce them. 

Sizes:  5 – 10

Chenille

Chenilles are used for embroidery and thicker yarns.  They have a sharp point and an elongated eye.  Most commonly used for cross stitch and needle point, they can be used on any tightly woven fabric due to their sharp tip.  These are used a great deal with wool applique.

Sizes: 13 -26

Tapestry

These are also used for embroidery, but unlike the chenille needle, they have a blunt point.  Tapestry needles are used on loosely woven fabrics so the needle will pass cleanly through the fibers.  Some cross-stitch fans and needlepoint aficionados prefer this needle over a chenille.  They have an elongated eye. 

Sizes:  13 – 28

Crewels

These are also called embroidery needles and have a medium eye and a sharp tip. 

Sizes:  1 – 16

Upholstery

Unlike most other needles, these can be curved, which make them idea for upholstery and furniture work, as well as some doll making.  They’re perfect for sewing areas where you can only access the outside of the object.  They have a very sharp tip.

Sizes: 3-inches – 18-inches

Betweens, Tweens, or Quilting

I’ve heard this particular needle called all three names.  These are for sewing through thick quilts and have very sharp points.  They are short and fine and have a round eye.  The shorter length is designed to produce nice, small, even stitches on quilts.  They can also be used for fine and precise stitches in tailoring.  These are thin, short, and have a sharp tip.

Sizes: 1 – 12

Beading

Beading needles are used for the obvious – sewing on beads.  I’ve also used them to sew on sequins.  They generally are very fine and thin, as they have to go through the eye of small beads (like seed beads).  They are longer than most other types of needles and have a sharp tip. 

Sizes:  10 – 15

Bodkins

These “needles” are large and blunt.  And I put needles in quotations marks because these can be made of plastic.  I’ve never really thought of them as needles, although I suppose  those made of metal could be.  They are large, flat needles used to thread elastic through casings.  When my daughter was young and I made all of her clothes, I would use a safety pin to do this.  Then I found Bodkins and they worked one hundred percent better than a safety pin.  I also used them to run ribbons through the smocked dresses I made her.  These have a very rounded point, so the tip does not pierce the fabric, which makes it super-efficient threading anything.  However, if you’re making baby or doll clothes with tiny casings, a small safety pin will work better.  Most Bodkins are too long to work efficiently in small areas.  They are on the long-ish end of the needle family. 

No sizes

Darners

Darning needles are used for mending.  They have an elongated eye for thicker thread and a semi-blunt point.  If you knit, you probably use one of these needles for sewing seams together. 

Sizes: 1 – 9, 5/0 – 9, and 14 – 18

There are also what I call “specialty” needles which don’t fit into these categories:

Leather – Sizes 3/0 – 10 used for leather and faux leather.

Milliners  — Sizes 5/0 – 10 used for hat making and crafts.

Milliners

Sailmakers – Various sizes and used for canvas.

Self-Threading – Sizes 4 – 8.  These needles typically thread from the top of the eye instead of from the side.  Instead of inserting the thread through the eye, you simply push it through the top of the needle.  I like to use these needles when I’m tying a quilt or using really thick thread or yarn. 

Self-Threading Needles

It’s worth mentioning  some hand applique enthusiasts like using Milliners for needle turn.  They just always seemed too big for my hand – I have trouble controlling them.  However, I have small hands and fingers, so that may be the issue. 

Now let’s get down to the nitty-gritty.  Let’s talk about needle brands.  I’ve listed my favorite brands below in the order I prefer them:

  1.  Tulip
  2. Roxanne
  3. Primitive Gatherings
  4. John James (those only made in England)
  5. Clover Black Gold
Tulip Needles

We’re going to begin with Tulip and why I like them so much.  It all has to do with the way they’re manufactured.  Most needles are made in small, circular motions, with the steel either rotating clockwise or counterclockwise. 

Tulip needles are made like this:

They roll off with the rotation spun lengthwise, the length of the needle.  While this seems like a minor manufacturing change, it actually allows the needle’s length-wise grain to work with the motion of hand sewing.  The clockwise or counterclockwise manufacturing works against the motion of hand sewing.  So, Tulip needles makes the hand sewing process less of a strain on your wrist and fingers.  If you’re only putting in a few stitches here and there, this isn’t a huge issue.  However, if you’re pushing a needle through fabric for hours at a time, this one manufacturing change takes so much pressure off of your hands.  And if you’re like me and have a bit of carpal tunnel, it’s a huge benefit. 

Roxanne needles are a little longer and a little finer than standard needles.  The eye is also a bit bigger.  So, if you struggle to thread your needles, this brand may be just what you’re looking for.  They are also evenly tapered and has great plating – making them stronger than a lot of needles.

Many of you may be acquainted with Primitive Gatherings for their wool, fabric, and patterns.  And they’ve always carried needles.  But in the last several years they have come up with their own line of needles.  I have not used their chenille or embellishing needles, but I have used their binding needles and I love them – and not just for binding.  They are long, thin, strong, and have a large eye.  I love them for binding, but they are a great all-around, general sewing needle. 

Even if you haven’t quilted but a short while, you’ve probably heard of the John James brand of needles.  This is one of the standard needle brands requested by sewing teachers everywhere.  It’s one of the oldest needle manufacturers, formed in the United Kingdom in 1840.  Any needle size, any specific needle you needed, John James has it.  And up until most of the needles started being made in China, these were an excellent needle choice.

Clover is a familiar brand name among most sewing and crafting enthusiasts.  This company produces many, many great sewing notions, including a range of needles.  However, a few years ago they came out with the Clover Black Gold Needles.  I came across them entirely by accident.  I arrived for a hand applique class at my LQS and realized I had left my needles at home on my sewing table.  When I asked the store owner if she had any John James (since this is the brand most quilt stores have in stock), she told me “No – try these.  They’re way better.”  And she sold me pack of Clover Black Gold Applique Sharps.

It was love at first stitch. 

These needles are ultra-fine, extremely sharp, and produce 30 percent less friction than other needles (with the exception of perhaps the Tulip brand).  They’re coated with a black plating to resist rust, and it’s a good idea to wipe the needle with a fabric scrap before using just to make sure there is no black residue.  The only drawback to this needle is the eye is extremely small – but then again, it has to be because the needle is very fine.  There are ways to deal with a small eye, and we’ll discuss them later.  However, it’s the fineness that makes this needle a stellar one to use in applique.  It’s so thin, it easily slips between fabric and freezer paper.  It’s also one of the best needles (in my opinion) to use with silk thread. 

However, as much as I love the Clover Black Gold Applique Sharps, I’m not crazy about their hand quilting needles.  The needles are very thin and seem to break easily when passing through the bulk of a quilt sandwich. 

Now that you know what my favorite needle brands are, let me ask a question – do you know what they all have in common?  I’ll wait while you ponder this question (cue Jeopardy music).

If you guessed they’re manufactured in either Japan or England, you’re correct.  The exception to this maybe Primitive Gatherings needles – I couldn’t find where they were made.  So, let’s talk about why this is important.  The simple fact is these countries have produced needles for a long, long time and they know what they’re doing.  They don’t cut corners, rush production, or use poor quality steel.  My beef with John James is that they have shipped most of their manufacturing to China.  If you’re a John James fan, make sure the pack states “Made in England.” Yes, labor and goods are cheaper in China, but it shows in the product.  Take a look at this:

If you look closely at the eyes of some of these needles, you can see they’re incorrectly manufactured.  Look at the crud in the eyes.  This would certainly make threading the needle difficult.  And more than likely, these burrs would cut your thread, making the entire hand sewing experience a nightmare.  When purchasing any hand sewing needle, you want to make sure the eye is clear, and the shank of the needle is smooth.  Tips should be sharp (unless they’re ballpoint, bodkin, or tapestry).  And generally, cheaply produced needles don’t hold up to these standards.  As a matter of fact, in my opinion, if you have needles that come in these types of packages:

Toss them.  Overall, they’re poor quality.  Most of these are found in the “Begin to Sew” or “Begin to Quilt” kind of packaging. 

I can hear some of my all-machine-quilting-all-the-time folks from here – “But we’re only taking a stitch or two.  The type of needle we use doesn’t matter that much.”  And in all honesty, if you’re that solid of a machine piecer and quilter, it doesn’t.  However, needles – even the top-of-the-line ones – aren’t expensive.  Treat yourself.

Finally, let’s talk about some needle notions which make your hand piecing life easier.  The first one is this timeless little gadget:

A thimble.  I’m ashamed to admit it, but I quilted over 30 years before I learned to use a thimble.  I blamed it A) I was never taught how and B) I now had fake nails and I couldn’t get any thimble to fit correctly.  And my dilemma wasn’t for lack of trying.  I had a handful of thimbles I had purchased and just couldn’t seem to work with any of them.  It wasn’t until I had my finger fitted and purchase the right size of thimble with an open top (to accommodate my nail), that I learned the joy of using a thimble.  It helps you get and maintain a rhythm as well as protects your fingers.  I promise a blog is coming on this soon.

The next is this notion:

A table-top needle threader.  I know there are lots of needle threaders which look like this:

However, I’ve found that they break easily and  I had trouble maneuvering the wire through a small, round eye.  The table-top needle threader accommodates all types of needles and all sizes of eyes (even the very small ones).  Plus, this is an inexpensive gadget.  If the eye of the needle is so small it still is difficult to thread even with a threader, first make sure the eye is free of any burrs.  After that, if you’re still struggling, check your thread.  If it’s a three-lobe thread, it may be too thick for the eye.  Try switching to a two-lobe thread – it will be just as strong as the three-lobed, but it will be finer. 

Some quilters like these:

Needlebooks.  They allow you to keep all your needles in one place, arranged by size.  And they are handy.  I don’t use one – I simply keep my needles in the package they come in.  I’ve sewn long enough that I even prefer one brand over another for specific tasks.  If I put all my needles in a book, I wouldn’t be able to tell the brands apart.  However, I do use this little jewel a lot:

It’s a Quilter’s Dome and it allows you to keep threaded needles in one spot.  I find this really handy with applique.  Most of the time, I used fine cotton thread in a color which matches my fabric with my hand applique.  I may have as many as a half-a-dozen needles threaded at one time for a project.  I can keep them all in here.  The needles remain threaded and the threads (for the most part), don’t get tangled. 

There are also these two thread conditioners:

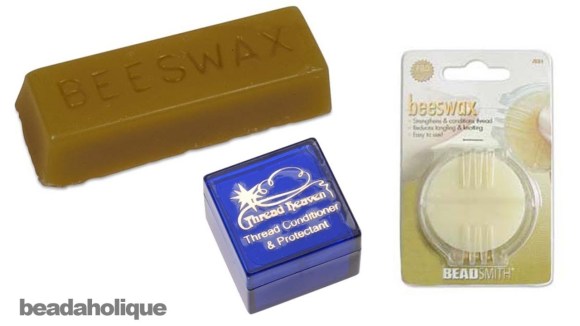
When you run your thread through either of these, they leave a residue on your thread which keeps it from tangling and knotting as you hand stitch.  My preference is the beeswax.  I’ve used beeswax since I began sewing and to me, it just seems to work better. 

Lastly, when do you know it’s time to throw a hand sewing needle away?  With sewing machine needles, we know those have about an 8-hour shelf life.  Are hand sewing needles any different? 

Sort of.

The amount of time they can be used before tossing them varies with the brand and how much you’re using them.  If you only take a stitch or two now and then, the needles could last you a pretty long time.  If you’re using them consistently for hand sewing or hand applique, their lifespan is shorter. Rule of thumb for me is this:  When the needle becomes difficult to push through the fabric, it’s time for a new one.

What about a bent needle?  Should you toss it immediately?  That depends entirely on you.  One of the best hand quilting needles I ever had was slightly bent.  I almost cried when it did finally break.  If a bent needle is still sharp and you like it, the quilt police aren’t going to force you to toss it.  However, if it slows you down or makes the process difficult, don’t be afraid to throw it in the circular file. 

This is probably information than you ever wanted to know about needles.  In summary, here’s probably what you need to remember:

  1.  Needles made in Japan and England are the best.
  2. Use the right needle for the right job.
  3. Inspect your needle to make sure the eye is clear, the shank doesn’t have burrs, and the tip is sharp (for those needles that need a sharp tip).
  4. Needles aren’t expensive – even the best ones.  They’re an affordable quilting luxury.  Treat yourself.  Replace as needed.

Until next week, Level Up Your Quilting!

Love and Stitches,

Sherri and Sam

PS – Standard disclaimer:  I don’t work for any of the companies listed in today’s blog, nor do I receive any free merchandise for recommending them.  I mention them because I use them, love them, and recommend them to my friends.

Categories
Uncategorized

Getting Myself Organized

One of the most frequent questions I get asked concerns how I organize myself for projects.  There are several answers to this question.  A lot of it depends on the project.  Some of it depends on where I’m making it (a quilt retreat, a friend’s house, my mom’s home, or my studio).  A tad bit even depends on my mood.  The one concept which stays constant in all of this is that quilting isn’t my only job.  My husband and I own our own demolition and environmental company and I’m the CFO.  Some weeks I work 60 hours.  Some weeks I may only clock in 20.  This forces me to stay semi-organized, so if I can snatch just 15 minutes of sewing time, I can make the most of it.

The first item to discuss is the fabric itself.  I’ve come a long way from the corner of my kitchen in the mid-1980’s where I was the Queen of Fat Quarters. I have more room, and thus more fabric.  In addition, during the Pandemic shutdown, I’ve done my part to help our quilt stores stay open.  I purchased fabric from LQSs across the nation in an effort to keep them up and running and help the owners keep their bills paid and food on the table.  I really, really need to sort and straighten again.  Let me also put this fact in right here:  There are literally hundreds of thousands of ways to store fabric. Google fabric organization and literally hundreds of blogs and pictures will appear with the click of a mouse.   In earlier blogs I’ve highlighted the way I purchase fabric and how I organize my vast textile collection.  In a nutshell, here’s a repeat:  I flat fold anything over a yard.  Fat quarters and single yard cuts are folded and wrapped around cardboard inserts used for comic book display (these are way cheaper on Amazon than the cardboard bolts for fabric).  And any scrappage 8-inches square or larger is sorted according to color and placed in bins.  I do occasionally purchase bolts of fabric and these few items are stored along a wall.  The way I store my fabric will differ from the way you store yours due to space.  You must make your storage area work for you – it has to be kept semi-organized and you have to be able to see what you have.  So, Google and Pinterest ideas until you find something which fits your space and your quilting style.  Let me also insert this thought:  The storage system which works well for you now, may not work in three years.  Be flexible and open to change.

As far as purchasing fabric, my rules of thumb still are the same.  If you’re purchasing for a pattern, be aware most or them already allow for the “oops” factor – in other words, they’re giving you several inches of extra in the fabric requirements in case you mess up.  There is generally no need to purchase an extra ¼-yard to guard against any cutting or sewing mistakes.  If you’re purchasing fabric which has no real clear purpose other than you like it, three yards will usually cover any quilting needs.  If you’re buying the material with applique in mind, one yard should do the trick.  But if you find a fabric which completely wins your heart over and you simply cannot live without, buy five yards.  Why so much?  First, five yards will cover its use in at least two quilts.  And if you love it enough to buy five yards, you will want to use it in more than one quilt.  Second, once a fabric is out-of-print, manufacturers will rarely ever reprint it.   Yes, Ebay and Etsy can save your quilting sanity, but why take the chance.  In my entire quilting career spanning 34 years, I’ve only known one textile manufacturer to reprint a fabric more than once.  And it was a panel, not a fabric line.  If you really, really love the material, purchase the entire bolt.  I’ve done this a couple of times – primarily it has been for backgrounds/neutrals.  I’ve purchased prints twice.  And except for the bits and pieces in my scrap bins, every inch has been used.

When I initially discussed my fabric purchases, one item I didn’t include was quilt backing material.  It was probably around during that time span, but it never registered with me because I didn’t have a long arm then.  I was quilting all my tops on Big Red, who manages pieced backings just fine thankyouverymuch.  Enter my long arm, and suddenly backing fabric became important because Leanne prefers it over a pieced back.  How do I manage backing fabrics?  Backing is wider than regular fabric.  Whereas a bolt of “the normal stuff” is 44-45-inches wide, backing fabric can run from 108-inches wide to even wider.  Therefore, it does take more shelf space.  Typically, I purchase backing fabric as needed, due to the space issue.  That, and we all know there may be months weeks of time between stitching that last seam on a top and putting the first quilting stitch in the sandwich.  When a quilt is prepped for Leanne, then a backing is purchased.  However, let me throw this out here – quite often you can find a lovely backing fabric for the front of your quilt.  With The Fish Almighty quilt I’ve made the DH for Christmas – the background fabric is a backing.  And I’m prepping an applique quilt right now and the background is a backing fabric from the Bella Suede line of P&B Textiles.  Both of these quilts required significant yardage, and once I crunched the numbers, the backing fabric actually saved me money. 

With any fabric which makes it way through my front door, it’s first stop is my washing machine.  I’m a pre-washer and if you wonder why, go here: https://sherriquiltsalot.com/2017/09/01/to-prewash-or-not-to-prewash-thats-the-question/.  It’s washed and draped over a drying rack.  Once dried, one of two things will happen.  If it’s fabric which has been purchased for a future use, it’s ironed and either put on a cardboard insert or flat folded.  However, if it’s been purchased with a specific quilt in mind, it’s starched and ironed before I cut it.  I don’t starch any fabric until I’m ready to use it.  The reason behind this is I use real fabric starch – not Best Press or other starch alternative.  And starch can attract bugs.  So, the fabric that hangs out with my stash gets a good pressing but no starch.  Fabric immediately destined for the cutting mat gets pressed and starched.  And then it’s rotary cut according the pattern directions, regardless of whether or not I’m starting the quilt immediately or in a week or three.  

 I often am asked why I do this – cut everything out when I’m really not sure when I’ll start making the quilt.  I do it for three reasons.  The first concerns the fabric itself.  If there’s a mistake in the fabric requirements or I make major cutting errors, then chances are that particular fabric is still available.  Six months from now, this may not be the case.  Secondly, cutting the fabric is my least favorite activity about quilting.  I’d much rather get it over with.  I even cut out the binding.  Plus, knowing  I have the quilt already cut out and waiting for me in a project box makes me feel all warm and eager to start.  The third reason is the project box itself.

I use project boxes.  Most of the time they’re either the plastic storage tubs from the dollar store or these (my favorites) from our local office supply place.  I have plenty of room in the boxes.  I have also come in possession of these: 

Also pretty darn perfect and free from a friend.

I’d like to park it here and explain what I put in the project box.  There’s the cut-out quilt, of course, and the pattern.  However, I also add in any special quilting notions, rulers, templates, etc., to the box.  If it’s an applique quilt, I toss in specialty threads, fusible webbing (if needed), and anything else required except my applique tools (which have their own box).  If I have the backing at this point, I don’t put it in the box because it takes up too much room.  This system makes it super-easy to grab the box and begin the quilt no matter where I’m constructing it – my studio, a friend’s house, my mom’s, or at a quilt retreat.  It just makes my quilting life a tad bit easier – I’m not running all over my studio hunting down everything – it’s all nicely packaged together.  I realize that bags can be used for this purpose, but for me, it’s easier to see I have everything if I put it in a box.

How I handle the basic supplies is a bit different.  I tend to purchase those in bulk.  Here’s why:  Hancock Fabrics is out of business.  There was a Hancock’s near my house and if I needed anything, it was literally 10 minutes to the store and 10 minutes home.  But now?  Totally different story.  Where I live, there are no longer any fabric stores near me (and I’m not counting Hobby Lobby – their line of sewing notions is limited).  If I run out of something, I’m doomed until I can get some delivered or make the 20 – 30 minute trek across town.  Thus, I purchase the basics – such as thread, needles, and bobbins – in bulk.

Big Red is my primary sewing machine, and I always have her threaded and ready to go.  One of the great things about quilting verses garment making is thread.  When you make clothes, the thread has to harmonize with the fabric.  With quilting, you’re primarily working with neutrals.  I always make sure I have a stash of black, dark gray, light gray, and beige-ish thread.  However, the one neutral missing in that list is white.  I don’t – as a rule – use white thread unless the entire quilt is white.  A beige or ecru thread will blend with the white and any other color put with it.  If the light gray thread is super-light, it will work just as well.  The fact that quilters can use these standard colors is great because we can take serious advantage of thread sales.  You all know I’m a thread snob and I like long-staple thread.  If I run across a great thread sale, I can use it to my full advantage and none of the thread will languish in my thread cabinet.  It will all be used. 

Another kind of thread-snobby thing I do is purchase pre-wound bobbins.  I know I can wind my own, but the pre-wounds have so much more thread on them than any bobbin you can wind on your sewing machine or a bobbin winder.  It saves me time and – in the long run – thread.  Like the spools of thread, I can purchase my pre-wounds in the basic quilting neutrals and take full advantage of the sales.  I purchase my pre-wounds from Superior Thread (go here https://www.superiorthreads.com/).  They have a great selection of both bobbin styles and colors and wonderful customer service.  They also tend to run sales pretty regularly, so at least go to their website and get yourself put on their email list, so you’ll know when these happen. 

While we’re talking about buying in bulk, you may also want to do the same with the sewing machine needles which are used in your primary sewing machine.  Big Red likes Schmetz or Organ.  Superior Threads has both brands of these needles in the size I use the most – microtext, quilting, and topstitch needles. 

I am prepping a future blog on setting up your sewing space, but I will share this bit of organizational wisdom right here:  Command Hooks are your bestest friend.  I use these in lots of areas in my studio, but the one which is the most useful is this:

It’s on the left side of Big Red and my small sewing scissors hang there.  I place them on the hook after each sewing session, so when I return to my studio, I know exactly where they are. 

Keeping your sewing space organized is important, and what works for me may not work for you.  No matter what storage system you use or how you set up your sewing machine area, it’s important to keep a few commonalities in mind:

  1.  As much as possible, have your fabric arranged so you can see it. With some studios, such as mine, my fabric is out in the open.  But once upon a time, it was in a cabinet.  Wherever it is, just make sure you can eyeball it and know what you have.  I have mine arranged by color (except for holiday fabrics).  This works for me.  But I also know quilters who have their fabric arranged by designer and/or family.  It’s whatever system works best for you.
  2. Find a way to keep your project(s) organized.  For me, boxes work best.  Some quilters use 1-inch deep trays.  The main concept behind this type of organization is to save yourself time.  If you can employ a project storage system which allows you to keep your quilt, the pattern, and any required notions such as specialty thread, templates, or particular rulers together, this will save you a lot of time in the long run.  Future you will thank the past you for keeping all this stuff together, so you don’t have to run it down when you’re ready to quilt. 
  3. Be consistent with your fabric.  If you’re a pre-washer, wash all your fabric before you store it.  This is a good idea for two reasons.  First, you’ll never wonder if it has been prewashed and second, when you’re ready to cut the quilt out, this step is already taken care of and you’ve saved some time.
  4. You’ll never regret having a good supply of quilting basics, such as rotary blades, machine needles, thread, and pre-wound bobbins.  I look at it this way – remember when COVID started and everyone was making grocery store runs for toilet paper?  For years my family poked fun at my tendency to purchase this commodity in bulk, especially after both Meg and Matt left home and it was just Bill and me.  They don’t any longer.  You’ll never regret having a stash of machine needles on a Friday night at midnight in the middle of a quilting session and your needle breaks.  If you have a stash tucked away somewhere in your sewing area, you can keep on stitching until the sun rises without waiting for the fabric store to open on Saturday or Amazon Prime to deliver them on Sunday.  The items I’ve listed are consumables.  Sooner or later they’ll all be used and used up.
  5. Keep you sewing area as organized as possible.  At least know where your pins, seam ripper, stiletto, and scissors are.  The Command Hooks work great for me, but you may want to use something else.  Bottom line is this – know where they’re at so you don’t lose time looking for them.  And put them back where you keep them after your sewing session is over. 

The simple steps I’ve written about in this blog has saved me time and sanity.  Quite often I only get a few minutes a day in my studio and I try to make every second count.  Knowing my fabric is ready and I have everything I need at my finger tips allows me to make the most of my time.

Until next week, Level Up Your Quilting,

Love and Stitches,

Sherri and Sam

PS — Standard disclaimer applies. I am not employed nor to I receive any free products from Command Hook, Superior Thread, Amazon, or any other companies listed in any of my blogs. I recommend and support suppliers and companies which I use on a regular basis that offer consistently wonderful products and stellar customer service.

Categories
Uncategorized

Log Cabins

When Log Cabin quilts are mentioned to anyone – quilter or non-quilter – most folks can conjure this image:

“Traditional” Log Cabin Block

Log Cabin blocks and quilts are easily one of the most recognizable quilting images.  Their appearance – strips of fabric sewn around a center square – is one of the most iconic quilting visuals.  Some quilt histories tell us the Log Cabin quilt came of age in the in the middle to late 19th century and they were designed to honor President Abraham Lincoln, who was born in a log cabin in Kentucky.  Quilt historians will inform you that the squares in the middle of the blocks were either red – representing the hearth of the home – or yellow – representing the light in a window.  Typically, one side of the block was made of darker fabrics and the other side was made of lighter fabrics, allowing for some stunning layouts known as Barn Raising, Sunshine and Shadows, and Streak O’ Lightening. Quilt historians also may add this interesting tidbit:  A true Log Cabin Quilt was always tied, never quilted.

And most of that is outright lies.  So, hang tight and let me blow some quilting gaskets.

First of all, let’s talk about the real history of the quilt and quilt blocks, because everything else – from the kind of fabric used to where most Log Cabin quilts originated from in the United States – depends on the quilty truth.  And the truth is, the Log Cabin block has been around for literally thousands of years – not just mere hundreds.  According to Barbara Brackman’s date base, America’s earliest signed and dated Log Cabin Quilt was made in 1869.  The British Quilt Heritage Project found Log Cabin Quilts dating from the late 1800’s to early 1900’s.  However, the National Museum of Scotland is in possession of a small box made for sewing tools which has the Courthouse Steps (a variation of the Log Cabin we’ll discuss a bit later in this blog) embroidered on it that dates to the mid 1700’s. 

However… if you boil down all the myths, fiction, and facts concerning Log Cabins, you will probably find Ancient Egypt at the bottom of the pot.  That’s right…

MUMMIES

This is theory, but it’s pretty plausible.  Think Valley of the Kings and 19th century British archaeology (I’m having flashbacks of the movie, The Mummy right now).  When these tombs were opened, archaeologists found hundreds of animal mummies.  Apparently, Egyptian royalty wanted their pets with them in the afterlife, so these critters were mummified along with their owners.  Some of these animal mummies found their way back to England and are now in the British Museum of History.  If you have a chance to look at the small mummies either on the internet or in person, you’ll find some of these have Log Cabin designs on them.  France was also caught up in the archaeology/mummy frenzy.  Some of their archaeologists accompanied Napoleon to Egypt in the early 19th Century and returned with the Log Cabin design shown clearly in their pictures and drawings.

Janet Rae from Edenburgh, posits another theory about Log Cabin design:  land cultivation.  This idea takes into consideration the type of land cultivation known as “run-rigs” from the Middle Ages in both Europe and the British Isles.  During this time the farmers had both wet and dry fields to farm, and these were called run-rigs.  Early maps and drawings of the run-rigs look very much like Log Cabin blocks.  It is possible that someone drew inspiration from the actual run-rigs or drawing of them and made the first Log Cabin blocks. 

Along with these two theories, we have to keep in mind that Log Cabin blocks have popped up in other locations, where there is no clear theory about just how they got there.  There are the Log Cabin blocks from the Isle of Man called The Roof Pattern.  Here the blocks are folded pieces of fabric hand sewn onto a fabric foundation.  The unusual issue about the Isle of Man is that is very isolated.  No one is exactly sure how the inhabitants came up with the idea of a Log Cabin quilt.   Canada also has its own version called Canadian Logwork.  If the pattern traveled across the sea from England and then Canadians made their own version or if the Canadians came up with the idea all by themselves is not known. 

Thus, the real origin of the Log Cabin block is a bit of a mystery.  Since needlework was traditionally a woman’s field of expertise, the male historians obviously felt it wasn’t worth mentioning.  We may never actually know when and where the Log Cabin block developed.   In this blog I want to look at the Log Cabin from strictly an American viewpoint.  So, let’s dive in and return to America in the mid-19th century when the Log Cabin block was in its heyday and blow a few more quilting gaskets. 

During the time of the Abraham Lincoln administration (1861-1865), we saw the pattern begin its rise in popularity, culminating several years after his assignation.  The myth around the block’s sudden fame in the quilting world embraces the idea the Log Cabin Quilt was designed as a type of  tribute to Lincoln’s Kentucky birth in a log cabin and the fact he spent a good many of his formative years growing up in one.  Since we already know that’s a myth – Log Cabin blocks and quilts had been around a lot earlier than even 1850 – let me also blow a gasket about most of the quilts originating in Kentucky.  From what some quilt historians can determine through quilt inventories and wills, most of the Log Cabin Quilts originated in Indiana.  That’s not to say Kentucky didn’t have quite a few Log Cabin quilts of their own, it’s just the majority of Log Cabin quilts listed in wills and household inventories are from Indiana.  And the earliest dated American Log Cabin quilt came from Kansas. 

 Now that this myth is put to bed, what about the theory which embraces “true” Log Cabin quilts are tied, not quilted?  To a degree, this is correct.  While we tend to construct our Log Cabin quilts out of 100 percent quilter’s cottons, batiks, or flannels, the early Log Cabin quilts were made out of just about anything – wool, flannel, velvets, cottons – whatever the maker had on hand, that’s what was used and often several types of these fabrics were combined in a single quilt.  Add to this fact many of the quilt blocks were pieced on fabric foundations and you have a quilt with a lot of bulk.  Hand quilting was out of the question.  The quilt was tied.  Sometimes the quilt top was so bulky and heavy, a batting wasn’t used.  It wasn’t needed.  The quilt top and backing would keep you plenty warm at night. 

How about the idea that in the early Log Cabin blocks, the center square was either red or yellow? This seems to be true both and untrue.  The earliest Log Cabin designs – those which pre-date our mid-19th century American Log Cabins — do not use a “standard” center square color.  It was only when quilters embraced the Log Cabin to symbolize Lincoln that we saw the use of red or yellow fabric for the center square.  There is another myth in quilting lore which states if a Log Cabin quilt was hung outside a house or cabin and the center squares in that quilt were black, then this was a stop on the Underground Railroad.  That is false. Despite what any historian says, a direct link between quilts and the Underground Railroad has never been factually substantiated.  And today, most of us don’t use either color in our centers.  As a matter of fact, my guild is using a Log Cabin design for our 2021 raffle quilt and the center block is raspberry-colored.  The last Log Cabin quilt I made used blue in the center. 

Finally, what about the block using dark fabrics on one side and lighter fabrics on the other?  This myth turns out to be mostly correct.  In order for the block to look like what we perceive a Log Cabin block to be, this has to hold true to some degree.  Even from the earliest Log Cabins – either on animal mummies or those inspired from run-rigs — there is a clear distinction between the two sides of the block. 

This may be more than you ever wanted to know about Log Cabin blocks and quilts.  I like to know the past behind quilty issues, as the this is what initially drew me to quilting in the first place.  Now a days we can choose to honor the traditions by incorporating them in our quilts, or we can decide to make these blocks our own by constructing them in ways that make us happy. 

As I begin to talk about constructing these blocks, let’s take a look at some traditional Log Cabin blocks:

We’ll talk about the block on top first.  The strips of fabric around the center square are called “logs” and you’ll notice the logs on this block are wide.  One of the great features about Log Cabins is their versatility.  You can make the blocks as large as you need simply by adding more strips around the center square.  And the “logs” can be just about any width you desire as long as you keep in mind the Golden Ratio.  Let’s look at an example.  Let’s say you have a stack of 2 ½-inch squares you want to use as the centers of your blocks and you want to know your log options – how wide can you make them and how narrow could you make them and the block still look balanced?  Remember from my past blogs, the Golden Ratio is the number 1.61803399.  When we’re using the GR to “math” out quit issues, we shorten this number to 1.618.  To see what is the widest possible strip we can use for our 2 ½-inch square, we multiply 2 ½ by 1.618.  This gives us 4.045 or 4-inches.  However, don’t stop at 4-inches.  That’s incredibly wide.  We divide that by the four sides of our block and get 1-inch.  The widest we could make our strips is 1-inch (finished) for our 2 ½-inch center square and the block still look balanced. 

To discover what’s the narrowest we could make our blocks, we divide 2 ½ by 1.618.  this gives us 1.5451117 or 1 ½-inches, which we divide by four again.  This answer is .386279 or 3/8-inch, finished. 

Both of those numbers tell us we can make our finished strip widths anywhere from 3/8-inch wide to 1-inch wide and those strips will look nicely balanced against our 2 ½-inch squares. 

Now that the math-y part is out of the way, there are a couple of other construction issues which need to be considered.  First, be sure to cut your fabric logs on the straight of grain.  This step will make your blocks lie nice and flat.  The second issue concerns the strips themselves.  It’s really, really tempting to just rotary cut a bunch of strips, sew them on, and then cut off the excess.  Although it’s super-tempting and this is a super-easy way to make your logs – don’t.    Here’s why…

Remember back in 2018 when I blogged about quilt borders ad nauseum?    How you cut the borders to match the length and width of your quilt center and sewed them on that way, because this helped keep your quilt square?  The same principle applies to  the center of your log cabin block – and the larger the block, the more this applies because there’s more to keep square.  Let’s look at an example –and for the sake of simplicity, I’m using all unfinished measurements:

This is the log cabin block we used earlier.  The center square of the block is 2 ½-inches.  If we’re making our fabric logs 1-inch wide, then this means our first log is a 1 x 2 ½-inch rectangle.  Our third log would be 1-inches x 3 ½ inches.  The fourth 1-inch x 4 ½ inches, etc.  We would need to cut each individual log out to the size needed in order to keep everything nice and square.

However, I don’t use this method on Log Cabin blocks with very narrow strips. The narrower the strip, the harder it is to cut it out accurately.  Take a look at the center of this little quilt top:

This is from a Round Robin I did with my guild a few years ago.  The center log cabin blocks have super-narrow logs.  I honestly would have had a bit of a struggle cutting these out to the correct width.  Couple that with the fact that the narrower the strip, the harder it is to cut the fabric straight.  Since I didn’t want to waste my time or my fabric, I opted to paper piece these blocks.  If my Log Cabin blocks are either very small (6-inches or less) or have narrow logs (less than 1-inch finished), I personally think it’s easier to paper piece them.  I also believe it’s more accurate.  As with all paper piecing, you’re trading fabric for precision, but for Log Cabin blocks with slim logs, I think this is the simplest way to construct them.  If you decide to go this route with any Log Cabin block, it’s still important to cut your fabric strips on-grain so the block will lay flat and hold its shape. 

I also must say, I really like Log Cabin blocks with the narrow logs.  I’m not sure why the appeal more to me than the “traditional” looking Log Cabins, but they do.  Those narrow strips just seem to completely change up the block’s appearance. 

The Log Cabin block is beautifully simplistic – and the great thing about simple blocks is they’re really easy to change-up.  The quilter can tweak it here and there and suddenly it looks entirely different with very little work involved.  To date, Pinterest has over 556 variations of this block.  My EQ8 has 50.  While it’s impossible for me to cover all the variations of the Log Cabin block, I want to highlight four construction changes and six block ideas.  These are the most common variations the kept popping up on my Google searches. 

Construction Changes

  1.  Use Partial Seams – We covered this technique in detail in my previous blog about partial seams (https://sherriquiltsalot.com/2020/10/07/partial-seams-way-easier-than-they-look/), so I won’t go into detail again with that.  But just to jog your memory, compare the traditional block against a Log Cabin block which used the partial seam construction:
Log Cabin Block with Partial Seams
  •  Move the Center of the Block – Instead of putting the center square in the middle of the block, move it to a corner.  This is easy to do.  Instead of surrounding the center on all four sides with logs, just add the logs on two sides, or use more fabric strips on two of the sides than the other two.  Either way you chose, you’ve altered the blocks appearance while not having to undergo any complicated construction techniques.
  •  Enlarge the Center Square – While typically the center square can be larger than the width of the fabric logs, look what happens when the center is made much bigger.  This is a great way to showcase fussy cuts, embroidery, or applique.  In the block below, the center has not only been enlarged, it’s been made into a signature block. 
  •  Make a Vertigo Block – I’m not really sure what these are called:

But I call them Vertigo Blocks because they kind of make me dizzy.  My EQ calls them Twisted Log Cabins.  These occur when you really play with the fabric logs, and in fact with these blocks, the logs aren’t even strips – they’re triangles.  While personally I would paper piece these, if you’re a really fastidious piecer, I’m sure they can be rotary cut and sewn together. 

While we’re still on the topic of Log Cabin construction, I’d like to share with you a few organizational tips.  Log Cabins require lots of fabric strips in lots of different sizes.  These strips are often very close in length – sometimes there’s a half-an-inch or less difference in how long they are.  It’s easy to pick up the wrong piece and sew it on the block, only to have to turn around and rip it right out.  Depending on how many strips I have to work with, here’s a few ways I keep myself from getting confused.

I’ve used these:

These neat little trays are found at most dollar stores.  I get mine from Dollar Tree, and they come three to a pack.  I line these up and stick a post-it-note in the bottom of each tray indicating the length (and width, if I’m varying both lengths and widths of my strips). 

I’ve also used a TV tray.  If I don’t have as many logs surrounding the center square this works nicely.  I simply lay them out on the TV tray, starting with the shortest and ending with the longest.  I can park the tray beside my sewing machine and chain piece while marathoning Hulu.

If I’m making a huge Log Cabin quilt which entails lots and lots of strips, I have used either this:

Or this:

I can sort my strips and then hang them.  Again, both of these can be located near my  sewing machine, so I can chain piece and binge watch my new favorite series.

Lastly, let’s talk about variations on the Log Cabin block.  This simple block and be tweaked and changed for literally hundreds of different looks, but I want to show case the six I like the most.

My very favorite Log Cabin variation is the Pineapple Block.

Some quilters will claim this is a Square-in-a-Square block, but I’ve always heard it was a type of Log Cabin.  Sure, the center is kind of a Square-in-a-Square, but the rest of the construction is pretty much standard Log Cabin.  I’ve always loved the way this block looked when made from batiks.

Another popular Log Cabin block is Courthouse Steps.  If you look closely at this block:

You’ll see the difference between it and the traditional Log Cabin block is the construction.  In the traditional block, we sew the logs around the square in a clockwise direction.  With the Courthouse Steps, we sew the fabric strips around the center in the same manner we sew borders around the quilt center – sew the right and left side strips on and then the top and bottom ones.

Sometimes with the Log Cabin blocks, we can isolate the technique (fabric strips around a center) and use it in other ways, such as this block:

Or this block. 

You can also use this method in other areas of a pieced block to give it a different look.  My personal favorite is this:

Hearts.

I love hearts.  If you look closely at most of my quilts, you’ll find hearts quilted into the design at some point.

And if you’re really up to a challenge, try using them as hexagons or 60-degree diamond blocks   It’s really not that difficult.  For the diamond blocks, simply cut the center squares as 60-degree diamonds (we learned how to do that here (https://sherriquiltsalot.com/2020/07/01/60-degrees-of-separation/) and then proceed to sew the fabric strips on as normal.  This will give you blocks that look like this: 

Which can be pieced into a quilt that looks like this:

If you’re feeling really ambitious, the Log Cabin hexagons are fun to make and look super-complicated, but in reality, all they need is a little more pre-planning. 

Simply cut the center square as a hexagon – but don’t get too small.  This block screams for a large center which can showcase a fussy cut fabric.  The logs are sewn on the same way as a traditional log cabin, but there are a couple of steps that should be altered.

  1.  Instead of cutting out the strips true-to-the-size of the edge of the hexagon, allow at least for an extra ½-inch of length.  When the strip  is sewn on the side of the center, you need at least ¼-inch to hang off each end. 
  2. After the strip is sewn on, press it outwards. Then line a ruler up with the adjacent side of the hexagon and trim the extra fabric off, so it will be angled correctly.  Do this for each fabric strip, until you get to the last strip.  That strip will need extra length because it will have to cover two raw edges – the last one and the first one.

When you piece these hexagons together, they will need connector pieces just like any standard hexagon quilt.

Lastly, let’s take a look at Log Cabin quilt layouts.  The unique construction of the block allows for two great aspects of the quilt tops – no sashing is needed, and the light/dark sides of each block makes layout possibilities nearly endless.  Just make sure your blocks are square and the same size. 

You can run the lights and darks on the diagonal.  You can set them as a zig-zag (also known as Streak o’ Lightning).

You can arrange them to look as if they’re set on-point.

This layout is called Barn Raising.  It’s a fairly traditional layout, as far as Log Cabins go. 

They can be laid out to look like pinwheels or flying geese.

Honestly, the possibilities are only limited to the space you have to layout your blocks and your imagination.  Pinterest has over 300 different Log Cabin layout designs, if you do find yourself needing inspiration.  Not to mention the blocks can be used as a border treatment or incorporated into other layout designs. 

As I’m coming to the end of this blog, I hope you’re inspired to try a Log Cabin quilt of some type.  They’re a really fun and endlessly versatile block to make.  Just keep in mind to cut your strips on the grain and check to make sure the blocks are all the same size (or pretty darn close).  If I get requests to highlight certain blocks (like I did for this one), I’ll write more of these types of blogs.

Until next week, Level Up Your Quilting!

Love and Stitches,

Sherri and Sam


Categories
Uncategorized

Partial Seams — Way Easier than They Look

Several weeks ago – way back when we were constructing the LeMoyne Star block – we dealt briefly with a technique called partial seams.  I kind of glossed over it, because I was much more interested in everyone getting good and comfortable with Y-seams.  The traditional LeMoyne Star requires both kinds of seams, as do many of the Feathered Star blocks.  And while getting those Y-seams accurate is important, it’s just as essential to know how to make a great partial seam, because those can be used for wonderful effects in lots of different blocks.  Bonus:  They’re easier to make than Y-seams.  As a matter of fact, if I’m constructing a quilt block with partial seams, I don’t look for an easier way out.  They’re really not that difficult.

Let’s start by defining what a partial seam is and where to use them.  A partial seam is just that – a part of a seam.  Instead of sewing down the entire length of the pieces of fabric, there comes a point where you stop and add another piece of fabric.  These seams are used when the fabric pieces attached to the center shape extend past the beginning shape.  You stitch the first part of the first seam, add pieces to the sides, and end by attaching the last piece of fabric and stitching the last part of the first seam.

I realize all of the above sounds confusing.  This is one of those techniques that’s much easier to show than tell.  So, I’m going to walk you through the process step by step.  And if you’d like to sew along with me, you will need the following:

One 4 ½-inch square

Four 1 ¼-inch x 5 ¼-inch strips.  For this exercise, it will help if all four strips are cut from different colored fabrics.  This will help you see how the partial seams work their magic. 

Step One:  Lay out your block.  Since the center of the block we’re constructing is large-ish, this is a great way to showcase a fussy-cut piece of fabric, an applique piece, or some embroidery,

Step Two:  You can start on any side of the block.  I start on the left side, because…well… I always start on the left side.  Then I work clockwise around the center.  Place a strip of fabric right sides together with the center block, aligning the top edges.  The strip will hang off the bottom side of the block and that’s okay.  It’s supposed to.

Step Three:  Sew the seam down the block, stopping and backstitching (or use a lockstitch if your machine has one) about 1-inch before the end of the square.  Your block should look like this:

Press your seams as desired.

Step Four:  Now we will lay a strip (right sides together) on the top of the block.  When we do this, you’ll notice that this strip is the exact length of the block.  Sew this seam as normal, down the entire side.  Press the seam as desired.

Step Five:  Repeat step four for the right side and the bottom strips.

Step Six:  Now we’re ready to finish the original seam.  Fold the unsewn part of the left strip back over the sewn block, aligning the unsewn edge and pin in place.  Starting where you backstitched (or locked stitched) in step two, finish sewing down the seam to complete it.  Press the seams. 

There…

Much easier than Y-Seams.

I like the effect that partial seams give a center square.  If the center square is small, the partial seam technique makes the block look like a type of log cabin square.  Per request by Laura, one of my regular readers, I want to pause and focus on log cabins and partial seams for a bit. 

I love log cabin blocks.  I want to devote an entire blog to them soon.  In my opinion, they’re one of the most perfect quilt blocks.  You can make them super-easy or change them up to be more challenging.  And depending on your color choices, the effects produced can be stunning.  They’re a great way to use of scraps or showcase your best fabric.  Let’s start out by looking at a “traditional” log cabin block:

As you can see, a “traditional” log cabin block is comprised of a small square in the center (historically, these squares have been either red or yellow, symbolizing the hearth in a home, but we don’t always choose these colors in our quilts today).  The small block is surrounded by strips of fabric, placed in such a way that one side of the block is made out of light fabrics and the other side is comprised of darker fabrics.  It’s this layout of the blocks that give log cabins quilts such striking effects:

Now, let’s take a look at a log cabin block in which we’ve replaced the normal seams with partial seams:

With every round of strips, we have one partial seam. And by changing out the traditional with a different technique, we’ve altered the look of the block just a bit.  This one minor construction adjustment makes the block look like we’ve taken the trouble to use set-in seams, when we haven’t.  Switching from traditional seams to the just-as-easy partial seams alters the look of a quilt enough to make folks pause as ask, “How did they do that?” 

Squares are not the only shape which can utilize the partial seam treatment.  Triangles can, too.  The method remains the same, but the appearance is stunning.

Partials seams can be substituted in nearly any block that has borders.  The block we worked through today used solid pieces of fabric as the strips.  But what if you pieced those strips like this:

This gives a new and exciting perspective to a center square. 

A partial seams is one of those quilting techniques that’s easy to do and generally doesn’t require extra fabric if you decide to switch out your pattern to use this method.  Once you’ve gotten the hang of it, it really doesn’t even take extra time.  But the effects it can give quilt blocks, and in return, a quilt top, is stunningly different.  Master it.  Tuck it away.  Pull it out and use it.

Until next week, Level Up Your Quilting!

Love and Stitches,

Sherri and Sam