When Log Cabin quilts are mentioned to anyone – quilter or non-quilter – most folks can conjure this image:

Log Cabin blocks and quilts are easily one of the most recognizable quilting images. Their appearance – strips of fabric sewn around a center square – is one of the most iconic quilting visuals. Some quilt histories tell us the Log Cabin quilt came of age in the in the middle to late 19th century and they were designed to honor President Abraham Lincoln, who was born in a log cabin in Kentucky. Quilt historians will inform you that the squares in the middle of the blocks were either red – representing the hearth of the home – or yellow – representing the light in a window. Typically, one side of the block was made of darker fabrics and the other side was made of lighter fabrics, allowing for some stunning layouts known as Barn Raising, Sunshine and Shadows, and Streak O’ Lightening. Quilt historians also may add this interesting tidbit: A true Log Cabin Quilt was always tied, never quilted.
And most of that is outright lies. So, hang tight and let me blow some quilting gaskets.
First of all, let’s talk about the real history of the quilt and quilt blocks, because everything else – from the kind of fabric used to where most Log Cabin quilts originated from in the United States – depends on the quilty truth. And the truth is, the Log Cabin block has been around for literally thousands of years – not just mere hundreds. According to Barbara Brackman’s date base, America’s earliest signed and dated Log Cabin Quilt was made in 1869. The British Quilt Heritage Project found Log Cabin Quilts dating from the late 1800’s to early 1900’s. However, the National Museum of Scotland is in possession of a small box made for sewing tools which has the Courthouse Steps (a variation of the Log Cabin we’ll discuss a bit later in this blog) embroidered on it that dates to the mid 1700’s.
However… if you boil down all the myths, fiction, and facts concerning Log Cabins, you will probably find Ancient Egypt at the bottom of the pot. That’s right…
MUMMIES

This is theory, but it’s pretty plausible. Think Valley of the Kings and 19th century British archaeology (I’m having flashbacks of the movie, The Mummy right now). When these tombs were opened, archaeologists found hundreds of animal mummies. Apparently, Egyptian royalty wanted their pets with them in the afterlife, so these critters were mummified along with their owners. Some of these animal mummies found their way back to England and are now in the British Museum of History. If you have a chance to look at the small mummies either on the internet or in person, you’ll find some of these have Log Cabin designs on them. France was also caught up in the archaeology/mummy frenzy. Some of their archaeologists accompanied Napoleon to Egypt in the early 19th Century and returned with the Log Cabin design shown clearly in their pictures and drawings.
Janet Rae from Edenburgh, posits another theory about Log Cabin design: land cultivation. This idea takes into consideration the type of land cultivation known as “run-rigs” from the Middle Ages in both Europe and the British Isles. During this time the farmers had both wet and dry fields to farm, and these were called run-rigs. Early maps and drawings of the run-rigs look very much like Log Cabin blocks. It is possible that someone drew inspiration from the actual run-rigs or drawing of them and made the first Log Cabin blocks.
Along with these two theories, we have to keep in mind that Log Cabin blocks have popped up in other locations, where there is no clear theory about just how they got there. There are the Log Cabin blocks from the Isle of Man called The Roof Pattern. Here the blocks are folded pieces of fabric hand sewn onto a fabric foundation. The unusual issue about the Isle of Man is that is very isolated. No one is exactly sure how the inhabitants came up with the idea of a Log Cabin quilt. Canada also has its own version called Canadian Logwork. If the pattern traveled across the sea from England and then Canadians made their own version or if the Canadians came up with the idea all by themselves is not known.
Thus, the real origin of the Log Cabin block is a bit of a mystery. Since needlework was traditionally a woman’s field of expertise, the male historians obviously felt it wasn’t worth mentioning. We may never actually know when and where the Log Cabin block developed. In this blog I want to look at the Log Cabin from strictly an American viewpoint. So, let’s dive in and return to America in the mid-19th century when the Log Cabin block was in its heyday and blow a few more quilting gaskets.
During the time of the Abraham Lincoln administration (1861-1865), we saw the pattern begin its rise in popularity, culminating several years after his assignation. The myth around the block’s sudden fame in the quilting world embraces the idea the Log Cabin Quilt was designed as a type of tribute to Lincoln’s Kentucky birth in a log cabin and the fact he spent a good many of his formative years growing up in one. Since we already know that’s a myth – Log Cabin blocks and quilts had been around a lot earlier than even 1850 – let me also blow a gasket about most of the quilts originating in Kentucky. From what some quilt historians can determine through quilt inventories and wills, most of the Log Cabin Quilts originated in Indiana. That’s not to say Kentucky didn’t have quite a few Log Cabin quilts of their own, it’s just the majority of Log Cabin quilts listed in wills and household inventories are from Indiana. And the earliest dated American Log Cabin quilt came from Kansas.
Now that this myth is put to bed, what about the theory which embraces “true” Log Cabin quilts are tied, not quilted? To a degree, this is correct. While we tend to construct our Log Cabin quilts out of 100 percent quilter’s cottons, batiks, or flannels, the early Log Cabin quilts were made out of just about anything – wool, flannel, velvets, cottons – whatever the maker had on hand, that’s what was used and often several types of these fabrics were combined in a single quilt. Add to this fact many of the quilt blocks were pieced on fabric foundations and you have a quilt with a lot of bulk. Hand quilting was out of the question. The quilt was tied. Sometimes the quilt top was so bulky and heavy, a batting wasn’t used. It wasn’t needed. The quilt top and backing would keep you plenty warm at night.
How about the idea that in the early Log Cabin blocks, the center square was either red or yellow? This seems to be true both and untrue. The earliest Log Cabin designs – those which pre-date our mid-19th century American Log Cabins — do not use a “standard” center square color. It was only when quilters embraced the Log Cabin to symbolize Lincoln that we saw the use of red or yellow fabric for the center square. There is another myth in quilting lore which states if a Log Cabin quilt was hung outside a house or cabin and the center squares in that quilt were black, then this was a stop on the Underground Railroad. That is false. Despite what any historian says, a direct link between quilts and the Underground Railroad has never been factually substantiated. And today, most of us don’t use either color in our centers. As a matter of fact, my guild is using a Log Cabin design for our 2021 raffle quilt and the center block is raspberry-colored. The last Log Cabin quilt I made used blue in the center.
Finally, what about the block using dark fabrics on one side and lighter fabrics on the other? This myth turns out to be mostly correct. In order for the block to look like what we perceive a Log Cabin block to be, this has to hold true to some degree. Even from the earliest Log Cabins – either on animal mummies or those inspired from run-rigs — there is a clear distinction between the two sides of the block.
This may be more than you ever wanted to know about Log Cabin blocks and quilts. I like to know the past behind quilty issues, as the this is what initially drew me to quilting in the first place. Now a days we can choose to honor the traditions by incorporating them in our quilts, or we can decide to make these blocks our own by constructing them in ways that make us happy.
As I begin to talk about constructing these blocks, let’s take a look at some traditional Log Cabin blocks:
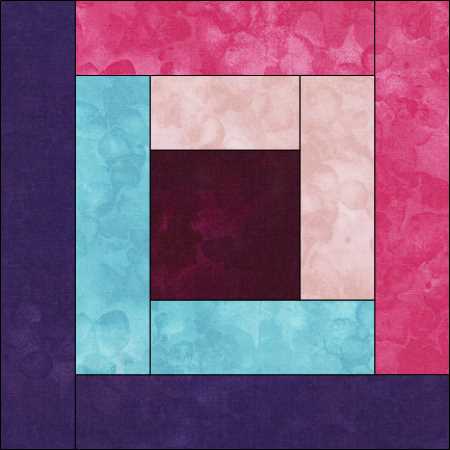

We’ll talk about the block on top first. The strips of fabric around the center square are called “logs” and you’ll notice the logs on this block are wide. One of the great features about Log Cabins is their versatility. You can make the blocks as large as you need simply by adding more strips around the center square. And the “logs” can be just about any width you desire as long as you keep in mind the Golden Ratio. Let’s look at an example. Let’s say you have a stack of 2 ½-inch squares you want to use as the centers of your blocks and you want to know your log options – how wide can you make them and how narrow could you make them and the block still look balanced? Remember from my past blogs, the Golden Ratio is the number 1.61803399. When we’re using the GR to “math” out quit issues, we shorten this number to 1.618. To see what is the widest possible strip we can use for our 2 ½-inch square, we multiply 2 ½ by 1.618. This gives us 4.045 or 4-inches. However, don’t stop at 4-inches. That’s incredibly wide. We divide that by the four sides of our block and get 1-inch. The widest we could make our strips is 1-inch (finished) for our 2 ½-inch center square and the block still look balanced.
To discover what’s the narrowest we could make our blocks, we divide 2 ½ by 1.618. this gives us 1.5451117 or 1 ½-inches, which we divide by four again. This answer is .386279 or 3/8-inch, finished.
Both of those numbers tell us we can make our finished strip widths anywhere from 3/8-inch wide to 1-inch wide and those strips will look nicely balanced against our 2 ½-inch squares.
Now that the math-y part is out of the way, there are a couple of other construction issues which need to be considered. First, be sure to cut your fabric logs on the straight of grain. This step will make your blocks lie nice and flat. The second issue concerns the strips themselves. It’s really, really tempting to just rotary cut a bunch of strips, sew them on, and then cut off the excess. Although it’s super-tempting and this is a super-easy way to make your logs – don’t. Here’s why…
Remember back in 2018 when I blogged about quilt borders ad nauseum? How you cut the borders to match the length and width of your quilt center and sewed them on that way, because this helped keep your quilt square? The same principle applies to the center of your log cabin block – and the larger the block, the more this applies because there’s more to keep square. Let’s look at an example –and for the sake of simplicity, I’m using all unfinished measurements:

This is the log cabin block we used earlier. The center square of the block is 2 ½-inches. If we’re making our fabric logs 1-inch wide, then this means our first log is a 1 x 2 ½-inch rectangle. Our third log would be 1-inches x 3 ½ inches. The fourth 1-inch x 4 ½ inches, etc. We would need to cut each individual log out to the size needed in order to keep everything nice and square.
However, I don’t use this method on Log Cabin blocks with very narrow strips. The narrower the strip, the harder it is to cut it out accurately. Take a look at the center of this little quilt top:

This is from a Round Robin I did with my guild a few years ago. The center log cabin blocks have super-narrow logs. I honestly would have had a bit of a struggle cutting these out to the correct width. Couple that with the fact that the narrower the strip, the harder it is to cut the fabric straight. Since I didn’t want to waste my time or my fabric, I opted to paper piece these blocks. If my Log Cabin blocks are either very small (6-inches or less) or have narrow logs (less than 1-inch finished), I personally think it’s easier to paper piece them. I also believe it’s more accurate. As with all paper piecing, you’re trading fabric for precision, but for Log Cabin blocks with slim logs, I think this is the simplest way to construct them. If you decide to go this route with any Log Cabin block, it’s still important to cut your fabric strips on-grain so the block will lay flat and hold its shape.
I also must say, I really like Log Cabin blocks with the narrow logs. I’m not sure why the appeal more to me than the “traditional” looking Log Cabins, but they do. Those narrow strips just seem to completely change up the block’s appearance.
The Log Cabin block is beautifully simplistic – and the great thing about simple blocks is they’re really easy to change-up. The quilter can tweak it here and there and suddenly it looks entirely different with very little work involved. To date, Pinterest has over 556 variations of this block. My EQ8 has 50. While it’s impossible for me to cover all the variations of the Log Cabin block, I want to highlight four construction changes and six block ideas. These are the most common variations the kept popping up on my Google searches.
Construction Changes
- Use Partial Seams – We covered this technique in detail in my previous blog about partial seams (https://sherriquiltsalot.com/2020/10/07/partial-seams-way-easier-than-they-look/), so I won’t go into detail again with that. But just to jog your memory, compare the traditional block against a Log Cabin block which used the partial seam construction:

- Move the Center of the Block – Instead of putting the center square in the middle of the block, move it to a corner. This is easy to do. Instead of surrounding the center on all four sides with logs, just add the logs on two sides, or use more fabric strips on two of the sides than the other two. Either way you chose, you’ve altered the blocks appearance while not having to undergo any complicated construction techniques.

- Enlarge the Center Square – While typically the center square can be larger than the width of the fabric logs, look what happens when the center is made much bigger. This is a great way to showcase fussy cuts, embroidery, or applique. In the block below, the center has not only been enlarged, it’s been made into a signature block.

- Make a Vertigo Block – I’m not really sure what these are called:


But I call them Vertigo Blocks because they kind of make me dizzy. My EQ calls them Twisted Log Cabins. These occur when you really play with the fabric logs, and in fact with these blocks, the logs aren’t even strips – they’re triangles. While personally I would paper piece these, if you’re a really fastidious piecer, I’m sure they can be rotary cut and sewn together.
While we’re still on the topic of Log Cabin construction, I’d like to share with you a few organizational tips. Log Cabins require lots of fabric strips in lots of different sizes. These strips are often very close in length – sometimes there’s a half-an-inch or less difference in how long they are. It’s easy to pick up the wrong piece and sew it on the block, only to have to turn around and rip it right out. Depending on how many strips I have to work with, here’s a few ways I keep myself from getting confused.
I’ve used these:

These neat little trays are found at most dollar stores. I get mine from Dollar Tree, and they come three to a pack. I line these up and stick a post-it-note in the bottom of each tray indicating the length (and width, if I’m varying both lengths and widths of my strips).
I’ve also used a TV tray. If I don’t have as many logs surrounding the center square this works nicely. I simply lay them out on the TV tray, starting with the shortest and ending with the longest. I can park the tray beside my sewing machine and chain piece while marathoning Hulu.
If I’m making a huge Log Cabin quilt which entails lots and lots of strips, I have used either this:

Or this:

I can sort my strips and then hang them. Again, both of these can be located near my sewing machine, so I can chain piece and binge watch my new favorite series.
Lastly, let’s talk about variations on the Log Cabin block. This simple block and be tweaked and changed for literally hundreds of different looks, but I want to show case the six I like the most.
My very favorite Log Cabin variation is the Pineapple Block.

Some quilters will claim this is a Square-in-a-Square block, but I’ve always heard it was a type of Log Cabin. Sure, the center is kind of a Square-in-a-Square, but the rest of the construction is pretty much standard Log Cabin. I’ve always loved the way this block looked when made from batiks.
Another popular Log Cabin block is Courthouse Steps. If you look closely at this block:

You’ll see the difference between it and the traditional Log Cabin block is the construction. In the traditional block, we sew the logs around the square in a clockwise direction. With the Courthouse Steps, we sew the fabric strips around the center in the same manner we sew borders around the quilt center – sew the right and left side strips on and then the top and bottom ones.
Sometimes with the Log Cabin blocks, we can isolate the technique (fabric strips around a center) and use it in other ways, such as this block:

Or this block.

You can also use this method in other areas of a pieced block to give it a different look. My personal favorite is this:

Hearts.
I love hearts. If you look closely at most of my quilts, you’ll find hearts quilted into the design at some point.
And if you’re really up to a challenge, try using them as hexagons or 60-degree diamond blocks It’s really not that difficult. For the diamond blocks, simply cut the center squares as 60-degree diamonds (we learned how to do that here (https://sherriquiltsalot.com/2020/07/01/60-degrees-of-separation/) and then proceed to sew the fabric strips on as normal. This will give you blocks that look like this:

Which can be pieced into a quilt that looks like this:

If you’re feeling really ambitious, the Log Cabin hexagons are fun to make and look super-complicated, but in reality, all they need is a little more pre-planning.

Simply cut the center square as a hexagon – but don’t get too small. This block screams for a large center which can showcase a fussy cut fabric. The logs are sewn on the same way as a traditional log cabin, but there are a couple of steps that should be altered.
- Instead of cutting out the strips true-to-the-size of the edge of the hexagon, allow at least for an extra ½-inch of length. When the strip is sewn on the side of the center, you need at least ¼-inch to hang off each end.
- After the strip is sewn on, press it outwards. Then line a ruler up with the adjacent side of the hexagon and trim the extra fabric off, so it will be angled correctly. Do this for each fabric strip, until you get to the last strip. That strip will need extra length because it will have to cover two raw edges – the last one and the first one.


When you piece these hexagons together, they will need connector pieces just like any standard hexagon quilt.

Lastly, let’s take a look at Log Cabin quilt layouts. The unique construction of the block allows for two great aspects of the quilt tops – no sashing is needed, and the light/dark sides of each block makes layout possibilities nearly endless. Just make sure your blocks are square and the same size.
You can run the lights and darks on the diagonal. You can set them as a zig-zag (also known as Streak o’ Lightning).

You can arrange them to look as if they’re set on-point.

This layout is called Barn Raising. It’s a fairly traditional layout, as far as Log Cabins go.

They can be laid out to look like pinwheels or flying geese.


Honestly, the possibilities are only limited to the space you have to layout your blocks and your imagination. Pinterest has over 300 different Log Cabin layout designs, if you do find yourself needing inspiration. Not to mention the blocks can be used as a border treatment or incorporated into other layout designs.


As I’m coming to the end of this blog, I hope you’re inspired to try a Log Cabin quilt of some type. They’re a really fun and endlessly versatile block to make. Just keep in mind to cut your strips on the grain and check to make sure the blocks are all the same size (or pretty darn close). If I get requests to highlight certain blocks (like I did for this one), I’ll write more of these types of blogs.
Until next week, Level Up Your Quilting!
Love and Stitches,
Sherri and Sam

4 replies on “Log Cabins”
Very interesting post about log cabin blocks and quilts. I enjoyed it.
Thank you! It was fun to write!
Thanks, Sherri. Your post is fun and informative.
You’re welcome!!