Categories
Uncategorized

More On-Point Options

Okay, let’s review…


At this point in the year, you’ve learned a lot about piecing and applique.  You’ve learned probably more than you ever wanted to about borders. And last week, I threw everything up in the air when I introduced the concept of setting your quilt on point.

You should be really excited now and itching to design your own quilt.  And you should do just that.  You’ve really got just about everything you need to dig into your stash, sew up some blocks, and lay that sucker out just the way you want and not how the pattern dictates and be completely successful with the process.  You’ve lost your fear of quilt math, realizing that it’s simple multiplication, division, addition and subtraction.  You can throw terms like Golden Ratio and Quilter’s Cake around with all the confidence in the world.

So, allow me to muddy the waters just a bit more…

At one time or another, you’re going to have some wonderful quilt blocks that you want to set on point.  You dig through your fabric or make a mad dash to the LQS or your favorite on-line shop and get the material for those setting blocks and setting triangles.  You get home, begin to lay everything out and are hit with one cold, hard fact…

That fabric you loved in the store or from your stash for the setting blocks and triangles just ain’t singing the same tune it did on the cutting table. It doesn’t add that “zing” that you thought it would to your blocks.  You may have just ran your debit card up $20 or $30 and you certainly don’t want to toss the fabric away and make another purchase.

What can you do?

Why don’t you piece your setting triangles and/or blocks? Or alter the basic layout?

Whoa….there’s a new concept.

Yes, you certainly can piece the setting blocks and/or triangles, just as you can anything else on your quilt.  And you can alter that on-point layout that was in the last blog.  The results will take you from a quilt that is nice, to one that has every WOW factor in the book.

Let’s play with the layout first.  By changing the layout just a little, you can dramatically change your quilt top.  You can alter a simple on-point layout from this:

Chain quilt with colored corner triangles

To this:

Chain on point quilt 2

With the above illustration, I’ve colored the setting triangles different colors to make it easier for you to see what I’m doing with this.  While the nine-patch blocks are the same from the quilt last week, did you see what I did with them?  Instead of separating them with setting blocks, I sewed them together and only used one set of large setting triangles on the right- and left-hand side.  These are shown in blue.


Now let me draw your attention to the top and bottom, right and left-hand corner triangles shown in green.  Those aren’t small at all, like they were in the first on-point quilt we worked with.  These are large – larger even than the large setting triangles.  These are double corner triangles.  So how do you use Quilter’s Cake to come up with the measurements to cut these triangles?  It’s not hard, I promise.  Since we’re still working with 12-inch finished blocks, take the 12-inches, divide it by 1.414, then multiply that by 2 and add 7/8-inch for the seams. So, on a 12-inch finished block, the equation would work like this:

12 ÷ 1.414 = 8 ½-inches

8 ½-inches x 2 = 17

17 + 7/8 = 17 7/8-inches.  You would cut your square 17 7/8 inches and cut it in half once on the diagonal.  The difference with these corner triangles is that you would make two for each corner.

The math isn’t hard…don’t be scared of it.  When I taught chemistry and physics to a bunch of gangly high school students, I always told them numbers were your friends.  Words can lie, but numbers (if interpreted correctly) cannot.  They will always tell you the truth.

Now let’s take those layouts and play with fabric.

Take a look at this quilt:

On point star 1

This is a great on-point quilt.  It has some nice colors; the points of the stars aren’t chopped off.  Piecing-wise, this is very nice.  I do want you to notice one thing.  The same fabric is used in the background of the star blocks, the setting blocks, and the setting triangles.  There is nothing wrong with this approach.  With this color-way, the blocks seem to “float” across the top of the quilt.  And again, let me emphasize, there is nothing wrong with that design.  Sometimes that is the look you’re going for.

But, if you want to go for a bit different look, without piecing those setting squares and/or setting triangles, then make the fabric do the work for you.  Look at the same quilt, keeping the fabric in the star blocks the same, but changing up the fabric in the setting triangles:

On point star 2

Or changing the fabric in the setting blocks instead:

On point star 3

Or by adding sashing and cornerstones…

On point star 4

And altering the sashing and cornerstones a bit….

On point star 6

If you don’t like the empty blocks beside the stars (if you or your quilt artist has great quilting skills, this would be a great place to showcase some feathered wreaths), throw in another block:

On point star 5

Sometimes all you need is a quick fabric change up to make your quilt really sizzle.

When you’re piecing a quilt, the options are endless and once you have a good grasp of the quilt math and some confidence in choosing fabrics, the sky is literally the limit when it comes to either changing the design of a quilt pattern or designing your own.

Don’t be daunted.  You can do this.

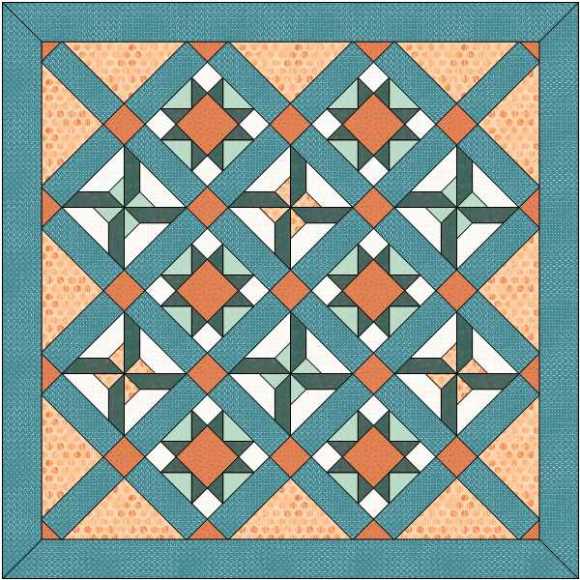
Throwing in a different quilt block where a plain setting block is one thing, but now I want you to think about piecing the large setting triangles.  Let’s look at this design I came up with using Fossil Fern fabrics.

On point star 7

Wouldn’t this quilt look wonderful if we could work in some piecing on the triangles?

On point star 8

Now what about piecing the setting blocks?

On point star 9

There are so many secondary patterns going on in this quilt it boggles my mind.  And with the pieced setting triangles, you’ve just made your border, so it’s a win-win.

My final thought before we wrap up setting triangles is this:  Don’t settle for ordinary.  Let your imagination and creativity work overtime in the simple design elements of a quilt.  When a quilter is putting together a quilt top, it’s easy to get caught up in the blocks – whether they are pieced or applique or a bit of both.  That’s well and good.  But don’t stop there and don’t let the pattern dictate every element of your design.   Carefully consider the borders and sashing, the setting blocks and setting triangles, as well as the corner triangles. Use those to enhance your center and make the whole quilt a one-of-a-kind design.

Make it yours.

And make it sing.

Until next week, Quilt with Excellence!

Love and Stitches,

Sherri and Sam

DSC01315

Categories
Uncategorized

On Point Options

We’ve dealt with borders for the past few blogs, and most of the quilts that we looked at while discussing all our border options were horizontal-set quilts – that is the quilts were made of blocks, all lined up in rows both horizontally and vertically.  However, now I want you to think about changing the quilt top up a little bit – not with anymore borders, but with putting the quilt blocks on-point.

What does on-point mean?  It means that instead of horizontally setting the block, it’s turned and is set in the quilt with the corners in a vertical  and horizontal position instead of a horizontal position.  So, instead of this:

Shoo Fly Block

It’s this:

monkey wrench block on point

Which means, instead of the quilt looking like this:

shoo fly with cornerstones

It could look like this:

Shoofly quilt on point

This on-point option is a very simple one, and like most quilt design options, the quilter is only limited by his or her imagination.  I want to discuss the options, so that you can let your imagination run wild, but first I want to walk you through the basic steps of how you construct an on-point quilt.

Let’s say you have a wonderful idea for a quilt, or you have a great pattern, but for some reason you just aren’t diggin’ the whole horizontal and vertical row thing.  I can understand that.  While I’m not opposed to that layout (indeed, some quilts will not work unless they’re laid out that way), I do love me an on-point quilt.  There’s more movement in it and there are just so many options available.

But how do you go about making that change?

It’s not hard, I promise…but just like borders, you have to do the math.  So, let’s take this process from the top.

Let’s say you have a stack of 12 ½-inch unfinished squares and you decide to put them on-point in a quilt top.

bare on point layout

Notice that there are spaces for your blocks as well as spaces for triangles.  These triangles are called setting triangles and they look far more complicated than they are.  In this layout there are two sizes of triangles.  Along the sides are larger triangles and at the top and bottom right- and left-hand sides are smaller triangles called corner triangles.  The plain blocks that fit in between your pieced blocks are the same size.  That’s not hard to figure out.  But what about those triangles?  How do you figure out how big to make them?  And do you cut them out as triangles or is there someway you can cut out a square and then sub-cut it into triangles?

The answer to the first question is there is a math equation you can use and the answer to the second question is yes!  Let’s start at the beginning, working with the above layout.

First let’s play with your blocks, and for the sake of this example, let’s  say you’ve got nine 9-patch blocks that are 12 ½-inch unfinished.

Chain Quilt on point

That means the plain squares set between the 9-patch blocks will also need to cut 12 ½-inches, unfinished.

chain quilt with colored setting squares

But what about the triangles?


There are couple of important details to remember about triangles before we begin the math.  First, one or more edges of nearly all  triangles will be cut on the bias; therefore, handle them cautiously and be careful not to stretch the bias.  The large triangles in an on-point quilt will be quarter-square triangles – that is, we cut four of these triangles from one square of fabric – and it’s important that the long edge of these triangles (called the base) is cut on the straight-of-grain of the fabric.  If the base is cut on the bias, you’re going to run into all kinds of problems—it will stretch, and you’ll never get the quilt to lay flat.

half and quarter square Triangles

The smaller triangles at the right and left corners, top and bottom, are half-square triangles – they are produced by cutting out a square and then sub-cutting that square on the diagonal.  These must have their short-sides on the straight-of-grain.

If you’re thinking ahead, you’ve been hit with a couple of facts that maybe causing you some concern at this point:

  1. The blocks are 12 ½-inches unfinished.
  2. When the blocks are set in the quilt, the blocks will be 12-inches, finished.
  3. In order to cut the large triangles, we need to know the long measurement, but we only know the short (12 inches).
  4. In order to cut the small triangles, we need to know the short measurement, but only know the long (12 inches).

What’s a quilter to do?

Learn a new formula, that’s what.

I introduced you to the Golden Ratio (1.618) in my blogs about borders.  Let me now introduce to what is called Quilter’s Cake (mathematicians have pi, we have cake…) 1.414.

For the large, setting triangles –

Step One:  Take the finished size of the block and multiply it by 1.414

12 x 1.414 = 16.968 round this up to 17.

Step Two:  Add 1 ¼-inches for seams.

17 + 1 ¼ = 18 ¼

Thus, an 18 ¼ – inch square will produce four of the large triangles you will need for the above quilt (shown in coral color in the illustration).  There are eight large triangles, you get four triangles per square, so you would only need to cut two 18 ¼-inch squares and then sub-cut those by cutting them twice on the diagonals.

chain quilt with colored large setting triangles

Now let’s talk about the small corner triangles, which are colored green in this illustration:

Chain quilt with colored corner triangles

There are four of those, and since these are half-square triangles, we know we only need to cut two squares, but we need to know what size to cut them.

For the small corner triangles –

Step One:  Take the finished size of the block and divide it by 1.414.

12 ÷ 1.414 = 8.4865629.  Round this up to 8 ½ -inches.

Step Two: This time add 7/8-inch for seams.

8 ½ + 7/8 = 9 3/8-inches

Cut two 9 3/8-inch squares and cut them in half on the diagonal one time.  Each on-point quilt always has four corners (well…all quilts have four corners), so you always need only four small corner triangles.

Chew on all this information during the week.  Next week we’re going to let our imaginations go crazy with those setting triangles and blocks.

Until next week, Quilt with Excellence!

Love and Stitches

Sherri and Sam

DSC01112

Categories
Uncategorized

Non-border Borders….

We have talked a great deal about borders – how to properly construct them and some design options.  At this point, you may be asking yourself, “Why is this crazy lady so obsessed with borders?”

Blame Susan.

One of my partners-in-crime has a history with other quilt guilds – she’s belonged to different ones in the different states she’s lived in and has even been President of some of those guilds.  She’s been around a lot of different quilters and quilts and has quite a few quilt shows under her belt.  We were attending a quilt show together (along with several other of our friends) when she whipped out some slips of paper and told us, “Write down the name and number of the quilt that you think has the best border treatment.”

I certainly wasn’t going to contradict Susan when she was on a mission.  I took my slip of paper and made notes.

Afterwards, she explained to me that she felt that sometimes when quilters get to the borders, it’s almost as if they give up.  Instead of transferring all that work, attention to detail, and creativity to the borders, the quilter just puts plain borders on her or his work of art just to be done with it.  “It’s almost like they just gave up,” she explained.

While I had never thought of it that way (I just assumed they were following the directions), I did realize that I disliked plain borders most of the time.  As I stated earlier, if you or your longarm artist have some serious quilting chops, plain borders can be made into a work of art.  Otherwise…they’re just plain.

Think of borders as a blank canvas.  All your creativity can be poured into them.  Just because the quilt instructions call for wide strips of fabric with no piecing or applique doesn’t mean you have to stick to the directions.  Always remember that quilt directions are suggestions, and as long as you can do the math, you can design them just about anyway you want.

However, with any design you chose for your borders, and however you plan on sewing them on, you’re dealing with long seams and lots of bulk.  It’s always important to have lots of room to support the quilt as you’re sewing, so the top won’t pull to one side.  If this happens, all you’re doing is battling the weight of the quilt and the seam won’t be straight.  But did you ever stop to think how much easier it would be if you could put the border on as you’re sewing the quilt squares into rows?  Wouldn’t it be so much easier if you could think of the border as other blocks at the beginning and ending of your quilt rows?  That way as you’re sewing the rows together, your borders would automatically be put on!

Can this happen?  Is this a possibility?

Yes.  And this is where my “Nonborder Borders” come into play.  This is not my idea.  Other quilt instructors such as the Pizza Girls, Cindy Williams, and Carol Doak have also had this idea.  Let me explain generally how this works, and then go into a little more detail.  Take a close look at this quilt:

Storm at Sea

This is a variation of Storm at Sea.  This is a beautiful quilt, and a Storm at Sea is on my bucket list of quilts.  There is a lot of movement and constructed in shades of blue and blue-green this would be a truly wonderful quilt.

Now, let’s pull in a bit and take a close look at one of the rows.

Storm at Sea Row

Can you see how part of the border is attached to each row?

Here’s a more detailed version.  Can you see the two Snail Trail blocks attached to the main block?

Close up storm at sea 1

Snail Trail                                                      Storm at Sea main block


This is still a pieced border, but it’s pieced in such a way that the border can be treated as the first quilt block and the last quilt block on a row.  When all the rows are completed and sewn together, the border is already on.  Word of caution here…it is absolutely vital with this process that you square everything up each step of the way.  Because the border goes on with the rows, there is no final squaring up prior to attaching the borders as it is in a “normal” border treatment.  There is no measuring the length and width of the quilt center to get an average, so you know how long to cut the border length.  So, while this is a great method, and makes life so much easier, just be careful to make sure you’re squaring up each step of the way.

If you plan ahead, you can use this technique on almost any pieced quilt border you want to make.  It takes a little forethought and sometimes you have to do some minor design changes, but to me, it’s worth it.  I suffer from fibromyalgia that affects my back and neck (mostly), so anytime I don’t have to wrangle with the heavy bulk of a quilt top and borders, life is easier for me.  And if you like the look of traditional borders, where the borders are a darker color than the center, you can still do that with this method – just change your fabric.


Section of Horizontal Layout


Let me encourage you to play with this technique.  Draw out your ideas on graph paper or use the Electronic Quilt software (my personal favorite) to sketch out some ideas.  There are two additional resources I would like to leave you with for this technique.  The first is Cindy Williams.  If you’re on Facebook, she’s there under the name of The Math Whisperer.  She has a simply wonderful book called Perfectly Pieced Borders that may be available through her blog.  She teaches at different retreats and quilt shows.  If you’re ever in a venue where she’s lecturing or giving workshops, do yourself a favor and take one or three from her.  I had the awesome opportunity to take two classes with her in Pigeon Forge in 2015.  And she’s one quilt instructor I’d jump at the chance of taking classes from again (something I can’t say about every class I’ve taken….).


The next resource is Carol Doak’s Creative Combinations: Stunning Blocks and Borders from a Single Unit.  These blocks and borders are paper-pieced but are easily adaptable to this “Nonborder Border” technique.


Once again, my usual disclaimer:  I am not employed by Cindy Williams or Carol Doak.  I have used their products and have discovered that their products and their customer service is stellar – if it wasn’t, it wouldn’t get my stamp of approval.


The year is quickly winding down.  I want to start a series on setting triangles, bias bars, and tension before we say good-bye to 2018 and the Year of Quilting with Excellence.  I already have next year’s theme in mind and you will see where all this emphasis in the basics will come into play.


Until next week, Quilt with Excellence!


Love and Stitches,

Sherri and Sam

PS – For those of you  who know I live in North Carolina, we are hurricane ready!  Just finished my third trip to the store and Bill and I have bread, peanut butter, and water.  Sam has an extra disposable litter box and extra cat food.  This isn’t our first rodeo with hurricanes, but Florence is the biggest we’ve ever had to deal with.

DSC00736

Categories
Uncategorized

Applique and Mitered Borders…

If you’ve known me for any length of time, took a long look at my quilts, or have read this blog for several years you know one thing about me:  I’m the Queen of Applique.

Shortly after I learned to piece relatively well, my quilt teacher and mentor, Ellen, pulled me aside and said, “You need to learn to applique.”

“Why?” was my response.  I had learned to piece and was doing well with that.  Why throw another quilting formula into the equation?

“Because it’s fun and I like it.”  Meaning…Ellen wanted a partner-in-crime and I was it.

Luckily for me and Ellen and our quiltship, I liked applique as much as she did.  So much so that I generally have one machine-applique project and one hand-applique project going on at the same time.  Of all the classes I teach, applique has remained the most requested for years.  Of all the quilts I make, at least 95 percent of them have some applique on the tops.

So, it’s only natural that as we’re discussing borders that I bring up applique borders as an option for your quilts.  For me applique borders work their magic in two ways:  First, on a heavily pieced top, it can calm it down a bit and let the mind and eyes have a rest.  Secondly, if it’s an appliqued quilt center, the applique border serves to enhance that design.

In other words, appliqued borders are a win-win not that I’m the least bit prejudiced. 

Take a look at this quilt:

Flowers for my wedding ring


This is Flowers for My Wedding Ring by Judy Niemeyer. This quilt is a double wedding ring pattern, heavily paper-pieced.  The intersecting circles give the impression of constant motion.  Now stop and gaze at that border.  The applique border in this quilt works two wonders in my opinion.  First, it helps the colors in the quilt center to be pulled out into the borders.  Second, it allows the viewer to stop and rest their eyes.  There are places in that border where the flowers trail and spin and your eyes can follow that.  Then there are places where there is absolutely nothing going on and you can take a deep breath and rest.  I also admire the way she planned this border:  The flowers don’t ring the entire border but occupy two corners.  I also love how the flowers, vines, and leaves reach into the quilt center, pulling the center out to the border.

For me, viewing a quilt is very much like listening to good music.  There are places where there are a lot of motion, but those are balanced with spaces that are not so busy.  Just as music has crescendos and pianofortes, quilts will have spaces where lots of action is occurring, and those spaces need to be balanced with quieter blocks.  I find applique borders can provide the quiet a pieced center needs.

Now take a look at this quilt:

applique borders

This is an applique quilt by Erin Russek and I want you to notice how the borders work to pull the design in the center out to the edges of the quilt.  It’s a sweet, lovely quilt with some nice applique.  The flower, buds, and leaves in the border echo the design in the center.

DSC00977 - Copy - Copy

Now if I’ve done my job correctly, I have just talked you into trying an applique border.  So, let’s get to the nitty-gritty details and discuss how is the best way to go about the applique.  When I am working on an applique quilt center, if the blocks are pieced and appliqued (as in the At Piece with My Past above), I will piece the blocks first and then do the applique.  This way if the applique has to be centered into a square, I stand a much better chance getting that applique centered with no points of leaves cut off, etc.  If I appliqued before I pieced it, there is always the chance that points of petals or leaves could get caught in a seam.  Over all, I manage applique borders in much the same way:

First, after determining the length of the border, I cut those out and add about an inch extra.  I also make them about an inch wider than called for in the pattern.  I do this on the chance that as you applique (either by machine or hand), the fabric will “pull up a little” and make your borders smaller in width and length.  Any extra can be cut off with a rotary cutter after the applique is done, if you desire.

After I’ve cut the borders out of the material, I use a fabric marking pen (not the air soluble kind) to mark the exact finished width and length of the border as well as the center.  This shows me where the boundaries are for applique placement.  Then I usually sew the borders onto the quilt center.

I know what some of you may be thinking here…”That’s gonna be a lot of quilt to have in your lap when you applique.”  Notice I said that’s what I usually do.  I want to walk you through a couple of options on the applique borders.

I’m just slightly paranoid about chopping off tips or other parts of my applique if I put the applique on the border and then sew the border onto my quilt.  So, if my quilt center is a twin-size or smaller, I use the “Sew-the-Border-on-First” method.  Here’s how I go about that:

  1. Unless I’m using the needle-turn method, I pre-make all of my shapes.
  2. Then I make sure I have a clear drawing of my border, with all the lines in black ink. I make this drawing to scale, also marking the top, bottom, left, and right margins of the finished  These boundary lines allow me to line everything up.  I also mark the center of the pattern, as well as the center of the border fabric, to make sure everything will look balanced.
  3. I pin the pattern to the back of my border fabric and then glue baste my pieces into place. Sometimes this means using a light box, depending on the color of the border fabric.

This method works the best.  But if the quilt is large – double to California King, this is awkward.  You’re just working with a lot of bulk and that gets cumbersome and tiring.  So, if the quilt center is large, I use the “Prep-the-Border-and-Then-Sew-It-On” method.  Here’s how this works:

  1. Unless I’m using the needle-turn method, I pre-make all my shapes.
  2. I make a clear drawing of my border to scale, with all the lines drawn in black ink. It’s very important that on this drawing, the margins of the finished border are clearly marked, as well as the center.
  3. When I cut the border fabric for this method, I make it about 2-inches wider and longer. This is where extra caution comes into play.  These borders are constructed off the quilt.  If anything goes wrong – the fabric pulls up a lot or you’ve miscalculated – you’ve got some safety margin to play with.
  4. Draw the top, bottom, left, and right margins on your border fabric.  Do not use and air soluble marker.
  5. Lay the border fabric on top of the border drawing and glue-baste your applique pieces into place.
  6. Applique those pieces, trim the borders if necessary, then sew borders onto the quilt center according to directions.

Needless to say, if you’ve got applique pieces that reach into the quilt center, those will have to be partially sewn on the border and then finished when the border is attached to the quilt center.

Let’s discuss mitered borders now.  When I began quilting about 30 years ago, I would never have considered making a mitered border on anything – a quilt center medallion (as seen in my At Piece with My Past) or a quilt top.  They just looked too hard and that diagonal mitered seam on border had to match up exactly with the corners of the quilt center.  Beautiful, mitered borders appeared too difficult.  But once I learned how to do them, I discovered two things.  First, they aren’t hard at all.  They just required a different skill set.  And secondly, they really looked impressive.  While they do take a bit more time than “regular” borders, they definitely add the “WOW” factor to a quilt.

door-frame-large

If you’re not exactly sure what a mitered corner is, take a look at a picture frame or a door facing.  There is a diagonal seam at the corners where the pieces of wood meet.  That’s a mitered corner.  You can get the same effect on a quilt – all it takes is a little planning.

  1. Go through the steps listed in the last blog to determine the correct length for your borders.
  2. Multiply the width of the borders times two.
  3. Add six.

For example, if my quilt center is 50-inches by 60-inches and my border is 4-inches wide, the equation for the top and bottom border length would be 50 + 8 + 6 = 64.  I would cut my top and bottom border 64-inches long and 4-inches wide.  For the right and left border length, the equation is 60 + 8 + 6 = 74.  I would cut my side borders 74-inches long by 4-inches wide.

This is where the planning comes in – if you decide you want to use mitered borders on a quilt pattern that calls for traditional borders, you will probably want to purchase at minimum an extra yard of fabric for the  borders, as mitered borders uses more material.


Once the correct length is determined, begin by sewing on your first border.  Fold the border in half to find the center, then find the center of your quilt top.  Match the centers and then begin pinning from the center out.  Repeat the process for all the quilt borders and sew them on, beginning ¼-inch away from the start of the seam and ending ¼-inch from the end of the seam.  Remember to back stitch or lock your stitches at the beginning and the end of these seams.

mitered-borders-photo-2


There are several different ways to make the miters, but here is what I think is the easiest way.  Fold the quilt top in half diagonally with right sides facing each other, to form a triangle. Line up two adjacent borders – such as the top border and the right side border, on top of each other with the fold of the quilt top so that it forms a 45-degree angle.

mitered-borders-photo-3

When the borders are lined up, take a ruler and line it up with the 45-degree angle and extend that angle onto the quilt borders.  Mark that angle on the borders with a pencil or other fabric-safe marker.  Pin in place.

mitered-borders-photo-4

Now you’re ready to sew the miter.  Locate the stitch line you made when the border was sewn onto the quilt top and begin sewing at that point.  This will prevent any gaps or spaces on the front.  Sew from the stitch line out to the end of the border, directly on the pencil line you made.  Backstitch or lock stitch at the end.  Unfold the quilt top and make sure that everything lies flat and there are no gaps.

mitered border close up

Trim away the excess border so that there is a 1/4-inch seam and press.  I find the miter looks prettier if this seam is pressed open.  Repeat on the other three corners, and you’re done!

Mitered seam pressed open

I hope you’ve come away from this blog wanting to try applique borders and not having a fear of mitered ones.  Both of those borders add so much to a quilt and are not that difficult at all.  They require a different skill set than other borders, but they really do add a WOW factor to your quilt.


Next week I want to talk about nonborder borders…


Until then….Quilt with Excellence!


Love and Stitches,

Sherri and Sam

DSC01410