Categories
Uncategorized

This is the Batt, the Whole Batt, and Nothing but the Batt….

Once upon a time, when my quilt top was finished, the next item on my list was the backing.  I’d either piece it or pull a whole quilt back from my stash.  Since this was BLM (Before Long Arm Machine) you know what I didn’t think about at this point?

The batting.

In many ways, the batting is always an afterthought with a lot of quilters.  What’s on sale?  What do I have?  What does my long arm artist have in stock?  Does the Joanne’s 40% off purchase coupon on my app cover batting this week?

Before I had a long arm, I was right there with you.  I honestly didn’t give it much thought or effort.  Most long arm artists seemed to like the 80/20 and had plenty of it in stock.  Unless I was making an applique quilt that was show bound, I really didn’t care too much about what was in the middle of my quilt sandwich.  But like I said, that was BLM.  Once I started quilting 99% of my own stuff, suddenly batting became as important as pattern and color choice.

Let’s take today’s blog and look at batting a little more closely, starting with its history.  In England and Australia, it’s commonly called wadding.  In America, it became known as batting.  Before commercial batts were available, it was up to quilters to make their own.  Cotton was grown, picked, and laid out in front of the fireplace to warm.  The warmth was important, as it made picking the seeds from the cotton bolls easier.  In 1793, Eli Whitney invented a little machine called the cotton gin (short for engine), that separated the cotton seeds from the cotton fiber.  Once seedless (by either method), the cotton fibers were combed with combing cards like this:

The combs separated the fibers.  Once the quilter had enough combed cotton fibers for a quilt, they were spread out on the backing of a quilt, and the quilt sandwich was made as normal.  These early batts were not one piece like we have today, but literally handfuls of cotton fibers spread as evenly as possible over the quilt back.  For this reason, the quilting stitches had to be close together to keep the batt from migrating and clumping up. 

Now that you’re thanking the good Lord for Eli Whitney, the cotton gin, and commercial batts, let’s discuss what to look for in a suitable batt for your quilt.  The first decision that must be made is what size should be purchased.  Fortunately, pre-packaged batts come in crib, twin, double, queen, king, and California king sizes.  This is handy if you don’t quilt many of your own quilts by either domestic or long arm machine.  If you do a great deal of your own quilting, I’ve found it much more economical to purchase batting by the yard, or better yet, batting by the roll.  Storage space does become an issue, especially if you purchase more than one roll at a time. 

My dream batting storage…..

But no matter what the form the purchased batting is in, you need to spread it out and let the folds relax for a day or two before making the quilt sandwich.  If I have some stubborn folds that just won’t go away, I will steam those out with an iron.  And always remember the batting should be three-to-six inches larger than the top (as should the backing).  Sometimes there is a little shrinkage in the quilting process.  A quilt that will be long armed will need the larger margin.  A quilt quilted on a domestic machine can make do with the smaller margin. 

The next item up for consideration is fiber content.  Most battings are made of cotton or a cotton/polyester blend.  However, today’s batts may also contain wool, silk, or bamboo fibers.  Some batting is all organic and some is made from recycled fibers.  There is no right or wrong decision here – what matters is personal choice, what the quilt will be used for, and how you want the quilt to look.  The batt you chose for the quilt that goes on your bed may be entirely different from the batt you may chose for a crib quilt.  With fiber content, loft also must be given some consideration.  Loft is a fancy-schmancy way of saying thickness.  If you chose a thicker batt (higher loft), the quilting stitches will be very visible.  If a flatter batt is used, the piecing will show more predominantly, rather than the quilting.  While we are talking about loft, let me also throw this in here:  low loft works generally works best for quilting done on a domestic machine or an embroidery machine.  A high-loft batting can be difficult to maneuver through those machines.  Most long arms can handle just about any loft without major problems. 

Always read the batting label carefully. It not only gives fiber content, it also includes important information about care and how far apart the quilting lines can be.

Now that we’ve covered size, loft, and fiber content, there still are a few batting terms I want to define for you before we move into brands and appearance.  We see these terms on the batting labels and it’s important to know what they mean, because these characteristics affect the quilting plan and the quilt’s appearance. 

Quilting Distance – Some batting will specify an optimal quilting distance between rows of stitches.  Take a look at your quilting pattern and use this information to your advantage.

The batting has been pulled back to show the scrim.

Scrim – This is a light layer or grid of woven fibers added to some cotton battings.  It acts as a stabilizer and helps to hold the batting together while quilting.  This can be a good safeguard if you’re a beginner quilter or prefer a design with wider spacing between the quilting lines.  If you use a cotton batting without scrim, you’ll need to plan to make your quilting lines close together, so the fibers won’t separate in the wash.

Bonded – Some battings contain a type of glue or bonding adhesive, which means the batting fibers may get looser once the quilt is washed and the glue or adhesive is rinsed away.  This usually requires close quilting lines to make sure the quilt holds together over time.  However, if a batting is bonded, it generally won’t beard. 

Bearding on a quilt back

Bearding – This term refers to wispy fibers that eventually seep out of the quilt top.  I can’t begin to explain how annoying this is – and disheartening.  You spend months on a quilt and then more time (and perhaps more money) for the quilting, only to have batting wisps make you quilt look as if it needs a good shave.  The way to avoid this is to use quality batting.  Trust me, you’ll regret using the cheaply made stuff.

Fusible Batting – This is great for small projects!  It can be ironed temporarily to secure it into the middle of a quilt, which saves time because that means no pinning or basting.  However, personally, I’ve never been able to successfully use it in large quilt projects without it wrinkling on me

Needle-punched Batting – Needle-punch batting is mechanically felled together by punching the batting with a lot of needles.  Because of this process, it’s a firm batt and it is denser than other batting.  Needle-punch batting is a great choice for quilts that will endure a lot of harsh abuse (such as a play quilt or a chemo quilt).  It’s also great for quilted apparel. 

Moving on, now it’s time to address brands and desired appearance. 

Quilters, as whole, are a pretty loyal bunch.  Once we find a designer, tool maker, or any particular brand we really like, we tend to stick with that product and go into deep mourning if the manufacturer goes out of business.  Batting is no different.  There are several stellar batting manufacturers out there (Hobbs, Warm and Natural, Mountain Mist, and Pellon to name a few).  I base my choice on customer service and consistent value for the dollar – just as I do any quilting-related purchase.  And my very favorite batting brand is Hobbs. 

I love Hobbs batting. I love wool batting, too.

They have just about any kind of batt you could want, in any size you want, with just about all the fiber content available.  I’ve never had an issue with bearding and their customer service is wonderful.  Warm and Natural and Quilter’s Dream come in close seconds.  And I will use Mountain Mist polyester batting for hand quilting.  But what works for me may not work best for you.  Try different brands out to determine which one works for youThat’s what is really important. 

Let’s look at each type of batting and what kind of look it gives your quilts.

Cotton Batting – This is made from 100% cotton fibers and is about 1/8-inch thick.  When quilting on a regular sewing machine or an embroidery machine, this is probably the kind of batting you want, as it doesn’t create a lot of bulk you have to deal with when maneuvering the quilt through the machine throat.  This batting gives great drapeability and is the kind you want to use when you want the attention to be on the piecing and not the quilting.  It is not the best batting to use for hand quilting, though.  Cotton batting comes in two colors, white and natural.  Care must be given when using the natural color.  It’s kind of an ecru shade and if you’re using light colors or white as the background or neutral, it can make those colors appear dull.  Overall, white is generally the best choice for almost any quilt that you plan to use a cotton batting.  One more word of caution, before putting the quilt top on the quilt sandwich, peruse the batting for any cotton seeds that somehow slipped through the manufacturing process.  These can be oily and eventually leave a small stain on your quilt top or back.

Polyester Batting – Like polyester thread, polyester batting has come a long, long way over the years.  Polyester batts used to have incredibly high loft and have thin patches here and there in the batt.  No more.  Today’s polyester batts hold its shape and thickness better than almost any other batting, but is very light.  It has nice drapeability, and if the quilt you’re making is one that may spend significant time in the washing machine, (such as a crib quilt or child’s play quilt) this is probably the kind of batting you want.  It stands up well to such treatment.  The loft is a bit higher on polyester batting (it can run from 3/8-inch to 1-inch thick), which means your quilting stitches will show up more than with a thinner batt and it adds warmth without weight.  Another plus is that polyester batting is mold and mildew resistant.  Polyester batting is my go-to batt for hand quilting.  It needles beautifully. 

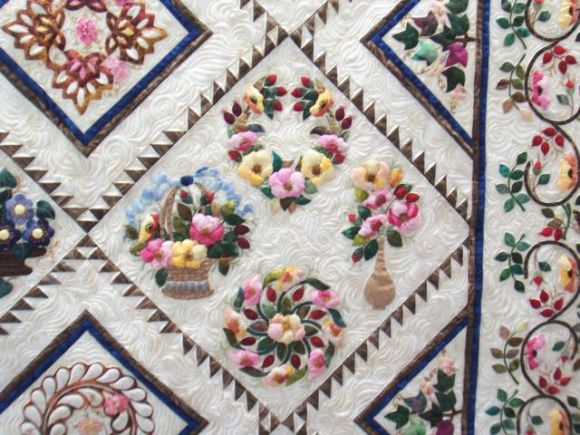
Wool Batting —   I love wool batting.  It has a higher loft, running about ½-inch thick.  This is my go-to batting for applique quilts.  The higher loft emphasizes the quilting stitches, which in turn defines the applique better.  And despite the thickness, it’s incredibly light weight.  It is also very warm.  This batting is excellent for hand quilting or the long arm.  It is a bit bulky for domestic machine quilting.  It also ties beautifully.  Because of the ½-inch thickness, it doesn’t drape as pretty as a polyester or cotton batt, but you’re trading that off for definition of quilting stitches – your quilting with be front and center with a wool batting.

Cotton/Poly Batting – Like the name denotes, this batting is a blend of cotton and polyester fibers.  It’s commonly called 80/20 (80 percent are cotton fibers and 20 percent are polyester), and this is generally the staple of all long arm quilters.  It’s a great all-around batting.  This batt has all the  characteristics of a cotton batting, with the loft of a polyester one.  It quilts well and washes great, too.  The drapability is good.  While I will always prefer a wool batt for my applique quilt, this is my go-to batting for cuddle quilts, throws, and play quilts. 

Bamboo Batting

Bamboo Batting – This batting is still fairly new to the quilt market.  It’s comprised of 50 percent bamboo and 50 percent organic cotton.  In order to make this batting, the bamboo is processed into fiber using pollution-free methods with little waste — so it’s a “green” quilting supply.  The pros to this batting are it is very breathable and holds up well to machine quilting of any kind.  It’s machine washable, with a 2 percent to 3 percent shrinkage.  The cons to this batting are I have always found it a bit stiff.  It doesn’t drape as well as the other batts.  And there isn’t enough history behind this batting to determine how well it holds up to time, use,  and the elements. 

Silk Batting

Silk Batting – If I had to name a favorite kind of batt, this would be it.  It’s great for hand or machine quilting – needles slips through this like a hot knife through butter.  It’s appearance in either pieced or applique quilts is spectacular.  It has a bit of a higher loft than cotton batting, but it is so light that the extra bulk isn’t a problem.  Like bamboo batting, silk batts are a recent addition into the batting market, so it doesn’t have a great deal of history, either.  To stabilize the silk fiber, it’s blended with polyester. The silk batting you purchase is really 90 percent silk and 10 percent polyester.  It’s also important to buy a bonded silk batt to prevent any bearding.  Silk batting maintains its loft, it’s light as a feather, and it’s warm in the winter and cool in the summer.  It can be machine washed, but any quilt made with silk batting should be laid flat to dry.  This quilt batt shows off your quilting stitches like no other batt and has the best drapability of them all.  It is simply the best.  The only drawbacks to this batting are the price and availability.  It is more expensive than the other batting and is generally only available through web sites.  I’ve never found it in a quilt store. 

Black Batting

Black Batting – Besides white and ecru, black batting is available, generally in the 80/20 blend.  If you use a lot of black in your quilt – say black is your background or neutral, you will probably want to use black batting.  However, if your quilt is a pretty equal mix of black and a light, or there are large patches of a light (such as in setting triangles when the quilt is set on point), you will want to forgo the black and stick to a white.   In this situation, the black would “gray-down” your light and probably not give the quilt the appearance you really want.  However….if you’re using a lot of bright, saturated colors (especially with batiks), you may want to go with a black batt even if you’re not using a lot of black in the quilt.  Black batting beneath these bright colors makes them look even brighter.

By now you should know your way around batting terms and types.  The best advice I can give you is to try the different brands and see what works best for the type of quilting you do.  If there is a brand I would personally always have in my stash, it’s the 80/20.  Of all the batts, this is the most versatile.  However, no matter what kind of batting is used, two situations will arise – scraps and shortage.  Every quilter has run into the situations where he or she has large, left-over batting pieces they don’t know what to do with (and they’re too big to justify throwing away), or you’ve finished piecing the quilt only to  discover you’re a few inches short on batting.  Here are a few ways to deal with both of those situations. 

Let’s talk scrappage first.  Quilters will always have leftover batting scraps, no matter how carefully it’s purchased.  I can never bring myself to throw away the large pieces of remaining batting scraps, no matter how hard I try.  I’ve discussed how to tame your fabric scraps, now I want to tell you how I manage my batting scraps.

The most important thing to remember is don’t mix your batting scraps.  With our fabric scraps, we know that all the material is 100% cotton and it’s all either prewashed or not.  However, with the exception of cotton batting (it has its own very distinct look), it can be difficult to tell the 80/20 from the 100% polyester.  Keep the different kinds of batting in different tubs and label the tubs.  The reason behind this will become apparent in a few more paragraphs. 

The large scraps – say 12 x 12-inches or larger – can always be used for projects such as mini-quilts, placemats, table toppers, or pillows.  Wider and narrow pieces of batting are good for wall hangings and table runners.  Smaller pieces can be used for coasters, Christmas ornaments, or mug rugs.  It’s always great to have these scrap options on hand for such projects so you don’t have to cut into a whole batt to get the size you need.  It’s a wise use of resources and money.  Those are the most obvious scrap-use options.  But what about the smaller pieces?  There are some organizations that will take certain sized smaller batting scraps.  These organizations use these scraps to make washable sanitary napkins for women.  You can google these groups and research what size they need and send your smaller batting leftovers to them.  There are also a few “unorthodox” uses for these scraps.  I have found they work wonderful on my Swiffer Sweeper — they pick up tons more than the regular dust mop cloths.  They also do a beautiful job polishing furniture. 

Now let’s look at a fairly common scenario.  You’ve pieced your top.  You’ve got your backing pressed and ready to go.  You rummage through your batting to find what you think is a large enough piece, only to discover is just a bit too short or too narrow.  Before you head to the store to buy another batt, let’s look at your batting scraps.  You may have enough to add to the large piece of batt you have so you won’t need to purchase any extra.  However, you don’t want to add two different types of batting together.  For instance, you wouldn’t want to add a cotton batt to an 80/20 or a 100% polyester batt.  Not only would the lofts be different, it would also give different appearances in the quilting stitches.  And if you wash the quilt, the cotton batt would shrink more than either of the other two, thus altering the quilt’s appearance even more.  This is why it’s important not to mix your batting scraps.

Piecing batting is not difficult. Place two pieces of batting together, with an overlap of about ½-inch on your cutting mat. 

Lapped Batting

Once the batting edges are lined up and overlapped, they will need to be cut.  Place a ruler over the overlapped area and cut down the center.  When you remove the little scraps, you’ll have two straight edges that will butt up together perfectly. 

When piecing batting, you don’t want a seam, so you don’t piece right sides together.  The batting pieces will butt up against each other and you will sew along the edges of the batt. 

The sewing does not have to be super-secure.  Basically, you’re simply basting it together until the actual quilting is done, which will hold it permanently into place.  I use a wide zig-zag stitch and a thread color (both in the bobbin and on top) that matches my batting.  Be sure not to let the batting pucker.  Some sewing machines seem to struggle moving the batting over the feed dogs.  If you’re machine seems to have this issue, try using a piece of tissue (the kind you use in gift bags) beneath the batting.  This will easily tear away from the batt when you’re finished.  If you have scraps of wash away stabilizer, those work great, too. 

There is this quilting product:

Fusible Batting Tape

With this fusible tape, you cut your batting as described above, cut a piece of tape the length you need, and fuse it onto the butted edges.  I have used this product and it works great.  The only problem I have is that my iron doesn’t like to press directly on the batting.  I use a press cloth over top and have no issues.   I have also heard (but I have never tried) lightweight fusible webbing (such as Heat-n-Bond light or SewKnit) also does a wonderful job in this process.  The directions state to cut a piece of the webbing ½-inch wide by the desired length and press according to directions and in the same matter as you would the fusible tape.

It’s always a great thing to save money, and by sorting and storing your battings scraps, we can do both.  It also keeps a great deal of batting out of landfills.  So, this is really a win-win for everyone.  And just in case you’re wondering, I have found no difference in the quilting process with either a pieced batting or a whole one, on either Big Red, my mid-arm, or my long arm.

Until next week, Level Up Your Quilting!

Love and Stitches,

Sherri and Sam

Categories
Uncategorized

How to Tame that Ugly Fabric

Most all of us have them…

I certainly do.  I bet if I were to check out your sewing space, you have them, too.

You know what I’m talking about….ugly fabrics.

I know, I know, beauty is in the eye of the beholder, but honestly, some fabric seems to be beyond help.  You know…the kind of fabric you look at and wonder what in the world was the designer thinking when they came up with that?

In my quilting world, I have one way I get rid of most of my ugly fabric – I put it on the free table at guild meeting and walk away quickly.  At this point, one of two things happen.  Either someone decides (for whatever reason) they just have to have that fabric and takes it home with them, or I manage to sneak out of guild meeting before someone waves me down and returns it to me because literally no one at the meeting wants it.  If the second option happens, either the fabric goes to Good Will or our charity quilt stash, or it’s thrown in the circular file.   I can’t bring myself to throw chunks of any perfectly good fabric away because it bothers my conscience; however, I have no qualms about someone else throwing my fabric away. It can bother their conscience. 

Nevertheless, ugly fabric is the topic I want to address this week – ugly fabric and what to do with it.  I do realize that what is ugly to me may be perfectly appealing to another quilter.  So, to give that fabric to a new home (see free table at guild reference above) is a completely acceptable alternative to allowing it to take up room in your stash.  Because we all know how that works.  It’s shifted around so much it finally ends up at the bottom of the heap, hopelessly wrinkled and still just as ugly.

However, if you can’t bring yourself to give it away (maybe dear Aunt Sue left it to you in her will or something), there are some things that can be done to minimize the unattractiveness and emphasize the use.  After these suggestions, maybe you can breathe new life into that homely fabric.

Use it for quilting practice – If you have a long arm and it’s a nice, big piece of fabric, you can always use it to hone your long arming skills with.  If it’s too small for that, use it to practice quilting on your domestic machine.  Make some quilt sandwiches and stitch away.  If you have enough to make a stack of small sandwiches, you can set those beside your sewing machine and have them ready for several practice sessions a week.  This is a double bonus – you use that ugly fabric up and you get better at machine quilting. 

Use it for leaders – Sometimes as you’re starting a seam out, your machine wants to “chew” your fabric.  It gets lodged in your feed dogs and when you finally dig it out, there’s a hole in your good quilting fabric.  Cut your unattractive fabric up in 2-inch squares, fold it double, and begin your stitching on this piece of material.  This allows your feed dogs to go ahead and engage before your good quilting fabric goes over them, thus eliminating any “chewing” of the good stuff.  You can reuse each leader several times before you need a new one.

Cut it up into small pieces – Sometimes a little of the ugly stuff works better than a lot of the ugly stuff.  Most of the time, small pieces of the homely fabric will work in a quilt much more effectively than large chunks of it.  I think it was Bonnie Hunter that said if the fabric is ugly, cut it up into small pieces.  If it’s still ugly, you haven’t cut it small enough.

Calm it down with a neutral – And this neutral will usually be either a white, black, or gray solid or a tone-on-tone print that reads as solid.  Ecru may work equally as well, but I’m not an ecru fan (so seriously, this could be a personal preference thing).  The neutral will work surprising magic on making that ugly fabric appear not quilt so unattractive. 

Find a quilt pattern that can take advantage of its ugliness – There are a few quilt patterns that work well with fabric we have no idea what to do with. 

I Spy Quilt calmed down with a bit of neutral fabric.

The first one is an “I Spy” quilt.  I Spy Quilts are quilts (generally made for children) created with pictorial or novelty quilting fabrics —fabrics printed with objects that might not be obvious from a distance but can be identified during a closer look at the quilt.  If your fabric has printed objects on it that are easily identifiable, it may be perfect for this kind of quilt.

Kaleidoscope Block

If it is a large print that has regular repeats, it may be perfect for a Stack and Whack or Kaleidoscope quilt.  These quilts amaze me for a couple of reasons.  First, you can take the fabric, align it, cut it, and make your quilt.  Then one of your quilting friends could take the same fabric, go through the same process, and neither quilt would have more than one or two of the same blocks.  The other reason these quilts astound me is that they revel in ugly fabric.  The uglier the fabric, the better the quilt looks.  If you have a homely fabric with fairly large, regular repeats, try a Stack and Whack.  You’ll be amazed. 

Turning Twenty Quilt

Turning Twenty is another quilt pattern that can use almost any type of material, even ugly ones.  The pattern is designed to fit a fat quarter.  Each quilt block is made of only three pieces, so this is an easy quilt for even a beginner, particularly since there are no curves or points to sew. The completed quilt takes 20 quilt blocks made by mixing the fabrics.  If you mix your unattractive fabric with some better-looking ones and throw in a neutral here and there, you’ve used up the material and made a nice quilt.  This is a great pattern to use with stellar fat quarter packs…and those fat quarter packs where only a few of the materials are stellar. 

Now let’s kick it up a notch.  Let’s really look hard at that fabric you don’t find so appealing.  I gave you some easy solutions about what to do with ugly material at the beginning of this blog.  Let’s level this process up a bit.  There are applique possibilities in those fabrics.  You’ve just got to know what to look for and how to picture it.  I can tell you my process – how everything works for me – and then it’s up to you to work it out in your own quilt studio.

For me, the process begins with my stash.  We’re starting with what we have before we fabric shop.  It’s always better to use up what you’ve already bought – it’s good stewardship and saves you money.  With my stash (and I’m referring to fat quarters and everything three yards or less), those are arranged by color.  Any fabric that is smaller than a fat quarter (and isn’t a precut) I consider a scrap and those are sorted by color and stored in bins.  When I am designing my applique, I go to these sources first.  Some parts of an applique pattern are easy to figure out – like leaves and stems.   If’ I’m prepping these, I pull out the greens and make some decisions. (And let me throw in here, I only keep scraps that are approximately 8-inches square, so I don’t become overwhelmed with my scrappage). 

But some other items require a little more imagination, and this is where pushing yourself to think outside the fabric box works in your favor.  For the sake of illustration, let’s think about baskets and birds.  In traditional and modern applique, both of these items get some serious play time.  Now I want you to think about how often you see a variety of material with either a basket weave or feathers.  I’ll wait a minute or two while you mull this one over….

(Cue music from Final Jeopardy….)

Times up.  The answer is, “Not often.”  It’s easier to find landscape fabric (material printed with bricks or stones or grass, etc.) than it is to find a piece of material that is printed with a basket weave or feathers.  I truly “lucked out” with this small quilt:

I had a scrap of basket weave material I saved from back in the 1990’s.  That’s nearly 30 years ago.  Situations such as this – when you need something to give the impression of an object but don’t have the exact fabric to do this – is when you have to use a lot of imagination and a good pinch of creativity.   This is where the ugly fabric can come into play.  Sometimes that ugly fabric is exactly what you need to give the impression of baskets or feathers or rocks, or even flower petals.  Let’s look at some examples. 

For example, take this fabric:

Ugliest Blue Fabric Known to Man (and Woman)

This is kind of a bold print, and I’ve had it in my stash for a while.  I’ve hung on to it for applique because you know what this would work well with?  Birds.  When I’m making an applique quilt that has critters on it or floral work, there are two ways these patterns are generally presented.  The first is a stylized way (the kind of applique I’m using on my Language of the Flowers quilt) where the applique pieces are imaginative but not true to life.  The second approach is a very realistic way in which the applique artist works to make the berries, birds, baskets, etc., look as accurate as possible. 

My first Language of Flowers Block. The applique is highly stylized.
Detail of applique form Little Brown Bird by Margaret Docherty. The applique on this quilt is extremely beautiful and realistic.

Let’s say I wanted the birds in my block to appear as blue birds or blue jays and I wanted them to look as lifelike as I could get them.  This material would be perfect.  We all know that blue birds or jays aren’t solid blue or even only blue.  They are created with different colors. 

Next, let’s go back to leaves.  A long time ago I urged everyone to try to always think creatively and if you find yourself stuck in the creative process, go for a walk.  Look around at all the greens and browns that nature has provided.  Leaves aren’t solid green.  Stems aren’t solid greens, either.  Neither is grass.  These fabrics:

Would work perfectly for them, if you’re approaching your applique from the realistic point of view. 

You’ll notice that none of this material is particularly attractive.  In fact, if you saw it in a fabric store or quilt shop, you may not even give it a second glance unless it was on the clearance table, because we’re all going to check out the clearance table…This is the point where we, as quilt artists, have to start thinking out of our box.  Leaves are more than just green.  Birds are more than just red or blue.  I can tell you in all honesty this process takes time and practice.  I began training myself to do this anytime I had to purchase material for applique or was rummaging through my scrappage/stash to begin the quilt.  If my quilt was leaning toward the very realistic end of things, I pulled everything that could possibly be used and spread it out on my cutting table. If I was looking for fabric to make leaves out of, I’d cut a reverse  template:

Bottom row illustrates reverse template

Then I would lay that template down on the material to see how it would play as a leaf.  I would do the same for flower petals, stems, birds, bunnies, berries…whatever applique pattern played a dominant role in my block, I’d make a reverse template and try it out on all the fabric that could be used in that quilt.  Over a period of time – several years, actually – I could look at a piece of material and begin to see the possibilities it had in it. 

One purchase I would encourage every applique quilter to make is ombre fabrics.  I’ve touched on these before.  These are so versatile and can run the spectrum of one color or several colors that undulate throughout the material. They hold endless possibilities for flowers, leaves, flower centers … just about anything you need.  Another purchase I have found helpful is fabric depicting the item you’re appliqueing – such a material printed with leaves on it for appliqueing leaves.   Make a reverse template and use it to help fussy cut your leaves.   The veins in the leaves are already there most of the time, so it certainly helps make your applique look realistic.

Let me offer this word of caution here.  Don’t mix stylistic applique and realistic applique together in the same block or the same quilt.  Mixing those two styles makes the quilt look off-balance.  While you can certainly mix applique techniques, don’t mix the two styles. 

I hope this blog has given you a new appreciation of your ugly fabric, and maybe has even moved it from the realms of hideous to the area of endless possibilities.  The more your practice thinking outside the box with those unattractive fabrics, the easier it gets.  And this makes you a smart consumer of quilt fabric.

Until next week, Level Up Your Quilting!

Love and Stitches,

Sherri and Sam

Categories
Uncategorized

Paper Piecing with Freezer Paper

As promised, this week we’re looking at paper piecing with freezer paper.  I love paper piecing, especially for complicated blocks.  You just can’t beat its accuracy.  While it is a trade-off between fabric and precision (it takes more fabric, but it’s way more accurate), it does make short work of difficult blocks with lots of pieces.  And no matter what you use as the paper medium for this, nine times out of ten, the paper has to be removed before the quilt is quilted.  However, this blog deals with that one time out of ten…the one time you don’t have to remove the paper from the quilt top before quilting because it’s already been removed.  When you paper piece with freezer paper, the paper is peeled off as soon as you sew the pieces together.  There are a couple of different methods that deal with using freezer paper as the medium in paper piecing.  We’re looking at both this week.

The first way is what I call the “standard” method.  This is the one most commonly used and the easiest to understand.  This technique uses the same numbered pattern that you use in regular paper piecing, but you don’t stitch through the paper.  Instead, you pre-cut the freezer paper templates, press them onto the fabric, and cut the shape out, adding an extra ¼-inch of fabric for the seam allowance.  Then you sew along the edge of the freezer paper as a stitch guide.  This helps you get the really super-sharp points.  When the block is finished, you simply peel the freezer paper off.  There is no stubborn paper to wiggle out of places where seams are joined or other tight spots because you don’t sew through the freezer paper.  This is a simple process and it’s easy to learn.

However, there are couple of cons to this method, the first one being accuracy.  Because you’re not stitching directly on a line, you won’t have the same level of precision as you do in regular paper piecing.  The second drawback is the amount of prep time this method takes.  Instead of simply printing parts of the block (or the entire block itself) out on a piece of paper and cutting just those out, each part of the pattern printed on the freezer paper must be cut out individually.  This takes more time.  However, if the quilt block has no tiny, sharp points or isn’t too complicated, this method works well, despite the amount of prep time.  The process goes like this:

  1. Start off by transferring your pattern templates onto freezer paper.  The easiest way to do this is to copy or print your pattern via your ink jet printer onto the 8-1/2-inch by 11-inch freezer paper that is printer compatible.  If you have to use a roll of freezer paper from the grocery store, you’ll have to trace the pattern onto it.  Use a ruler to keep your lines straight and trace carefully.  Cut each template out on the solid lines.  Don’t include the seam allowances on the templates.  Mark each piece with the pattern numbers or letters and make note of any special instructions —  like where to place the pattern along the grain line of the fabric.

Press each freezer paper template shiny side down onto the wrong side of the fabric.  Lay out pieces with enough space between them to allow a ¼-inch seam allowance on each piece.  Using a ruler and a rotary cutter, cut out each piece with the added ¼-inch seam allowance all the way around each piece. 

Pin two units together, inserting a pin through a point in one piece, and matching it up to the point on the second piece. 

Stitch the seam, working slowly and carefully, to avoid stitching on the paper.  Stitch very closely along the edge of the paper.  Unlike regular paper piecing, there is no need to shorten your stitch length, since perforating the paper isn’t necessary.  An open-toe foot, such as an applique foot, is a wonderful option for this part, as it allows for better visibility.

Press the seam open but keep the freezer paper in place.

Continue adding pieces in this same manner matching points, stitching along the edges of the paper, and pressing seams open.

When you’re finished, simply peel off the freezer paper and sew the units together.

The next  freezer paper method is a little more complicated.  If I want to use freezer paper for paper piecing and accuracy is a complete must (in other words, there is no “fudging” whatsoever in what I’m working on – like a border), this is the method I use.  The one of the difference between this method and the “standard” freezer paper method is freezer paper will be used for a master foundation pattern, as well as for individual templates.  This method works really well for compass designs (such as Mariner’s Compass) or blocks that have super-angular, thin points, such as New York Beauty.  To begin, make two copies of the pattern on the dull side of the freezer paper.  One copy will be used as the master foundation patterns and will not be cut apart.  The other will be used as individual templates.  The master patterns should all of the individual units a block requires.  Cut the master foundation pattern out, leaving a margin of paper around the outer edge.  Set this aside.  Take the template patterns and place them on another sheet of freezer paper.  Make sure the shiny side of the freezer paper is facing down for both sheets, and press them together with enough heat so that they bond securely together.  This makes your templates a bit sturdier. 

Cut out the paper piecing units, leaving a margin of paper around them.  Then cut the individual units out on the solid line.  Now you have your templates.

Press the templates to the wrong side of the fabric, leaving about one inch of space between the templates.  Cut them out, leaving about ½-inch seam allowance around each side. 

The dotted edge (the edge with a small dotted line) is the side that we need to turn.  Go ahead and plug in your iron (a small travel iron or a mini-iron works best), gather some spray starch and a small brush.  With the brush, paint some of the starch on the dotted edge fabric  seam allowance.  While the starch is still wet, fold the seam allowance over the template and press until dry.  Pull the template off and press again if you need to.

Repeat this process for all dotted edge seam allowances. 

Take the master foundation pattern to your pressing surface and place it shiny side down to the pressing surface.  Pin the first template piece that you’ve prepped with fabric onto the surface, wrong side up.  Make sure the fold aligns with the seam line on the master foundation pattern.

Place a thin line of basting glue on the fold line of the first piece.  Make sure to place the glue only along the edge where the second piece will overlap it. 

Place the second piece, wrong side up, on the master foundation pattern.  Be careful that the fold of the second piece aligns with the seam line of the master pattern.  Heat set this. 

On the second piece, put a fine line of basting glue on the fold where the third piece will go.  Place the third piece the same way you did the second piece and heat set. 

  Continue in this manner until you’ve assembled all the pieces in a unit.  When you get ready to give it final press before sewing, because there are no papers involved, you can press the seams however you need to (and to the darker fabric as much as you can).  But if you need to reduce bulk so it can be quilted easier, you can press the seams open or to the light side if you have to. 

Now you have to sew the units together.  The numbers on the patches in the master pattern indicate the sewing sequence.  I do shorten my stitch length a bit.  My default stitch length is a little long (in my opinion) for any piecing, so I always shorten it a bit.  A quarter-inch foot or an open-toe embroidery/applique foot works wonderfully for this.  Put your needle in center position and if your machine has an up/down option, program it for needle down. 

Lift one of the units off the master pattern and open the first seam until you can completely see the crease left by the fold.  Sew slowly and carefully directly on  this fold.  After completing the seam, trim the seam allowance to a scat ¼-inch.  Following the numerical sequence, continue sewing the seams in this manner.  Once all the units are made, you’ll need to check it against the master foundation pattern one more time.  Take the master pattern and press it onto the right side of the pieced unit, making sure to align the pattern lines with the seams.  Trim the completed unit so that the outer seam allowance measures ¼-inch.  Make as many units as your block needs, then sew the units together to make the block. 

A couple of hints at this point.  On average, the templates can be used seven to ten times before the edges get too soft and won’t give you a crisp fold.  If you make several sets of templates and set this process up as an “assembly line,” you’ll find this goes pretty fast.  I mentioned before in my blog on hand applique, that it’s important to use a type of basting glue that doesn’t your fabric stiff.  That’s important, here, too.  Even though you’re sewing with a machine, and that has lots of power behind the needle to go through layers of fabric and glue, you don’t want to have it leave the fabric feeling stiff or possibly breaking your needle.

I hope you consider one (or both) of these methods the next time you need to paper piece a block.  With a little planning and some extra prep time, you may find you really like this method.  Bonus…when you’re through, there are no pesky papers to remove.

Until next week, Level Up Your Quilting!

Love and Stitches,

Sherri and Sam

Categories
Uncategorized

Putting the Focus Quilters

It’s not all about the quilts.

It’s about the quilters – the fellowship. 

It’s about sharing the good times and the bad.

It’s about multiplying the joys and halving the grief.

It’s about taking the scraps life hands you and sticking your finger in fate’s eye when you make something beautiful out of it.

That’s what quilting is all about.

–Sherri Fields, May 2012

When I decided the theme for 2020 was “Leveling Up,” a lot of thoughts ran through my mind.  I knew I could emphasis more advanced quilting techniques.  I knew I could push daring color choices and placement.  I spent Thanksgiving week pouring over blog ideas I had never written about because I didn’t know if my reading audience would follow them.  I re-read books and articles that had challenged me to become a more advanced quilter.  Then I made a list of 45 ideas for this year.  And at the top of the list was you – the quilter.

There are all kinds of quilters in this world.

And thankfully, there is enough fabric, thread, and (generally) acceptance for all of us. 

This year, along with talking about some complex quilting techniques, I want you to focus on you, too.  We all wear lots of different “hats.”  We’re mothers and sisters and daughters and employees and employers.  We’re sons and fathers and brothers.  We’re in-laws and significant others and professionals and retirees.  We’re at various stages of life.  Some of us are taking care of small children and some of us are taking care of aging parents.  Some of us are widows, some of us are childless, and some of us are raising our grandchildren.  Some of us are dealing with a sick spouse or with our own health issues.  We’re all at different stages and at different places.  But the tie that binds us together is quilting and all of its creativity, chaos, and color.  No matter what technique or designer or fabric line we like best, get a bunch of quilters in a room and the talk quickly turns into the Fellowship of the Quilt. 

This is important.  And that’s why we need to take care of us as much as we take care of our fabric.  What do I mean by this?  I want each of us to define our quilting journey as uniquely ours and not compare it to anyone else’s.  I could never design quilts like Kim Diehl.  But you know what?  That’s not my quilt journey.  Each and every quilter has his or her own creative path they carve out for themselves.  My path is not your path.  I (almost) visibly cringe when I hear another quilter say, “I could never quilt like you.”  Know what?  You shouldn’t.  You should quilt like you.  And you should cultivate what makes you great as an artist and strive to make each quilt a little better than the one before.  What you shouldn’t do is compare yourself with other quilters. 

When I started quilting back in the mid-eighties, it became all-consuming.  During that time, I had small children and still made all of their clothes and most of my own.  I worked and my spouse worked out of town a lot.  This meant that my quilting time was limited.  I primarily followed patterns or took Saturday classes.  Once Target opened in my city and , my made children’s clothes a relatively cheap purchase, my sewing time freed up more, and I started to seriously quilt.  I began to take patterns and put my twist on them.  There were quite a few failures, but there were a few successes, too.  And I soon found out that I enjoyed “doing my own thing” much more than always following the directions.  I began to play with proportions and settings and color placement. 

Here began my creative path as a quilter.  These were the days before the internet, Facebook, and Instagram.  At this point in time, I had never heard the word “blog.”  The local public library was my Google and Hancock Fabrics was my quilt class.  Consciously or unconsciously, I was exposing myself to more quilts and quilters.  My interests began to expand.  I dabbled in art quilts.  I tried new techniques.  I wasn’t afraid to fail, and I didn’t know enough to be too intimidated by another quilter’s quilt.  I refer to this period in my quilting life as “Free Fall.”  I’d try just about anything and didn’t mind spending time with my seam ripper if things didn’t go as planned. 

This year, along with learning new techniques and playing with color and patterns, I want everyone to become sensitive to their creative process.  If you need to hit the pause button on your quilt journey, do so.  Sometimes time away from quilting is what you need to “reset” yourself as a quilt artist.  Sometimes that pause means leaning solely on patterns or kits just so you don’t have to think so much.  We’ve all been there, and usually the quilt mojo returns (either in a trickle or in a flood), and we release the pause button and hit play again. 

It’s also important to document your muse.  In other words, keep those things that inspire you near you.  The cell phone is actually a great help in this.  Take pictures of flowers or trees or buildings that inspire you.  Quilters are often inspired by non-quilty things.  A catalogue that comes in the mail.  Paint chips from the hardware store.  A design on a scarf, in a tile, or even in a wallpaper that we just have to reproduce in fabric.  Any and all of these things can push us towards our next quilt.  I keep pictures in a file on my phone.  I have several Pinterest boards.  I also keep a physical file folder with clippings and such that stir my muse.  Sometimes it’s color.  Sometimes it’s texture.  Sometimes it’s a pattern.  But it’s important to me that I keep them accessible.  They help me in two strategic ways:  If I am planning a new quilt, they give me inspiration.  If I am pushing my way through a project, they give me an added desire to finish it so I can move on to other ones.  It’s equally important to note that you need to document what inspires you.  What works for me may not stir any inspiration in you.  With me, it’s all about color.   Nine times out of ten, it’s colors that that inspire me.  Patterns make up the other one-tenth.  What works with your muse may be something entirely different.  And that’s okay. 

This year as we are challenging ourselves to try more complicated techniques and patterns, let’s stay sensitive to what inspires us as well as to what challenges us.  As we each carve out our own quilt journey, let’s not compare ourselves with each other, but encourage each other and hold that individual quilt path as nearly a sacred experience.  Next week we really begin our Leveling Up when we will look at a new way to paper piece.  Have your freezer paper center front and ready.

Meanwhile, don’t be afraid to try something new!  Level it up!

Love and Stitches,

Sherri and Sam

Categories
Uncategorized

Happy 2020!

Here we are at 2020.  I don’t know about you, but 2019  flew by so quickly, it’s hard to believe we’re in a New Year. 

New Year.

New Goals.

New Theme.

But before we get into all of that, let me give you my State of the Quilt thoughts and go into the predictions I had for 2019, as well as my thoughts about what may be happening in the 2020 quilt world.  I had three predictions for 2019: 

  1.  A Return to Traditional Quilting
  2. More Acceptance of Embroidery Machines as Part of the Quilting Landscape
  3. The Layout of Fabric Stores and Quilt Shops will Continue to Change

Let’s take them one at a time.

A Return to Traditional Quilting – I think I was dead on with this one.  Last year I thought it there would be a resurgence of traditional blocks, hand piecing, and hand quilting.  If there was one niche in the quilting world that specifically backed up this prediction, it is the explosion in popularity of English Paper Piecing.  While personally I don’t enjoy this technique, obviously hundreds of other quilters do.  With this revival of EPP, certain traditional quilt patterns and blocks also enjoyed shaking off the cobwebs and basked in the glow of popularity.

More Acceptance of Embroidery Machines as Part of the Quilting Landscape – Not only did embroidery machine work earn a place at the quilting table, but hand embroidery also has garnered a good deal of exposure this year.  Many quilt patterns incorporated hand embroidered blocks.  Not to be left out of the party, many applique patterns encouraged details performed with hand embroidery.  And embroidery machine programmers designed programs  for the embroidery machine that will allow you to quilt your quilt in a hoop. 

The Layout of Fabric and Quilt Stores will Continue to Change – This is one of those good news/bad news issues.  The landscape of the retail quilt world continues to evolve and unfortunately part of this evolution includes shuttering more of the brick-and-mortar quilt shops.  The biggest of these in 2019 was probably Keepsake Quilting. 

When I began quilting in 1986, Keepsake was at the forefront of the quilt world.  If I couldn’t find what I needed in Hancock Fabrics or one of the local quilt shops, the next place I’d look would be Keepsake.  Those were the days before the internet.  I’d hang on to the old Keepsake catalog until a new one came out.  Through the years, Keepsake changed hands a couple of time, until fairly recently one of “my” local quilt shops purchased it – Pineapple Fabrics.  They kept it open for a while but the distance between Keepsake and Archdale, NC (where Pineapple is located), as well as declining sales coupled with increasing costs of the brick-and-mortar establishment proved to be too much.  Like many quilt shops, Keepsake will live on in the internet world, but the shop itself if is closing. 

Okay, that’s the bad news.  The good news is the quilting world is keying into the next generation of quilters, while trying to keep us long-established ones happy.  The costs of sewing machines is declining, as technology continues to get cheaper.  Fabric manufacturers are still churning out their goods, but the colors are changing and growing somewhat brighter.  And there are more “niche” fabric producers, such as Spoon Flower that allow you to design your own fabric and have it printed.  With this sensitivity to the younger generation and their shopping habits, there are more available on-line stores to purchase your fabric.  And while I still encourage, urge, and push quilters to buy from their LQS, it’s nice to know that home-bound quilters now have everything at their fingertips. 

However, I do miss the days when I could go to a fabric store and see two or three of my friends there or make new quilty ones.  And I really miss the days when I could run into Hancock Fabrics and purchase machine needles at 8 p.m. on a Friday night after my last one broke and I was in the middle of a project.  Now I must Prime them because there are no fabric stores in High Point. 

None.  Not one. And I’m not counting Hobby Lobby.

Now my predictions for 2020….

Technology will continue to change our quilt world, both for the good and the not-so-good.  I believe that on-line classes and how-to YouTube videos will increase more and more as the next generation of quilters step up to the plate.  They’re the group that seems completely at ease with on-line teaching, as many of them have had this type of instruction in undergrad and grad work.  For us older quilters, this is awesome because it allows us to plug into designers that may never make it to our area.  The downside to this is there will be fewer “physical” classes.  With more and more brick and mortar stores closing, we quilters are losing precious classroom space that is difficult (if not impossible) to re-gain.  And in this process, we are losing one of the most valuable parts of quilting – the fellowship with other quilters. 

More technology means cheaper price tags on things like sewing machines and long arms. It also means more competition between brands and manufacturers.  And this means quilters will be able to afford machines and gadgets they never thought they would be able to purchase.

Quilt groups will become smaller.  With the rise in quilty technology, the number of on-line groups will continue to grow. The results could be the possibility of shrinking membership of physical bees and guilds.  This possibility bothers me a great deal, as quilt bees, guilds, and groups are a vital part of our quilting heritage.  If we have to wage war against any of these predictions, this is the one we should choose. 

This year may be the year that there is a resurgence in quilt preservation.  I am old enough to remember our bicentennial year – 1976.  With America’s 200th anniversary, there was a rising interest about quilting and antique quilts.  From that point in time, well into the 1980’s, many states had groups of quilters organize to document and photograph old quilts.  I have North Carolina Quilts book from this time.  It’s one of my prized possessions. 

I think with this new decade, we may very well begin to hear some rumblings from quilters that “We need to do this again.”  God knows its time – some of the quilts that weren’t eligible for the last round of documentation (because they weren’t old enough), would be up for it now.  This should be done.  If it’s not, we’re on the precipice of losing a good chunk of our quilting heritage.

And a side benefit of this may be an increase in numbers of folks that are interested in quilting. 

Predictions now out of the way, it’s time to announce the 2020 blog theme!  In 2017, we Quilted Fearlessly.  I urged you to get out of your comfort zone and try new things…harder things…stretch yourself as a quilter.  In 2018, we Quilted with Excellence.  I wrote a lot of “teachy” blogs, emphasizing the basics and encouraging you to embrace each step of the quilting process with your best work.  If I remember correctly, there was a lot of math involved in some of those blogs.  And those blogs still receive a lot of hits – especially the ones involving quilting and the Golden Ratio.  This past year, we Quilted with Passion, throwing our whole selves into the craft we love.  All three of these years have been a build up to 2020’s theme, which is:

Level Up!

What does this mean?  Well, if you or someone in your life is into any type of video gaming or games like Words with Friends or even Solitaire, you’re aware you “level up” – or go to the next level – after so many points are scored or certain skills are attained.  After Quilting Fearlessly, Quilting with Excellence, and Quilting with Passion, we are ready to push our quilting to the next level.  We’re ready to “Level Up.”  Details will be examined, reasoning will be questioned, directions will be dissected, and new skills will be tried.  I’m excited about this.  So, pull out your fabric, fire up those sewing machines and in 2020….

Level Up!

Love and Stitches,

Sherri and Sam