So…. Earlier this month I ran a blog about items you may
want to put on your Christmas list for that significant other to have for you
under the tree. One of those items was
this:
The Cuttipillar Light Box.
I will readily admit this is my very favorite light box to date. Yes, it’s a little pricey, but it came with a
carrying case and a translucent cutting mat that can sit on top of the
wafer-thin lighted surface, allowing you to cut fabric on top of it. It’s has LED lighting and three brightness
settings. I love this thing…I use it
weekly. I work with a lot of applique
and it has been worth every red cent I paid for it.
However, if you don’t applique often, or not at all, it
really doesn’t make sense to throw that much money into a light box. Chances are if you did, that light box would
end up collecting more dust than anything else.
But there still may come a time when you need a light box for quilting
or another craft. In this blog I want to
talk about some other ways to deal with this dilemma without breaking the bank.
The first way, of course, is simply purchase an
inexpensive light box. Walmart has
them. Amazon has an array of them. I purchased the light box I used for years
(before I found my Cuttipillar) from a tattoo supply house. If this is what you plan to do, make sure the
lighted surface is large enough to fit your needs. If the box is only going to experience
occasional use, a cheap light box will work just fine.
Nonetheless, there’s a few of you out there that are just dipping your toes into applique and
aren’t quite sure if that’s a technique you plan to stick with. Maybe you’re trying to still figure
everything out and any purchase beside fabric and pattern is completely off the
table. But you still need a light box to
trace the pattern. Have no fear, I want
to share with you a few easy ways to make your own light box without spending a
red cent (or at least not many of them).
Old X-Ray Light Boxes – If
you happen to know a medical office that’s re-upfitting its establishment and
can wrangle your way into purchasing one of their old x-ray light boxes (these
were used to illuminate the x-rays, allowing the doctor to read them), these
are great! The lighted surface is large
and is wonderful. My mother has one of these
that she uses in her stained-glass classes.
They may even give it to you, so they don’t have to deal with
disposal.
Flat-bed Scanners – Before printers developed the capability to scan as well as print and copy, folks had to have flat-bed scanner in order to scan and send documents or pictures. When turned on, the bed will light up, and that lighted surface is pretty large. The only downside to this is that the top of the scanner is attached to the bed and isn’t removable. That is about the only issue that will need to be dealt with. Check out thrift stores for these. Most of the time old flat-bed scanners can be picked up for a few dollars.
Storage Box – A
clear plastic storage box (generally priced between $10 – $15) can be converted
into a light box. You may even have one
in your quilt area that’s full of fabric you could shift somewhere else. The box needs to be deep enough and long
enough to add the light with a little room to spare. The lid should be flat, so the drawing
surface will be smooth. You’ll need a
light source to go in the box and there a couple of ways this can be
accomplished. You could cut a hole in
the side of the box, close to the bottom and insert a light source that plugs
into an electrical outlet. However, my
favorite light source is this:
These are battery operated and can be purchased at most
dollar store establishments. Simply put
these in the bottom of the box, press them on, return the lid to the box, and
trace away. If the box is big, a couple
can be used. And if the light is too
bright, just tape down a piece of white paper over the lid to diffuse it a
bit.
Acrylic Sewing Machine Extension – If
your sewing machine has one of these, it can do double duty as a light
box. Simply put one of those press-on
lights underneath the extension and get busy.
These are “small” fixes for a light box – they’re only so
big. There may come a time when you need
a bigger one – especially if you’re making a Baltimore Album Quilt or working
with a quilt that has large applique panels like this:
Commercial light boxes and those homemade light boxes
listed above can only be so big. So,
what’s a quilter to do? Below are some
solutions that will not cost you anything but a few dollars. In fact, you may already have these in your
home or garage.
A Kitchen or Dining Room Table that Has an Extension Leaf Capability – Pull the table apart as if you’re inserting the leaf. Measure that area and head to the hardware store/building supply house and pick up a piece of Plexiglas that will fit that area. The Plexiglas will fit into the area the table extension would go. Be sure to tape the edges of the Plexiglas with some kind of tape to keep it from scratching any of the table’s wood surfaces. Place a light source beneath the Plexiglas and you’re good to go. Bonus factor in this set up is that it’s just the right height to take the strain off your back.
Window or Sliding Glass Door – If
you don’t have a table that has extension leaf capability, you can always use a
large window or a sliding glass door.
Simply tape the pattern to whichever one you’re using and trace
away. Of course, using this method means
you have to do your tracing during the daylight hours (unless you can talk
someone into standing outside the window or door with a light source at night)
Light boxes are wonderful tools for any quilter, and if
you really like to applique, they’re a must.
If your budget allows it, purchase one that fits your need and your
wallet. If you’re only an occasional
appliquer, one of the homemade light boxes may fit your needs better.
Until Next Week, Quilt with Passion!
Love and Stitches,
Sherri and Sam
PS — Thanks to everyone who commented on The Quilt That I Can’t Finish. Ya’ll had some wonderful ideas and I’m thinking about exactly what I want to do. I’m leaning towards making it a wall hanging with the picture of my dad and me in the middle. I’ll let you know what I decide.
I think there comes a time in every quilter’s life where
methods and circumstances converge at a point where a quilt is more than a quilt. It’s a work of art. It’s therapy disguised as needle, fabric, and
thread. It’s sanity kept by sewing. It’s when the machine is almost a
confessional or a few stitches shy of an altar call. In 2018 (which you may remember is my terribilis
est annus), I needed such a quilt.
Something that would occupy my mind (to stop it from thinking about
everything that possible could happen) and challenge my talents. Thus, the hunt for a pattern began.
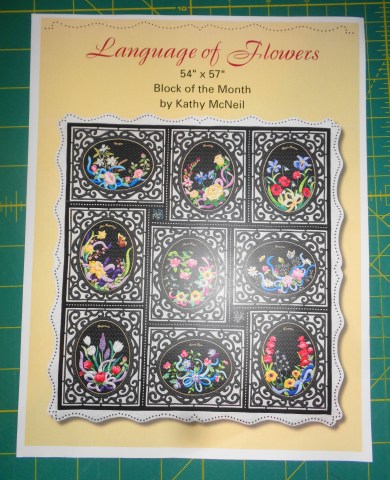
I found my quilt in Kathy McNeil’s Language of Flowers. If you don’t know who the award-winning Kathy McNeil is, stop right now and Google her. Look at her quilts and be in awe. She is simply amazing. I love her, her generous and sweet spirit, and her quilts and patterns. She is that wonderful blend of artist and quilter. Language of Flowers is a great fit for me because I like floral quilts and my it would feed my affinity for applique. Kathy also uses an applique technique known as Apliquick, which is also one of my preferred methods. There is a great balance of both hand and machine work with this quilt, which would allow me ample time to clear my head, pray, and be productive. So, my work started.
After raiding my fabric stash and purchasing some needed yardage,
I began. Kathy gave several technique
options for the black ovals that serve as the background for all of the flowers
and embroidery. The one that made the
most sense to me was the “Quilt it Before You Applique It.” A layer of thin, black batting was placed
behind the black ovals and it was quilted in ½-inch cross hatches before any of
the applique was sewed on. I chose this
method for one primary reason: In my
mind, it was the easiest. If I didn’t to
the background quilting now, when I did finish the entire quilt top, I would
have to go back and quilt in the background around all those tiny applique
pieces. While not impossible to execute,
it would be time-consuming and an overall pain in the rear. For several weeks, I marked the ovals at
½-inch increments on the background fabric and quilted them onto a rectangular
piece of Hobbs black cotton batting. The
batting would need to be thin, because when the top was finished and assembled,
another layer of batting would be added in order to quilt the whole thing.
This was relatively mindless work. My hands stayed busy while I prayed through
my morning prayer list. I pray twice
daily. In the morning, before I leave to
go to work, I pray through my list.
Later in the day, one person on that list is specifically prayed for,
along with both Meagan and Matthew. This
is the way I’ve prayed for years.
However, I’ve never been the type that can sit still and pray. My mind wanders too much. But give me something to keep my hands busy
and I can focus. Marking and quilting
those black ovals were perfect for prayer.
The next thing I had to decide was exactly how I wanted my quilt to look. Again, I want to emphasize that if you’re a seasoned quilter, the directions aren’t so much instructions as they are suggestions. You’re making the quilt. It’s your quilt. If you don’t like something or want to change methods and you have the skill set to do so, go for it. And this was where I was at. The pattern for The Language of Flowers called for machine embroidery and gold piping. While I was confident I could have undertaken both, neither of those appealed to me for my quilt. I opted to leave both of those out.
Now let’s talk applique – my very favorite topic. Kathy uses the Apliquick method for this and
I think that any method similar (I use a hybrid method that I will talk about
in another blog) would work best for this, even if you’re not crazy about
Apliquick. The reason? The black background and overlapping bright
colors. If the applique pieces aren’t
interfaced by some method, the dark fabric beneath them will show through
(called “shadowing), dulling the bright flowers and leaves. The “paper” used with the Apliquick method
prevents that. If you’re dead set
against using this method, then you will need to interface your applique fabric
with either a thin, iron-on interfacing (the kind used in garment construction)
or a piece of white fabric (more on this method in another blog) or opt to use
a light background fabric.
I chose my applique fabric from my scrap bins. This is a great quilt for that – you can raid
your scraps like crazy and reduce those.
The applique material would have to be bright in order to hold its own
against the black background. So,
pastels, as a whole, were out. Batiks
are a great choice (they work so well with so many flowers) as well as other brighter
fabrics, such as the Grunge line, Connecting Threads Quilter’s Candy, ombre
fabrics and Fossil Fern material. And
while I used Kathy’s color choices as a guideline, I did veer from that if I
didn’t have the right color or didn’t particularly care for the color. After all, it is my quilt.
It was when I sat down with my Cuttipillar Light Box and my Apliquick paper and Kathy’s pattern sheet that I hit a wall. I loved Kathy’s flowers, but the more I traced, the more I realized that appliqueing them could become a logistical nightmare for me. There are lots of tiny pieces. I tried two of her flowers – the small, pink flower and white flower on the far right of my block.
Then I stopped. At this point, I realized two things really quickly about me and this quilt. First, if I continued to use Kathy’s pattern for the flowers, I would literally have to undertake one unit at a time. Each flower and the ribbon had so many pieces. If I tried to trace them all at once and then cut them out, a lot would get lost in my translation – even if I took the time to label and number each piece. The second thing I realized was that the flowers on this pattern were very realistic and very detailed. My applique tends to lean towards the more stylized end of things – it tends to be very “lean and clean.”
I also came to the conclusion that while I may be able to
carry my stylization in some of the units, it wouldn’t work for everything. I would need to use the original pattern in
some instances. I chose to stick to
Kathy’s rendition of the ribbons and hand embroidery. But the leaves (each leaf is slightly
different in the pattern), flowers, and buds would have to be drawn from
another source. I did use the pattern as
a reference for the size of the flowers, leaves, and buds, but I turned
to another applique artist: Deborah
Kemball.
There are very few quilting artists and designers that I
buy everything they’ve ever published.
But Deborah Kemball is the exception.
I have every book and pattern she has produced (at least I think I
do). She works only with floral design
and her patterns are wonderfully streamlined with a touch of whimsy. Her work looks complicated – and some level
it is – but she breaks it down into steps that makes things pretty simple. And while she does not use the Apliquick
method (she uses the needle turn method), she does gives directions on how to
line your applique pieces so that the background does not shadow through. I find it wonderful that several of her
pieces were appliqued on a red background.
At this point, if you’re curious about the Apliquick method or you
already use it, please note that almost any applique pattern can be “converted”
into Apliquick use. It’s remarkably
similar to the freezer paper method, you just use a glue stick instead of an
iron.
Once I prepped my pieces, I had to lay them out. It’s recommended that you draw the pattern out on a piece of clear plastic to make an overlay. This will show you where to place all the pieces. However, in my nearly 33 years of quilting, I’ve done a difficult applique pattern or two and have developed a pretty good “eye” about layouts. Again, directions are merely a suggestion to me and not a hard, fast rule. I didn’t use the plastic overlay, but if you’re newer to applique than I am, you may want to use that technique to help you with the layout. The main concept that I had to keep in mind was I had to keep a consistent ¼-inch margin all the way around the oval because there is a frame that goes around the applique and I needed the pieces to stay within the frame.
After every piece was laid out, I glue pasted it in place and stitched it down. For me, this is the fun part. Lots of appliquers use silk thread. I do not. It has always been a constant battle between silk thread and me. I have never been able to knot it correctly and have always had issues with it slipping out of the eye of my needle. For hand applique, I use fine cotton thread (about a 50 or 60 weight) that matches my applique piece.
Now it was time to consider the oval frame and the scroll
work. I wanted a fabric that would
enhance the applique pieces and had a fairly firm weave. That firm weave was necessary. Take a look at that oval.
Normally, with curved edges (such as with leaves), the
applique piece is cut on the bias of the fabric. This bias cut allows for ease of
turning. However, with the oval piece there
were several issues I had to consider, the first being the width of the oval
frame itself. It’s narrow – finishing at
½-inch in width. If I did cut the piece
out on the bias, I would have to deal with the possibility of stretching the
fabric. Remember from my other blogs
about cross grain, straight-of-grain, and bias grain, it’s the bias cut allows
for the most stretch. If this oval piece
got stretched in any way, it would be nearly impossible for it to fit correctly
around my applique and it would not lay flat against the background. If I cut the oval on the straight-of-grain,
it would be difficult to turn the edges under smoothly, as this cut allows for
the least amount of stretch. I had to
cut the oval on the cross grain. This
would allow for enough ease to turn the fabric under without the threat of the
oval getting stretched out of shape. The firm weave would keep the fabric from
fraying, as the inside curve of the oval would have to be snipped frequently to
permit the material to turn under smoothly.
A firmly woven fabric is also needed for the scroll work.
One thing I appreciate about Kathy McNeil is that she is not afraid to use mixed methods. The scroll work is machine raw edge appliqued. Tightly woven fabrics are always needed for raw-edge applique, as that method takes a lot of abuse from the feed dogs and the stitch (both the type of stich chosen and the shortened length and width). A Batik would fulfill everything I needed the material to do. I pulled this fabric from my stash.
It would match and enhance my flowers beautifully. And while the flowers printed on the material are 1 ½-inch in diameter, the fabric is cut in narrow widths – so the flowers don’t appear so much as “flowers” as they do spots of color. It is as close to perfect as I could wish for. I appliqued the inner curve of the oval frame to the background by hand. The directions call for it to be machine appliqued with transparent thread, but I was a little antsy about that. I was a little afraid the machine work would stretch the oval – something I am avoiding at all costs. I used raw-edge machine applique for the scroll work.
At the beginning of this blog, I mentioned that this quilt
is more than “just a quilt” for me. The
hand sewing and prep work allowed me to meditate and pray. It slowed my world down enough for me to pause
my racing mind. However, this quilt is
highly symbolic. There was so much chaos
in my world – it seemed as if everyone I loved was facing some type of trial –
especially the women in my life. I’ve
mentioned before that I don’t have a sister.
I have a terrific brother, but no sisters. The women that I’m close friends with tend to
fill that role. I love this circle of
“chosen” family. That’s why I began my
blog with the quote from Amy Tenney.
These women are also behind the reason I chose certain flowers for the
applique. Historically, flowers have
held special meanings. Long ago, if a
person received a certain bloom from someone, they knew what the sender was
conveying without a word spoken. Along
the way, a lot of these meanings have been forgotten, but not in this quilt.
The white bud to the far right is Jasmine. Jasmine means “Gift from God.” I put this bud here especially for my
daughter, who was recovering from her cancer surgery when I started this
quilt. Her full name is Meagan Elizabeth
– which literally means “Precious Gift Sent from God.”
The pink bud beneath the Jasmine sprig is a Bush
Rose. It’s meaning is “New Beginnings,
Promise, and Hope.” Bush Roses are
different from the shrub roses that grow in a lot of yards. Bush roses are smaller and today are grown
most frequently in pots. However, they still
grow wild. There is a beautiful thicket
of them across the street from my home.
I look forward to seeing them in the Spring because when they bloom it
means that warm weather has returned.
Winter is over. To me they are a
perfect symbol for the women in my life.
They face hard times. They get
through those periods with compassion, strength, and dignity. Instead of withering beneath the “winters” of
their lives, they come out even stronger than before.
The large, pink flower that’s centered in the center of
the blue ribbon is a stylized Magnolia.
Growing up in the South, I’ve seen Magnolias in almost every yard. At Christmas, they often cover mantles and
are in door wreaths. They’re fragrant,
beautiful, and look oh-so-delicate. But
remember that wonderful movie Steel Magnolias”? Southern women aren’t called that for
nothing. Magnolias are deceptively
fragile looking. In reality they’re a
hardy flower that can stand up to our withering heat or our notoriously
dangerous hurricanes. Let the wind blow
through, but a Magnolia tree will remain standing, most of the blooms
intact. It’s no wonder that a Magnolia
means “Great, Splendid, Beautiful, and Dignified.” I had my mom in mind when I put that flower
in the center of the block. Mom will be
80 in January 2020. She’s owned her own
businesses then sold them and began a second career working for the City of
Graham. She retired from there and has a
third career teaching stained glass art at the local community college. She’s a gracious widow that lives
independently. She’s been the symbol of
hospitality and care for our family for as long as I can remember. A sweet, southern lady with a spine of steel
– that’s Mom. A true steel magnolia.
On either side of the applique are Pansies. Pansies always make me happy – their bright colors just make any day a little happier. They look as delicate as the Magnolia, but again, that’s deceptive. They’re planted in the fall and bloom throughout the colder months. In the spring, they’re pulled up and replaced with something far less colorful – like Marigolds. Pansies represent “Loving Feelings.” I cherish the women in my life. And I wish all of us women would cherish each other instead of tearing one another down. We need to build each other up. We may disagree, but as time goes on and our lives alter – children grow up and our families change – we need our female friends as much as we need our close relatives. Don’t take each other for granted.
The white flowers on the far left are daisies. That’s another flower that makes me happy. I live in a rural area of Guilford County and there are hundreds of these white flowers along the banks of the ditches and the sides of the road, The meaning of daises is “Purity and Innocence.” While this particular flower was chosen as a “filler” applique (something small to use in blank areas), it still holds special meaning for me. My kids used to pick handfuls of daisies for me. I would always put them in a vase and sit them on my windowsill in the kitchen. It was the first thing I would see when I made my way to the coffeepot in the morning. They remind me that it’s important – that no matter what life throws at you – to somehow maintain that childhood innocence, wonder, and trust we have in God.
Kathy’s BlockMy Block. I still have to finish the scroll work and the tiny borders.
Okay, so why did I go through all of this explanation? There are three reasons. First, I said at the beginning of this year, part of my Quilt with Passion promise was you would get to know me a little better. I’ve spent lots of time and lots of past blogs in teaching mode. I wanted this year to be a bit more informal. No one quilts in a void. Our past invades our present through color choice, methods, and memories. We all are sum totals now of what we once were. Second, I want to encourage you to take a quilt pattern and make it yours. Once you’ve garnered the skill set, change the pattern. Alter it. Make it yours. You can always give credit to the designer and pattern that influenced you, but make your quilt your quilt. Don’t be afraid to do so. And third, believe it or not, this blog sets up the theme for 2020. We’re quickly approaching the end of 2019 and I’ve already got some ideas ready for next year!
Last week I mentioned that I was writing my blog from
Emerald Isle, North Carolina and that I was on our annual family beach
trip. I’m home now, but see this?
This happened. I had an emergency room visit. For me, this time. Usually it’s Bill that frequents the ER with
vertigo and kidney stones. The universe
had obviously decided that it was now my turn.
It all started the day after we arrived. The garbage disposal wasn’t working
correctly. A quick phone call to the
management company resulted in a tech coming out to fix it. And while he did manage to get the garbage
disposal back to normal, what I didn’t realize was that whatever he did to the
pipes and lines caused the toilet to overflow in my bathroom. A bit later when I had to go, I hurried into
the bathroom and when my flip-flops hit the water, I fell hard. My knee and ankle were hurt, and I jarred my
neck. Some of you know that I’ve been having
neck issues for a while and have been diagnosed with a pinch nerve in my
neck. I had that under control until I
took the spill in the bathroom.
My daughter-in-law, Anna, immediately started icing my
ankle, which really helped. But the
pinched nerve brought on the migraine from hell, which is what put me in the
Carteret County Hospital Emergency Room.
A CAT scan showed that I didn’t hit my head but was told that I needed
to follow up with my doctor as soon as I returned home. Which I did.
The doctor brushed aside the concern I had about my neck and head and
x-rayed my ankle, which was swollen to a pretty impressive size by this
time. Long story short, I have a
re-pinched the nerve in my neck, chipped my ankle bone, and have fractured my
heel bone.
And now I’m in this…
For six weeks.
Lovely. As long as I’m out of
this thing by my quilt retreat, I can deal.
And thus, has ended my summer adventures as I settle into
fall and the Christmas season. So, let’s
close the book on Summer 2019 and talk about something else.
The rest of this blog is even a bit more personal and
painful than the injuries mentioned above. Those “owies,” as my granddaughters
called them, will eventually heal and become a distant memory, only
re-surfacing when I get a twinge of pain here and there in my foot or
neck. I face those with as much humor as
I can, because wailing and complaining really doesn’t do you or those you are
with any good. However, there are some
wounds that don’t heal and those usually involve your heart and your
emotions. And while yes, in time, that
type of pain lessens, it never completely goes away.
See this quilt? I
know that is a bit of a rough transition but stay with me. I promise it will all tie back in
together. If I’m remember correctly,
this is the second block of the month club that Hancock Fabrics put out. It is definitely post-2000. This was the second large quilt I had worked
on. I love the colors – the yellow and
blue combination is one of my favorite color ways. It took me a year to assemble the blocks – we
received one block a month. My friend,
Ellen, taught the class and she showed us how to quilt each block separately
and then put the whole thing together.
Not quite the quilt-as-you-go method, but pretty close. And you can tell I didn’t know a thing about
batting, because the kind I used is that white, ultra-fluffy, polyester
kind. I quilted a little here and there,
squeezing in the time as I could. The
year 2001 drifted into 2002, 2003, and 2004.
The blocks, thread, and batting accompanied me to the beach, to
bleachers as I watched my son play baseball, to dance class as I waited for my
daughter. I worked on it here and there,
a little along the way. I wasn’t in any
particular hurry to finish it. By this
time, I had completely fallen in love with hand applique and had another quilt
in the works using that technique.
Then in 2005, the bottom dropped out of my safe, little
secure world. My father hadn’t felt well
and thought he had gallstones. He went
to have himself checked out during the summer of that year. My brother called me while I was on my way
home from a Florida vacation.
“Are you driving?”
he asked.
“No.”
“We got the report from the doctor. Dad has pancreatic cancer.”
Boom.
My life changed in an instant. I couldn’t breathe. I couldn’t stop crying, ether.
For the ensuing months, my life became a blur of dealing with students and classes and teachers during the day and trips to Burlington in the afternoons, evenings, and weekends – from July through September. At some point, I left my bag with the blue and yellow quilt in the car, so it went with me through all of the trips to Mom’s and Dad’s house, Alamance Regional Hospital, and finally the Hospice Home in Burlington. When Dad rested or didn’t need me, I would pull it out, quilt, and pray for the miracle that didn’t come. Eventually, that quilt stayed with me through all the family coming in, the visitation, and the funeral. Then it went back in the bag and back home with me to Jamestown. The bag went into a closet.
And I haven’t been able to touch it since. September 21, 2019 marked 14 years since I’ve
worked on that quilt. I’ve tried
to. I really have. But the emotions that so overwhelmed me then are
just as tangible today as they were on September 21, 2005. I’m not sure I’ll ever be able to put another
stitch in it. Ellen had a similar
situation with a quilt she was in the middle of making when her brother passed
away. She was able to finish it, but it
was years later. I haven’t reached that place yet.
I’m not too sure I ever will.
I think some of us quilters piece and quilt so much of our
feelings into our art. It gives us
something to do as we emotionally work through trying situations and keeps our
hands busy as we storm the gates of heaven with our prayers. But then again, maybe just the sheer thought
of sitting completely still and coming face-to-face with our fears may keep
needle and thread weaving its way through yards and yards of fabric without a
stop. We can deal with the uncertainties
that life throws us – just don’t ask us to give it our full attention or we’ll
go crazy. Allow us to cling to what
makes us feel productive and creative while we’re processing the worst
situations.
This is what I mean when I say quilting keeps me
sane. During life’s awful moments, it’s
been a touchstone. I can sew or quilt
and pray prayers of desperation, plead for miracles, and remind myself that God
has been faithful and that He always will be.
Do you have one of these quilts somewhere in your
UFOs? Is there one you can’t finish –
not because it’s too hard or you’ve just grown to dislike it – but because
somewhere in the tangle of fabric and thread and batting there are just too
many raw emotions involved? Did you keep
it? Did you give it away for someone
else to finish? Or is it like this poor
yellow and blue thing of mine – stuck in a bag in the back of a closet? I’d really like to know how you handled it.
As I’m writing this blog, I’m at beautiful Emerald Isle,
NC, on our last family summer vacation of the year. It’s 79 degrees already at 9:30 a.m. – a fact
that makes this column a little difficult to write because I want to talk
Christmas. Not Christmas quilts or
Christmas fabrics but items you may want to put on your Christmas list for
folks to buy for you (or you can purchase for yourself – who says you can’t buy
your own Christmas presents?). These are
items that I own myself and absolutely love.
And before we get any further along, the standard disclaimer
applies: I do not work for any of these
companies, nor am I reimbursed in anyway for recommending them. I’ve tried these products and really like
them. Plus, the companies that stand behind these
items have given me great customer service through the years.
Wafer Light Box
If you love applique, chances are you are either using some type of light box or have devised one of your own. For years I used a light box that I purchased from a tattoo supply – I liked it better than the standard quilting light box because it had a bigger lighted surface area and I could set it up at an angle. However, I recently purchased a CuttaPillar wafer light box and love it better than any I’ve owned. Overall, I think any wafer light box is better than a standard one (easier to store, easier to transport, LED lighting), but the CutterPillar goes a step further. There are cutting mats that can be used on top of the lighted surface which is totally awesome, and it has a great storage bag that makes it super easy to transport to classes or retreats. I don’t know how I lived without this light box.
Karen Kay Buckley Perfect Scissors
Any product that Karen Kay Buckley
produces is stellar. I’ve used her
Perfect Circles, Perfect Leaves, Perfect Ovals, and Perfect Stems in my
applique projects for years. Then she
came out with a line of scissors that I became equally excited about. While geared toward applique artists, these
scissors are great for any quilting technique because first, they’re
ergonomically made. Your hand doesn’t
hurt if you have to cut a lot of pieces.
Second (and the detail that completely sold me on these scissors) is
that they’re micro-serrated.
The blades have tiny teeth on them that will work the same way as the
pinking shears used in garment production – the edges of the cut material won’t
fray. They come in a variety of blade
lengths, too. A couple of warnings to
keep in mind with these: First, if you
have to have them sharpened, but sure to let the person sharpening them know
that the blades are serrated. Believe me
when I tell you the teeth are tiny, tiny, tiny on these scissors. You almost can’t see them with your naked
eye. Second, be aware that the market
was inundated with a cheap knock off about a year ago. I believe legal steps were taken to remove
them from the internet, but some could still be out there. The knock-off brand is nowhere near as
wonderful as the Karen Kay Buckley scissors.
Electronic Quilt 8 (EQ 8) Software
If you’re beginning to take steps in designing your own quilts, or changing up quilt patterns to suit your tastes, this software needs to be on your Christmas list. I get the fact that yes, you can make your own pattern or change a current pattern with graph paper and pencil, but this software makes it so much easier and faster. In addition, you can add not only color to your blocks, but actual fabric renditions are in the software so you can really see how it will look. You can save your quilt project and come back to it later, knowing it’s on your laptop’s hard drive and you don’t have to go searching for that elusive piece of graph paper. The folks that produce EQ are constantly coming up with additions to the software to keep it up to date. This includes fabric lines and blocks by designers. These are available for a nominal fee through the Electronic Quilt website. When you register your software online, EQ will send you an email to let you know about new updates that are available.
Once you have the EQ 8 software, as the company develops EQ9 and makes that available for download, you don’t have to purchase the entire EQ9 – just an update to the current software. And the update is less expensive than the entire software platform.
Barbara Brackman’s Block Base is
available as an add-on, as well as the Dear Jane software (which can run
independently from the EQ programs).
The EQ program already comes loaded with hundreds of blocks, layout designs,
quilt patterns, etc. It’s a great
investment and does live up to the hype around the program.
Wool Pressing Mat
This item is kind of new to the quilting arena, although they’ve been used in the commercial garment making industry for years. They’re made of pressed wool, approximately ½-inch thick and hold heat well. You can pin your blocks or block units to it as you block them to make sure they come out the required size. I especially love to use it with applique pieces that I need to press or turn the edges under. It’s the perfect combination pressing cloth and ironing surface.
These come in a variety of sizes. I purchased the largest one. And truthfully, if they made them large
enough to cover your entire ironing board, I’d have one of those, too. There is a disclaimer that the wool “smells”
when you use steam. And it does the
first several times you use it. Some
folks in the industry recommend using essential oil on the mat to make it less
offensive, but honestly, to me the odor was not that bad. After a few uses, it completely
disappeared.
Apliquick Applique System/Tools
This gift would be a wonderful addition
to the quilters that love either prepped edge machine applique or hand
applique. Most of us, myself included,
were taught by either the needle turn method or the freezer paper method. The freezer paper method employs using some
kind of iron to help turn the edges of the pieces under. Any iron used that close to your fingertips can
result in burns. Hence, the beauty of
the Apliquick system – no heat is used.
The edges are turned under and glued onto a special paper (kind of
like interfacing, but it’s not). Special
tools are used that look kind of like chop sticks to help turn the edges
under. It’s a little awkward at first,
but it is by far the best method I’ve used – and I’ve done a lot of
applique. I can prep anything from the
tiniest circles to larger pieces quickly and easily with the Apliquick
method.
Martelli Rotary Cutters/Cutting Mats
I’ve sung the praises of Martelli cutters
and mats in previous blogs, but I want to mention them again. The mats are self-healing and run as large as
30-inches x 60-inches. They even have a
round one on a base that can be turned – kind of like a lazy Susan. While all mats eventually will need to be
replaced, the Martelli brand has the longest cutting life. Yes, you’re going to spend more money on a
Martelli mat, but yes, it’s going to last you literally years longer
than any other mat.
The rotary cutters are ergonomically
designed and are available for either right-handed or left-handed
quilters. Instead of having the handle
running up the palm of the hand, these have the handle on the side, taking more
off the stress off the hand and distributing it equally throughout the hand,
wrist, and arm. The cutters are
available in 45 mm and 60 mm sizes. You
should use the Martelli blades with these cutters and I’ve found the blades carry
about the same shelf life as other rotary cutter blades.
Undercover Mat
I’m in possession of two of these
wonderful creations. I keep one under
Big Red and the other is packed in the bag I take to retreat and sewing
classes. These are a great way to keep
your scissors, seam ripper, stiletto, and other sewing tools together at your
machine. These are available for purchase,
but if you have the time to make a few for Christmas gifts (or for yourself),
this is not a hard project to undertake.
Plus, there are several great free patterns on the internet for this
little jewel.
I realize that there are a few quilting staples that are
always going to be on your Christmas list:
fabric yardage, fat quarters, jelly rolls … you’re always going to want
or need fabric. But the seven items
above are a few specialty items that can really enhance your quilting life a
great deal. Some of these items carry a
larger price tag than others. However, I
have and use all of these tools and I do enjoy them. I’m sure you will, too.