As promised, this week we will finish the Lemoyne Star block. Right now, I’m putting this out here: This is the way I finish my blocks. As with most processes in quilting, there’s more than one way to do all the steps. This way works for me, but it may not work for you. And you know what? That’s okay. That’s why there’s more than one way to do things. This isn’t possible with all arts and crafts, but quilting is one area which gives you lots of options. Find the best way which works for you and use that method.
In the first step, we will inset one of the triangles. We’ll take the triangles which I cut out last week and mark them in a similar manner as we did the diamonds. Before marking, be sure to hit the triangles with a shot of spray starch and a hot iron to help stabilize the bias. All of the points of the triangle will need to be marked ¼-inch in from the sides. We can do this the same way we did the 45-degree diamonds – either by dots or by a line. I am using my Jinny Beyer Perfect Piecer for this process.
Take the triangle and match its dots or the X with the ¼-inch mark on the diamond. I pin them together at those points. Now gently, because even though we’ve stabilized the edges, we’re still handling bias, pin the triangle to the diamond at the other end, too. Now slowly sew from the end down to the ¼-inch end point. The same rules apply for this process as for joining the diamonds – tie (or knot) off or reverse stitch at the beginning and ends of the seams and slow down even more about a half an inch from the end point so you don’t over shoot your target. When that side is completed, join the other side of the triangle to the adjacent diamond in the same manner. This is where it can get a little awkward with your fabric. Double check everything before you sew so that you don’t get the other side caught up under your needle and sew it. You want to be as accurate as you can because even though we’ve stabilized the bias as much as possible with the spray starch, bias is bias. It can still be stretched. We’re limiting how much we handle it (as little as we can) and we’re doing our very best to be accurate, so we don’t have to rip out any stitches.
When the other side is completed, press the seams open to reduce bulk.
This is what it should look like from the front. At this point, it should like nice and flat with no ripples.
The next step involves the squares in the corners. Like the triangles, they need to be marked at the ¼-inch reference points. I still use my Perfect Piecer for this step, but unlike the triangles where I’m more inclined to make dots at the ¼-inch spots, I find it better to draw a line ¼-inch of the way in from the sides of my squares. With a square, I don’t have to worry about stretching the bias and a line is easier to see. I do hit the squares with a shot of starch and a hot iron before marking, though.
Technically, joining the square to one side of the triangle and one side of the diamond is not called a Y-seam. It’s a partial seam. I imagine it’s called this because the seams are joined at 90-degree angles (right angles), instead of the 45-degree angles which make up the Y-seams. No matter what it’s called, the method of joining the squares to the triangle and diamond is exactly like sewing the triangle to the diamonds. Match the intersecting points, pin, and sew slowly from one point to the other, remembering to knot or reverse stitch at the beginning and end to lock your stitches. When complete, press.
The square’s seams can either be pressed open or out towards the triangles and diamonds. This is a personal preference. Some quilters think open is easier to deal with as you’re matching starting and stopping points and others think pressing them towards the sides is easier. The more you work with eight-pointed star blocks, you’ll quickly see which way works best for you. With me it depends on the size of the quilt square. The Lemoyne Star block I’m using for this blog is 12 ½-inches unfinished and with larger blocks, I prefer to press the squares’ seams to one side. With smaller blocks I tend to press the seams open to reduce all the bulk I can. Smaller squares have a lot of seams coming together in a small space and this can make the quilting process difficult. The more I can reduce the bulk so my needle doesn’t break during the quilting process, the better.
Repeat this process for the other square on the diamond unit. Then repeat the entire procedure again for the other half of the diamond unit, but don’t inset the large triangles on the left and right sides.
Instead, once the diamond units are complete to this point, sew the two halves together and press the seam open (again to reduce bulk). Then insert the two left and right triangles with the same method we used above.
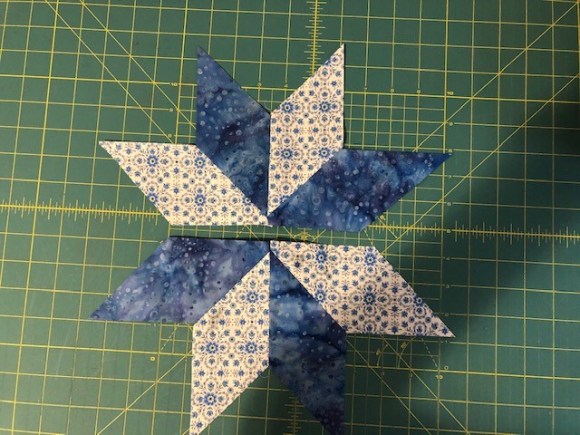
There is another method for joining the two units and let me explain why I don’t use that method. You complete the two halves so they look like this:
And then you join them with a stop-and-pivot seam.
You have to be dead-on to match points so your block doesn’t look wonky. And if the eight-pointed star block is small, you’re manipulating a lot of bulk under your needle in a small space. My method works best for me, but I encourage you to try both methods to see which works best for you.
Okay….now…what if you’ve tried these methods and you’re finding Y-seams and partial seams just really aren’t your thing? Does that mean you can never make a lovely eight-pointed star block, ever?
Nope.
If you remember, back in the first blog when we began discussing Y-seams, I threw out a disclaimer about myself – for years, I never made a Y-seam when a half-square triangle would work perfectly fine. The fact is, if your piecing is really precise, you can convert some eight-pointed star designs into half-square triangle blocks pretty easily. And since you know how to figure the yardage on HST blocks, you can quickly estimate the fabric requirements to fit your method of construction. Take a look at these two star blocks:
If you look at the original grid design of both of these, it’s easy to spot the Y-seams and partial seams.
However, if you look closer, you also begin to see these can be converted into 16-patch blocks, since the diamond shapes can be bisected evenly in the grid and the dividing line will fall evenly with the other patches on the row:
Thus, they can be converted into HST blocks which look the same even if you didn’t take the time for the Y-seams and partial seams. And as long as your piecing is good, no one will know the difference unless their nose is right against your quilt.
Please note that not all star blocks can be converted into HST blocks. You have to grid the blocks out to see if it will work. But if it can be done, it’s a wonderful thing. And even if it can’t, sometimes you can fudge it enough so that you can have a block that looks similar to the eight-pointed block you want.
In the next blog or two I want to do over how to cut pieces with odd angles. So far, we’ve dealt with squares and squares that be converted into triangles. However, there is a whole group of patches that aren’t square by any stretch of the imagination. And while templates are a wonderful tool to have to cut that group of patches out, sometimes rotary cutting is just as accurate and certainly faster.
Mention Y-seams to quilters and generally you get one of two responses – a shrug or a shudder. The shrug would indicate either a) the quilter has a solid knowledge of how to construct a successful Y-seam or b) has decided that he/she will never do a Y-seam when perfectly good half-square triangles can give you the same effect most of the time. The shudder comes from quilters who realize you can’t get through your quilting life without at least some Y-seams, have tried them, and now possess a vehement dislike for the entire process.
For those of you who aren’t aware of what a Y-seam, this is what one looks like:
It’s where three or more pieces come together at one point, and none of the seams are at a 90-degree (right) angle. I admit, the first time I attempted one of these, I decided I would opt not to have a lot of Y-seams in my future. And then I was introduced to blocks such as this:
And these:
These blocks fall into the eight-pointed star category and they’re some of the prettiest quilt blocks out there. In addition, a few weeks ago I introduced you to feathered stars:
While a great deal of the feathered star block is comprised of HSTs, the diamonds at the top have Y-seams and the squares in the corners have to be inset (sew part of the seam and pivot to finish). In the long run, the more you quilt, the more you can be assured that Y-seams will loom somewhere in the future. You may as well learn to make them correctly and at least be at peace with the process, even if they’re not your favorite technique to pull out of your quilting toolbox.
The first place to start is with your fabric. If you’ve given a hard look at some of the eight-pointed star blocks above, and you’ve read my previous blogs about angles, there’s a chance by now you’ve thought to yourself, “I’m looking at a lot of bias.” And if that’s what you’re thinking, you’re absolutely right. However, by now we know how to deal with bias. What we need to keep in mind is that the units used in making eight-pointed stars are not half-square triangles, so we can’t use the Sew and Slice method to avoid exposing the bias until the last minute. When the star units are cut out (either by template or rotary method), the bias is immediately exposed. So, let’s refresh our memory on how to protect the bias for as long as we can to avoid it stretching. The first step we want to take is, once the units are cut out, give them a shot of spray starch and press them with a hot, dry iron. The starch will help keep the bias intact. We also want to store them flat and in an area where they will not be handled a lot until we’re ready to sew them. The less handling, the better for the bias. And finally, do try to get them sewn together as soon as you can. Once they’re joined to another piece of fabric, the bias edge is no longer exposed.
The next step to consider is how you want to mark your unit. Like the Sew and Slice method with HSTs, you’ll need to mark your star block units because unlike most other quilt block seams, you’ll stop and start sewing a lot. There is no real chain-piecing with these. The start and stop points will have to be parked precisely and clearly in order to make these Y-seams go together perfectly and easily. So, a couple of things to keep in mind at this point.
Regardless of what marking tool is used, it will cause some friction along that bias edge. Make sure the star block unit is well-starched to reduce the friction as much as possible, so the bias won’t stretch. As a matter of fact, some quilters, such as Harriet and Carrie Hargrave, recommend starching the fabric or the block units to the point where they feel like paper. This is not a bad idea.
You will want a marking tool that will produce as little friction as possible. I have several go-to tools I reach for. I have used the blue fabric markers that disappear with water. I have also used Frixion pens. My favorite is this:
That’s right. A mechanical pencil. Why this? A couple of valid reasons. First, depending on the marking method I chose, the mechanical pencil leaves a narrow line on my fabric, so my seams stand a better chance of being exactly ¼-inch. Second, if I chose to use the “dot” method of marking, the pencil lead will slip through any template hole quite easily or be more precise if I mark the star block unit with a ruler. This will become clearer when we get into the actual construction process of the block.
With those thoughts in mind, let’s move into how we make one of these beautiful blocks. Keep in mind that Y-seams aren’t really that hard to make correctly. However, they do require a bit more concentration and precision than chain piecing. So…you may want to turn off the Netflix and save the glass of wine until later.
As I mentioned before, with Y-seams, there are distinct points where you start and stop sewing. These points must be marked on your fabric for precision’s sake. There are only two different marking methods that I recommend – marking the seam or making dots. Let’s deal with marking the seam first. This method requires a marking tool and a quilting ruler that has a distinct quarter-inch mark down its side. Actually, my favorite ruler to use with this is the Add-A-Quarter ruler that I demonstrated in my paper piecing blogs. Here’s how this method works:
Take the star block unit and draw quarter-inch seam marks all the way around the edges.
Where the lines intersect to form an “X” is your starting and stopping point. There are some pros and cons to this method. The good part about this method is it’s super easy to see your stopping and starting points. The not-so-good points about this is you would need to make sure the quarter-inch line drawn on the fabric is exactly a quarter inch away from the fabric edge. There is little wiggle room with this. The other con to this method is your running a marking tool along a bias edge. If you’re not careful, you can stretch the bias with this process regardless of the care taken or the marking tool used.
The ”dot” method is literally just that – where the seams would intersect, you simply make a dot with your marking tool instead of a line, like this:
If you’ve rotary cut your pieces, you’ll need to use a ruler to measure in ¼-inch from the corner of the block unit and place the dot there. There’s also this tool from Jinny Beyer, called the Jinny Beyer Perfect Piecer.
This tool has lots angles and these angles have lots of holes in them. It’s easy to line these up with your block unit piece and mark your dot at the quarter-inch spot.
The Perfect Piecer is available on Jinny’s website www.jinnybeyer.com. I like this gadget so much I have two. I keep one near my sewing machine and one in my hand sewing basket.
Lots of these eight-pointed star blocks are used quite frequently in quilting. As a result of this popularity, companies that make quilting templates frequently have Y-seam sets available for you to purchase.
This is a really great option. These templates offer uniform accuracy and like the Perfect Piecer, have pre-drilled holes to mark your quarter-inch starting and stopping points. If you have a real love for blocks such as Hunter’s Star, check around the internet. Quilt supply sites such as Marti Michell, Missouri Star, and Nancy’s Notions have a good variety. If you use the Perfect Piecer or some of the other templates, it will quickly become apparent why a mechanical pencil is a good marking tool – their lead fits easily into the pre-drilled holes.
There is one more technique you can use to indicate the stopping and starting points that doesn’t involve actually marking your fabric – simply finger press the corners where the sides meet, raw edges together, like this.
I will offer a bit of clarity with this method. First, it’s not quite as accurate as the other two techniques, and you want to do this right before you sew. Otherwise the crease will relax. I have used this method with loosely-woven fabric or really small pieces that I don’t dare stretch the bias.
Like making HSTs, QSTs, or FGUs, you will want to try all three of these techniques and decide for yourself which one works best for you. I would suggest making three identical 12-inch eight-point star blocks and use a different marking method with each. This way you’ll see which one your most comfortable with, and the larger block units make the Y-seams easier. (Note here — If I am making super small Y-seams — such as in some of the 4-inch Dear Jane blocks — I hand piece them. You have more control over the stopping and starting points, hand piecing allows for the greatest accuracy, and the blocks will lie perfectly flat.).
As we begin assembling the units into a block, there are a few steps we can take to make the construction easier and more accurate. These are little things, but they go along way with Y-seams.
Switch to a smaller sewing machine needle. I’ve found a 70 or 80 works best with Y-seams.
Decrease your stitch length. This isn’t paper piecing, so I’m not talking about lowering the stitch length super low. Big Red’s default length is 2.2. For Y-seams I lower it to 2 or 1.8. The reason we want smaller stitches is so we won’t overshoot the stopping point.
Decrease your speed. Y-seams aren’t something you can make fast. Accurate stopping and starting are the most important factors for ease of construction and nice, square, flat blocks.
Learn to love your “needle down” button, if you’re machine has one. This will keep the fabric from “wiggling out of place” under the presser foot when you come to a stop.
Since we’re not making a complete seam (sewing from one edge to another), we will need to either sew a few stitches as we start and then reverse stitch to lock them, or use the tie-off (knot) option if your machine has that. This should be done at the start point and the end point. When sewing regular seams, the stitches are locked as the seams intersect at the endpoints. Y-seams don’t intersect, so the endpoints need to be knotted off. This keeps the stitches from popping open as we joint the unit pieces together.
Stop sewing about ½-inch away from the endpoint and either slow down even more or literally take it a stitch at a time. If the unit piece is small, I use the needle up-and-down button and make one stitch at a time until I get to the endpoint.
Now let’s get to the actual sewing process. We’re making a Lemoyne Star Block.
First you join two unit pieces, right sides together.
Place the pieces under your presser foot, making sure that the stitches begin at the marked starting point. Knot stitch or reverse stitch to lock.
Stitch until you get about ½-inch away from the endpoint.
Slow down even more, being careful to stop exactly at the endpoint and knot off.
Continue adding units in the same manner until there are four star points sewn together. Set this aside and repeat for the next four star points.
Make the two-piece unit and press the seams open. Then make the next two-piece unit and press those seams open. Then join the two units together to make the large four-piece unit.
We need to press the seams and there a couple schools of thought on Y-seam pressage. Some quilters press the seams to one side, per normal. I don’t. I’ve found that puts all the bulk to one side and when you join the setting blocks and triangles to the star points, that bulk on one side make construction difficult. I personally find pressing the seams open to work best.
Now that we have the two parts of the eight-pointed Lemoyne Star completed and pressed, set those aside until next week.
Make the two units, but don’t sew together just yet!
I’ll show you how to add the corner squares and the large triangles as well as talk about 60-degree angles in the next blog.
Borders are (usually) the last pieces added to a quilt top. Loosely defined, they are strip(s) of fabric used to frame the quilt top. I also want to set the parameters of this blog. Since this year’s theme is “Level Up Your Quilting,” I am assuming all of the basics do not need to be explained in great detail – in other words, I’m working with the idea that you have several quilts under your belt. So, with this column, I’m presuming:
You know what a border is and realize a quilt can have more than one.
You know the proper way to sew on a border – it’s more than just cutting some super long strips of fabric the desired width and then cutting off the excess that hangs off your quilt top.
You realize there are multiple ways of making a border.
You see the potential in borders and avoid making them out of long, plain fabric strips.
The issue I have with a lot of quilt borders – whether the idea comes from the quilt designer or the quilt maker – is they’re just strips of fabric. So often at quilt shows, you come across a gorgeous quilt. The applique is divine, or the piecing is so perfect. The colors sing in harmony like the Brooklyn Tabernacle Choir. The quilting is appropriate, and the stitches have perfect tension.
Annnnndddd then you take a look at the borders. They’re long strips of plain fabric. Of course, they harmonize with the quilt center, but they’re just…plain. To me, it looks the quilter spent a ton of time on the quilt center, paying attention to all those little details and then just ran out of steam when they got to the borders. They surveyed their left-over scraps, decided what yardage they had the most of, cut some strips, sewed them on, and moved onto the quilting.
It’s really tragic. Really. All that time spent on a gorgeous quilt top and then frame it with plain strips of fabric. If I was a quilt center, I’d be offended.
So this blog assumes you know what a mitered border is and how to correctly put on a quilt border. I am taking for granted you’re aware there are multiple border treatments which can be used to spice up those strips of fabric and complement the quilt center. This is what we’re discussing today. I want to show you some options for those borders. You’ll see lots of illustrations that I hope give you lots of ideas. The very first thing I want you to understand and embrace is the quilt pattern is only a map. There are lots of ways to get to your destination. In other words, if the pattern calls for strips of plain fabric for the borders, you have the perfect right to change it up. Borders are a blank canvas…paint your dreams on them. This means, of course, that these borders will take additional time. But they’re worth it. Keep an open, creative mind and remember it’s alllllllll about the finished product – not the clock or calendar on the wall.
The easiest way to add some life to your borders is to put some applique on them.
Flowers for my Wedding by Judy Neimyer
With this method, the borders are literally still long strips of fabric; however instead of remaining plain, the quilter can applique vines, leaves, buds, birds…well, the choices are endless. My favorite type of applique borders has the applique pieces infringing on the quilt top instead of remaining just on the borders. This is a good way to pull the colors of the quilt together – use the scraps left over from the piecing (or other applique blocks) for the applique pieces. If you’re unsure about how to space things out or if your worried the layout may look off-balance, then off-set your applique. Put it in two opposite corners. This is actually my preferred way to applique borders. It just seems to add a different rhythm to the quilt.
However, as much as I love applique, I’ll do know that it’s not everyone’s favorite technique.
Let’s posit this scenario, because this is exactly where I’m at in a quilt that’s currently under my needle. Remember a blog or so back when showed you this pile of fishy blocks? I’m making a quilt for my DH and I really hope to have it ready for him by Christmas. Through some internet searches, I found a panel with trout and bass on it and I knew he would love it. He’s a big fly fisherman. It was perfect.
After the panel arrived, I had to determine a layout, and I wanted something that would complement the panel. I didn’t want the quilt to look like I just threw the panel in the middle of the quilt and then added borders until I made it as big as was needed. I didn’t want applique on it since this quilt will live in his den and may need to be washed semi-often. I played with graph paper and EQ for a while until I found this layout already uploaded into my EQ software.
I liked most of it but knew I would substitute some of the blocks for other designs. I want to walk you through the process to show you how you can change and design your own borders to complement your quilt.
The above quilt layout is a Medallion Quilt. A Medallion Quilt has a center block and everything else revolves around that center block. Literally. See this quilt?
Medallion Quilt by Lori Smith
It’s a Medallion. The center square is the main event and it has borders which complement – but do not overpower – the center square. The center square in a Medallion Quilt can be pieced or appliqued, but it’s the star of the show and everything else has a supporting role. Keep this definition in mind, because as we get to the end of 2020, the Medallion Quilt idea will get some serious play time.
This is not the type of fabric panel that could lend itself as the entire center block. Some fabric panels such as this one:
May have an idea or two for this for the granddarlings. I purchased two panels.
Can do that. But not this one. I knew it would have to be cut apart, and the largest fishy square would serve as the center block. I followed the layout directions and added three plain fabric borders around it – two narrow light green strips and a wider dark green strip. Since the panel is so “busy” (it has lots of movement and color), the solid colors helped calm it down just a bit. I also loved this panel for that reason – it has tons of color and I was able to pull every fabric I needed from my stash.
This brought my center medallion up to 21-inches square. I set it aside and began to work on the next round of squares – the star borders. I made each of them and then laid them out.
The center of this square in the pattern is 30-inches (each of the star borders is 30-inches long). When the 21-inch center medallion is placed in the middle of the star borders, there’s a definite space issue the original quilt directions won’t help me with at all. It’s up to me to figure out what to do next. There are a couple of ways I could approach this. The first way is to find the middle of the star borders (which is at 15-inches) and put a pin in it. Then find the middle of the center block (10 ½-inches) and put a pin in it. I can match the pins and measure the excess on the end of the star border – which is about 4 ½ -inches. Or I could math it out and find the difference and work with that: (30-inches – 21-inches) / 2.
30-21= 9
9/2 = 4 ½
Either way works, but it’s always nice when you know your stitching and the math works out to the same answer. Then you know you’re really on the money.
I have 4 ½-inches to play with. I could add more fabric strips, but I just did that around the fishy center. Since the 30-inch borders are stars made out of HSTs, I could echo that and A) make a wide 4 ½-inch border of HSTs or B) I could divide the 4 ½-inches in half and make two 2 ¼-inch borders. I could run one row of 2 ¼-inch HSTs next to the narrow green border and then have a 2 ¼-inch solid fabric border between that and the star border. And while I’ll be the first to admit if I’m dealing with HSTs, I like them larger (I wouldn’t mind making 4 1/2-inch HSTS), to have two busily pieced borders right up against each other kind of sets my teeth on edge. It just looks too busy. So maybe option B would work?
Nope. See, remember my center is 21-inches square. My hoped-for HSTs of 2 ¼ -inches will not divide evenly into 21. The product comes out to 9 1/3-inches.
Oy-vey.
Thus, came my option C. While 21 isn’t divisible by 2 ¼, it is divisible by three – 21/3=7. I will have one border of 3-inch HSTs and then a border of 1 ½-inches of solid fabric. Let me insert here that I could really play with the 4 ½-inches in a lot of ways. As long as the sum total of my borders add up to 4 ½-inches, I’m golden.
After, I’ve added the HST border and the strip of solid fabric, the center now looks like this and is exactly 30-inches square. The left and right border strip go on perfectly. Now I must deal with the top and bottom border. Let me also say at this point, you can put the top and bottom on first and then deal with the left and right sides. Most of the time it really doesn’t matter which way you proceed. I’ve just always done the left and right and then the top and bottom. While that 30-inch star border measures the same as the center, there is now added width because of the side borders, which means I need cornerstones. Each star border is 10 ½ -inches wide, so that means I’ve added an additional 21 inches to the center square. When you add that width and subtract the seam allowances (30 + 21 – ¼ – ¼ ), that makes the center now 50 ½-inches wide. Since the top and bottom borders are 30-inches long, I’m going to have to four cornerstones that are 10 1/2-inches square unfinished.
To further complicate matters, I’m using part of the panel as cornerstones and these fishy squares only measure 8 3/4-inches square. Never let anyone tell you I pick the easy way around things. Again, we could lay that 8 3/4-inch fishy square against that 30-inch star border and eyeball it, or simply cut super-wide strips and then begin to cut them down until everything matches. But why go to all that trouble when you could simply math it out? It’s easy – take the final unfinished size needed and subtract the unfinished size of what you have. So, 10 ½ -inches minus 8 3/4-inches is 1 ¼-inches. Divide 1 ¼-inches by 2 (for two sides), and that is 7/8-inch. Add ½-inch for seam allowances and the total is 1 3/8-inches. I will need to cut my strips 1 3/8-inches. I will cut those strips out of the background fabric so they will appear to “float” and the star strips won’t look chopped up.
Once the fishy cornerstones are added to the star borders, and the star borders are sewed onto the quilt center, it looks like this:
Before the math….
After the math…
Not too bad, if I do say so myself. And I mathed correctly – everything fit beautifully.
At this point, the quilt top measures 49-inches x 49-inches. Forty-nine is only divisible by two numbers, seven and itself. This makes my future layouts a little tricky. However, I can add a 1-inch narrow border (narrow borders are sometimes called floaters) and bring the center’s total to 50, which is divisible by a lot of other numbers. I’ll make this floater out of a solid strip of fabric for two reasons: First, it’s really difficult to make a pieced 1-inch anything, and second, that solid piece of fabric will complement the piecing.
After I added the 1-inch floater, the pattern design called for a 2-inch border. Continuing to echo the center square, I opted for the dark green for the 1-inch floater and the 2-inch adjacent border to be out of the light green. After this, the center was a nice 56-inches square. Since 56 can be divided by two, four, seven, and eight, there’s a lot of options for the next pieced border. However, the design calls for one more 1-inch floater on the other side of the 2-inch border. This additional floater will bring the center to 57-inches square. The tricky part with this measurement is 57 is divisible by itself, three, and 19. The last pieced border on this quilt top is a square-in-a-square border (this is also called the economy block). I would have to make 76 three-inch square-in-a-square blocks in order to make things come out evenly at this point.
And while I love my husband, I ain’t making 76 three-inch squares for a fish quilt that’s going to spend all of its life on the couch in his den. Nope. There’s gotta be a better way. So, let’s play with adding another 2-inch border. This will bring the center to 58-inches square. Fifty-eight is divisible by 2 (29), and 29 (2). That won’t work either, because that still would mean making a ton of 2-inch squares. Adding a 3-inch border means the center would be 59, and 59 is a prime number, meaning you can only divide it by itself and 1. But if I add a 4-inch border, that would bring the center to 60 and I can make ten 6-inch square-in-a-square blocks for each side and it would be wonderful.
Or I could leave off that last 1-inch floater and make the square-in-a-square border butt up against the 2-inch border.
This is a design decision and the primary reason I’m dragging you through my process with this quilt is to hopefully help you realize that a pattern is merely a starting point. Once you are confident with your quilting math, the sky is really the limit. You can take a design and tweak and alter it to fit what you want it to do. If I were making this quilt for myself, I would add that square-in-a-square border to the 2-inch light green border and call it a day. But this quilt isn’t for me, it’s for Bill. This is not a show quilt. This is a quilt he’s going to pull off the back of his couch to nap with on Sunday afternoons. It’s a quilt he’s going to reach for if the power goes out. It needs to be bigger for him (because he’s taller than I am), so the 4-inch border wins out, because with this quilt, use supersedes the design.
This is how it looks with the 4-inch border. I chose the brown fabric to pull the inner star borders and the outer strip borders together.
Next up, according to the layout, is that square-in-a-square border. Since the quilt is now 60-inches square, and I’m making 6-inch blocks, I’ll have to make forty squares (10 squares per side, and I’ll use solid blocks from the background fabric for four cornerstone blocks).
I found this fabric in my stash for the square-in-a-square block:
It works perfectly for that block and pulls all the colors in the panels and borders together. A word about the batik background fabric.
This fabric is actually quilt backing. I purchased it for another quilt, and it just didn’t work right with that particular top. But it works wonderfully with this one – just not as a backing!
After all the square-in-a-square piecing, I added another solid border to calm the quilt down. I opted for a narrow, 2-inch border, pulling the brown fabric out again. This would be the last time I used this fabric. It’s used three other times in the quilt and that’s enough.
The next border would be the last, wide border. It would need to be at least 4-inches finished to balance out the 2-inch border it’s beside. The pattern called for a solid fabric border, but I had to decide if I wanted to do that or go with a final pieced border to continue to pull the viewers’ eyes out to the edges of the quilt.
I opted for the pieced border. I know it’s hard to see really well in this picture, but I pieced the border, using large, rectangle pieces of several of the fabrics used in the quilt. This border is a great way to use up scraps and it serves to pull all the colors together. As soon as it comes off LeAnne the Long Arm, I will bind it in the same material I used in the middle of the square-in-a-square block. I already have the binding and the label made. Go me!
My It’s Always a Great Day to Fish quilt finished at 108-inches square. I’m pretty sure Bill will love it. Still, there are a couple of thoughts I want you to come away with from my show-and-tell blog. First, borders are a blank canvas for your quilt. If you aren’t comfortable changing up the blocks in the center of your quilt, let your talent showcase itself in the borders. Applique them. Piece them. If you have better quilting skills than I do, make them solid pieces of fabric and then quilt the life out of them. Just don’t allow them to look like they’re an afterthought — a period to the exclamation point of your quilt’s center. Second, if you know how to “math” your quilt, the sky really is the limit. Panels will not be predestined to be framed with round after round of plain borders. Orphan quilt blocks of different sizes can be set into a quilt that is lovely and wonderful. Don’t fear the math. It’s not hard … and unlike abstract disciplines like algebra and calculus, this math makes sense. If it seems a little overwhelming, take it a little at a time. And always, always remember the pattern is just the starting point. In the end, you control how your quilt looks.