We’ve talked a lot about triangles this year – setting triangles, corner triangles, half-square triangles – we’ve parlayed around the three-sided form in lots of aspects. We’ve discussed how to make them, how to cut them, and how to trim them. We’ve learned how to handle bias, that spray starch is a life saver, and (hopefully) by now you’ve discovered which is your favorite way to make triangles. Then we took this information and combined it with some math so we could learn how to estimate the yardage we need for our own quilt.
While we were playing around with estimating yardage, you saw me put the blocks into grid form with EQ 8. Knowing if a block is a four-patch, nine-patch, sixteen-patch, or-even-bigger patch is the first step in deciding how much yardage you need, and going through this process, we only used HSTs. However, this week I want you to grasp the concept that there is more than one way to fill in those units in your quilt block – they don’t have to be HSTs, although those are used quite often in design work. Today I want to talk about two other backbone-units used in quilt blocks – the Quarter Square Triangle (QST) and Flying Geese.
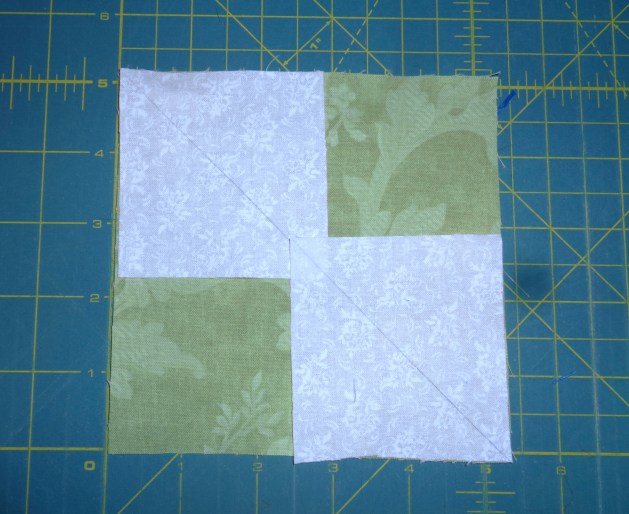
A picture is worth a thousand words. This is a QST:

It’s a square comprised of four triangles. Here are some quilt blocks that use these:


And there are some quilt blocks made entirely of them. These blocks are sometimes called Hourglass Blocks. Like HSTs, the design possibilities are endless. There are some other pros about these block units, too:
- They’re only a tad more difficult to make than HSTs. As a matter of fact, you begin with HSTs.
- The “Sandwich Method” of construction can be used.
- You never have to deal with bias edges.
- There are no special tools you need to purchase, although you may want to purchase a square ruler when trimming the block to size.
- You can make them larger than required and then trim them down for complete and utter accuracy.
- It’s easy to estimate yardage.
- They don’t need to be paper-pieced, so no papers to be removed.
- Like HSTs, you can make two at a time.
There are a few cons:
- Using this method with three or four fabrics creates mirror-Image blocks, and most patterns require identical blocks.
- The blocks must be marked on one of the backs.
So, while the pros outweigh the cons, there just may be a few issues you have to be particularly careful about.
You can take nearly any block that you can grid out and use a QST in one of those grid units. They can be turned and rotated to look the way you desire. Then you can use the QST formula to make them. It’s really EASY – simply take the finished size of the QST and add 1 ¼-inches to it. Cut one square this size from two different fabrics. Let’s try it.

This is the lovely Ohio Star Block. I’m using this block for a couple of reasons. First, I have a lot of quilting friends that are from Ohio. Second, this is about the easiest QST to work with. This block finishes at 6-inches and has four QSTs. When we grid this block out:

We know that each grid unit is 2-inches, finished. Now let’s apply the QST formula to see how big to cut our fabric squares.
2-inch finished blocks + 1 ¼-inch seam allowances = 3 ¼-inches. We need to cut our fabric squares 3 ¼-inches.
To make the QST, we cut two 3 ¼-inch fabric squares out of two different fabrics.

Now we proceed to make HSTs, using the Sew and Slice method. Draw a diagonal line from one corner to another on the back of the lightest colored fabric square.

Stitch ¼-inch away from each side of the line.

Cut the square apart on the diagonal line drawn on the backside of the block.

Tada! Two HSTs. Press the HSTs seam to the darker fabric.

On the back of one of the HST units, using a ruler and pencil, draw a diagonal line from one corner to the other. This line bisects the original seam.

With right sides together, alternating light and dark fabrics, align the outside edges of the two units and nest the seam allowances together.

At this point, I use a couple of pins to hold everything together. Then you proceed as you normally would to make a HST. Stitch ¼-inch away from the drawn diagonal line, then cut apart along the drawn line.


Tada! Two QSTs.

If you have used the formula that adds a 1 ¼-inch seam allowance to the finished block unit size, all you have left to do is trim off the dog ears and continue on with the block. But if you’re like me and would rather make your blocks a bit bigger and then trim them down, here’s the formula to use:
Size of finished block unit + 1 ½-inches for the seam allowance. So, taking our 2-inch finished block unit, here’s how that would look:
2-inch finished block unit + 1 ½-inches for the seam allowance = 3 ½-inch square. I’ll cut my fabric squares at 3 ½-inches and then proceed to make my HSTs. Once those are done, do NOT cut those down to the correct size. Continue on to make the QSTs. Once those are made then you cut them down to the correct 2 ½-inch size, unfinished.
To trim these oversized units, find the center of the block until by dividing the unfinished size by 2. In this case we divide 2 ½ by 2 and get 1 ¼. Find the intersection of this number on your square ruler and place this point over the center of your block, aligning the 45-degree line with one of the seam lines. Trim the excess fabric from two sides.

Turn the block so that the other two edges are in position to be cut. Align the midpoint at 1 ¼-inches on the ruler with the center of the patch. The cut edges should like up with the unfinished block size of 2 ½-inch mark on your ruler. Trim the final two edges.

This technique works well until you change up your block to something like this:

And since the triangles in the QSTs are different fabrics, this time the QSTS require a bit more planning, but it can be done! The steps are the same as the QSTs above, we just have to plan our fabric placement a little more carefully.
First, let’s find out the finished size of our QSTs. In this case, the we’re keeping them the same size as our previous block – 2-inches. So, let’s do the math.
2-inch finished block + 1 ¼-inch seam allowance (or 1 ½-inch if you want to make them larger and cut them down) = 3 ¼-inch (3 ½-inch).
We will need to cut out two different pairs of fabric squares –
One 3 ¼-inch (3 ½-inch) block of blue fabric + One 3 ¼-inch (3 ½-inch) block of white

And
One 3 ¼-inch (3 ½-inch) block of blue fabric + One 3 ¼-inch (3 ½-inch) block of green fabric

Then proceed as we did above.

The primary issue you’ll need to keep in mind with this particular technique is it produces mirror image blocks. Sometimes you can use them, but sometimes you would have to discard one of the pair. If there are lot of identical QSTs in the quilt and you can’t think of anything creative to do with the discarded QST, it may be a good idea just to opt with cutting the individual triangles out and sewing the QST together that way. Otherwise you’re wasting a lot of fabric and money.
It’s important that QSTs are taken into consideration when designing your blocks and your quilts. It adds a little bit more zing to how things look.
The other “backbone” block we’re looking at today is Flying Geese.

And while I’ve made probably literally thousands of these, it wasn’t until a few years ago when I found the construction method that worked for me, that I stopped dreading making this block. That’s right. For years I dreaded making this block because they always seemed to come out wonky, the wrong size, or I would chop the beak off the goose. Once I discovered a few techniques that prevented all of these issues, I became good with the Goose.
The first step I want to go through with Flying Geese is to graph a couple of blocks out. First let’s look at this Flying Geese block:

When it’s shown in a graph, we discover each of the geese is actually made from two HSTs.

It’s the fabric placement that makes the Flying Geese unit (FGU). If you choose to use HSTs to make the FGU, there are some trade-offs. You don’t have to worry so much about cutting the beaks off, but if the HSTs aren’t lined up just right, the beak will not be centered. If you make FGU this way, the Sew and Slice method can be used, which should make estimating the yardage easy for you by now.

Now let’s take a gander (get it… goose…gander?) at the other type of Flying Geese block.

When this block unit is shown in a graph, we can see that it’s not made from HSTs. It’s comprised of a large triangle in the center and two smaller triangles on either end.

When you look at those three units, the first thought that may go through your mind is “That’s a lot of bias to deal with.” And if that’s what you’re thinking, you are absolutely right. If you cut three triangles out to construct this Flying Geese Unit, even if you heavily spray starch them, the odds are that the bias will stretch and your unit will come out the wrong size, wonky, or stretched hopelessly out of shape. When I began quilting in the early 1980’s, I was taught to make three triangle units and sew them together. This was the start of my animosity towards Flying Geese. I knew little to nothing about bias then and nearly all of my units had something wrong with them. I avoided Flying Geese at all costs.
Then I learned about paper piecing and for years I paper pieced them. This worked well, but if there were large FGUs in the quilt, that was a lot of additional fabric (because remember in paper piecing, you’re trading fabric for precision). While I was assured of intact beaks and perfect size, I was paying for a good chunk of extra fabric. Thus began my search for other ways to construct my FGUs. And while I found several different methods, I still resort to paper piecing these if they are A) small units or B) they are the Circling Geese Units.

The first option in FGU construction is Flip and Sew method. I mentioned this method when we were working with Snowball Blocks in the blogs concerning on-point quilt yardage and connector blocks, but didn’t explain the method. It’s not difficult to do and it’s easy to figure yardage, so it’s a win-win. For this method, first take find the width and height of the finished FGU. Flying Geese Units are rectangles, so while the methods of estimating yardage and construction are the same, you have to remember that for at least one step of this procedure you won’t be cutting out squares, but rectangles. Let’s say we’re making FGUs that finish at 2-inches high by 4-inches wide.
For the “Goose” part (the large triangle in the center) you take the finished width and height and add ½-inches to each for seam allowances. So, you would cut the “Goose” unit 2 ½-inches x 4 ½-inches.

For the “Sky” part of the FGU (the two small triangles on either side of the large triangle), we will start with squares instead of triangles, which means we’re not dealing with any bias. These squares will need to be the height of the FGU plus ½-inch for the seam allowance, and in this case that means the squares should be cut at 2 ½-inches. On the back of these squares, draw a diagonal line from corner to corner.

Line the one of the sky squares up on the goose rectangle like this:

And sew on the drawn diagonal line.

At this point, I flip the lower half of the square up and lightly finger press it to make sure it looks okay.

If it doesn’t I rip the stitches out, re-position, and sew again. If it looks fine, I trim the upper half of the square off, leaving a ¼-inch seam allowance.


Then I press with a hot dry iron and shot of spray starch.
Position the second square like this:

And proceed the same way as you did with the first square.
At this point, your FGU should look like this.

It’s super important that there is a ¼-inch seam allowance at the top of the large triangle. If you don’t have this, there’s a chance you’ll cut off the top of the triangle when you join your FGUs together (also known as chopping the “beak” off of the goose).

The way to avoid this as you’re sewing your units together is to look for the “X” the “sky” triangle seams made. When joining the FGU, make sure to sew slightly above the center of the “X” (my preference), or in the middle of it.


If you’re designing your own quilt blocks, you may wonder how to proportion an FGU. It’s a little more challenging since we’re working with rectangles. How do you know how tall and wide to make these? It’s not hard. The height is exactly half the width. Take for example a block unit width of 4-inches, finished. That means the height is 2 inches. The FGU would be 4-inches wide x 2-inches tall. If you need to calculate by height instead of width for some reason you would multiply instead of divide. If the space you need to fill is 2-inches tall, then you would double that to find the width – 4 inches. This formula keeps the FGU proportionate, but it’s not a hard, fast rule. You can play with the space and proportions to fit your needs, but the FGU won’t look like a “traditional” one. But that’s okay – we’re all about creativity.
There is a way to make the FGUs a little bigger and cut them down. Simply add ¾-inch to the finished size instead of ½-inch. So, for our 2-inch x 4-inch finished unit, we would cut the rectangle out at 2 ¾-inches by 4 ¾-inches and the squares out at 2 ¾-inches. The only issue you must be careful about with making the units larger and then cutting them down is the “beak.” If you trim too much, you stand a chance of cutting the tip of the triangle off.
Thus far we’ve talked about paper piecing and the Flip and Sew Method for making the FGU. There is one more way to make these units and this by far is my favorite way to construct them. There is no bias and no fabric waste. As a matter of fact, this technique is called the No Waste Flying Geese Method. This makes four FGUs, two at a time. Once again, no actual cutting of triangles is involved. And unlike the Flip and Sew Method, we only cut out squares. The math for this is a little different, too. Let’s go over that and then we will move onto the actual construction.
Still working with our 2-inch by 4-inch finished rectangle, we take the width (4) and add 1 ¼-inches.
4-inches + 1 ¼-inches = 5 ¼-inches. Cut a 5 ¼-inch square out of the “goose” (large triangle) fabric.

Now for the “sky” (smaller triangles). To get this, take the height of our finished FGU (2-inches) and add 7/8-inches to it.
2-inches + 7/8-inches = 2 7/8-inches. We cut the smaller squares 2 7/8. And you will need four small squares of sky fabric for each large square of goose fabric you cut out.

As you can see, this is easy math and it makes estimating yardage easy, too. But now comes the fun part – the construction. To me, making FGUs this way is a little bit like magic.
- Place two of the small squares, right sides together, on opposite corners of the large square. The squares will overlap a little in the center and that’s okay. They’re supposed to with this technique.
- Draw a diagonal line from corner to corner through the small squares and pin them to the large squares.
- At this point, things work a little like the HST Sew and Slice method. Sew a seam ¼-inch away from both sides of the drawn line.

- Cut along the drawn line.

- At this point, your FGU looks like this: Kinda looks like wonky hearts doesn’t it?

- Take one of these units and place a small square on the corner of the large triangle. Draw a diagonal line on the small square and pin it to the “goose” fabric. I know some of you don’t like to pin, but I’ve found with this method, if I don’t pin, my fabric shifts too much, especially if I’m chain piecing.

- Again, sew a seam ¼-inch away from both sides of the drawn line. Cut apart along the diagonal line. Press towards the small triangles.

- To trim the block, find the center point of the height of the unfinished block and line up that measurement with the 45-degree angle on the square ruler.
- With these unfinished 2 ½-inch x 4 ½-inch blocks, the center point is 2 ¼-inches. Trim across the top and right-hand sides. Rotate the block and trim the remaining sides. You won’t be able to use the 45-degree angle, so line the point up with the ¼-inch mark on your ruler, with the trimmed edges aligned at the 2 ½-inch and 4 ½ ruler lines. Trim the block to 2 ½ x 4 ½-inches.


Some words of wisdom (or warning) at this point. From time to time when making FGUs, your block may be off. There are lots of things that contribute to this – weight of thread, your needle bobbles, your fabric shifts, the cat jumps up on your sewing table (not that Sam would ever do anything like that…). If your block is off a bit, never, ever cut the tip off your triangle. Shift your ruler up or down to ensure that point stays intact. This may mean your block is slightly larger or smaller, but you can always ease it into the block when you sew your pieces together.
I like to mix my FGUs up. The standard “idea” about these geese is the prominent fabric is the “goose” fabric and the “sky” fabric is a lighter color. But look at the difference it makes when you reverse these.

I also like to take my left-over scraps and make my “sky” blocks out of different fabrics. This really helps pull a scrappy quilt together.

Let me also throw this fact in here — there are specialty rulers designed for nothing but flying geese. You can google that quilting tool and literally dozens of options appear. However, I’m one of those people who won’t buy a ruler if I can’t use it for more than one thing. If I purchase a specialty ruler for one technique, you can bet your bottom dollar, it’s a heck of a ruler because as a rule, I don’t do that. This is why FGU specialty rulers aren’t in this blog. I want to use rulers and tools that you should already have in your quilting space.
Now you have two more block units to add to your design tool chest. There are lots of construction methods in your quilting arsenal, too. And you know how to estimate fabric. Any thoughts on where this may be taking us?
Until Next Week, Level Up Your Quilting!
Love and Stitches,
Sherri and Sam
