Categories
Uncategorized

Mathing the Yardage II

Last week we worked through the first three steps of estimating yardage for a quilt. This week we will go through the steps of calculating the amount of fabric needed for the rest of the quilt.

Step Four – Sashing Yardage and Quilt Setting

At this point, some design decisions will have to be made.  Will I use sashing?  If I do decide to use it, how wide will it be?  Will I use cornerstones?  If so, what kind of cornerstones will I use?  Will I set the quilt in horizontal rows or on-point?

Birds in the Air Quilt — no sashing or cornerstones

While the answers to some of these questions depends on how I want the quilt to look, some of them also depend on the quilt’s usage.  How big do I need the quilt to be?  If I have 20 Birds in the Air blocks that finish at 9 inches, and plan on setting the quilt in rows, I will have five rows with four blocks in each horizontal row. Without sashing, this means the quilt top will be 36-inches wide and 45-inches long – which makes it a great size for a crib quilt or play quilt, but not very practical for an adult.  It appears, if I stick with the horizontal setting, I need to plan on adding some sashing.

Using the Golden Ratio, we multiply 9-inches x 1.618 and get 14.562

Since there are four sides to a block, we divide 14.562 by 4 and get 3.6405 which comes to 3 5/8 in fraction form.  This mean the widest we can make the sashing is 3 5/8 inches.  Anything larger will look disproportionate. 

I would be the first to admit that 3 5/8-inch sashing is pretty wide sashing in my quilting world.  However, if I had a quilting pattern in mind for these units that would really show off the quilt, I would use the width to my advantage.  Likewise, I’d use that width if I planned on piecing my sashing.  And if I make my sashing that wide, this means my top will be 55 3/8-inches wide and 66 ¾-inches long.  Depending on the width of the borders and how many I decide to use, the top’s width and length could increase as much as 8-inches both ways (63 3/8 x 74 ¾).

Now let’s take it to the other extreme – how narrow could we make the sashing?  For this we take 9 and multiply it by .618.  When we do this, we get 5.562.  Again, we divide this number by 4 and come up with 1.3905 or 1 3/8-inches.  The narrowest we could make the sashing and it still be proportional is 1 3/8-inches.  If we use this measurement, the center would be 42 7/8-inches wide x 53 ¾ -inches long.  Add a possible 8-inches for borders and we would have a quilt 50 7/8-inches x 61 ¾ -inches. 

If neither of the smallest or  largest heights and widths work, remember you can always use any number between the largest and the narrowest widths.  So, if you want to use 2 ½-inch sashing, it will look fine.  Three-inch sashing is your thing?  Go for it.  Four and a half inch sashing?  Nope.  It’s larger than 3 5/8-inches.  Likewise, with my favorite 1-inch sashing.  It’s too narrow.

Since I want my quilt to be large enough for an adult, I will use 3-inch sashing.  Why didn’t I go with the largest number?  Convenience, really.  While mathematically I don’t mind working with difficult fractions or decimals, when I’m cutting out fabric, fractions like 7/8 and 5/8 are harder to cut accurately because my 58-year-old eyes have a hard time seeing those tiny lines on my cutting mat.  Go large or go home.  The 3-inch sashing falls between the largest and the narrowest widths, so it will look fine.   

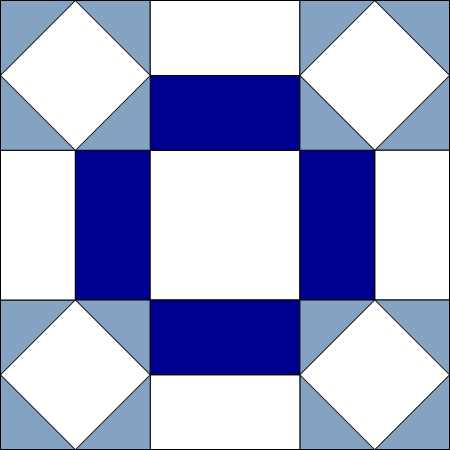
Let’s look at my layout at this point.

Since I’ve decided on 3-inch sashing, I know that those units will need to be cut at 3 ½-inches to allow for seam allowances.  I will need a total of forty-nine 9-inch units that are 3 ½-inches wide, unfinished. Again, let’s work with forty inches of usable WOF.  When we were working with the triangles, we were adding 7/8-inches to the finished size to allow for seam allowances.  This time we will need to add a ½-inch to allow for ¼-inch seam allowances. We divide 40 by 9 ½ and get 4.2 – we can get four 9 ½-inch units per 3 ½-inch wide strips.  Now, we divide 49 by 4, to determine how many 3 ½-inch strips we need – which comes to 12.25.  We will need to round that up to 13.  Multiply 13 by 3 ½ and we have 45.5 inches or 1 ¼-yard.  If the plan is to use any of the fabrics used in the triangles, add the 1 ¼- yard to that material on the chart.

If cornerstones are in my plan, now I have to figure those now.  They’ll be 3 ½-inches square, and I’ll need 30.  Working with 40-inch WOF again, divide 40 by 3 ½-inches to get 11.42857, which means we need three 3 ½-inch strips of fabric to get all 30 cornerstones.  Multiply 3 x 3 ½ and that’s 10 ½-inches, or 1/3-yard.  If those are coming out of any of the fabric I’ve got on my chart, I need to add it to that yardage. 

My fabric requirements up to this point.

An on-point layout would require a different number of blocks and borders.  Although the math is easy, there is quite a bit of it.  I will cover on-point layout fabric requirements in a follow up.

Step Five – Border Yardages

Borders are wonderful things.  They can pull the quilt top together by color and they can adjust the size of the quilt top.  Quilts with only one border is one of my pet peeves.   I’m not sure why, but it bothers me – even if the border is beautifully pieced and appliqued. 

  1.  Determine how many borders you want to use and the size of the borders.  Let’s go back to my Birds in the Air quilt top.  Per my usual preference, I will add two borders to this quilt top – a narrow first border, and then a wider final border.  And for the sake of illustration, I’m working with primarily plain borders, but I will add cornerstones to the outer border for interest.   
  2. The next thing that should be determined is how I want to cut the borders – do I want to cut them on the straight-of-grain (length of fabric), or do I want to cut the across the width of fabric? Again, for the sake of illustration with this blog (and since it’s the way most quilters make borders), we’re working with WOF. 
  3. At this point, my quilt top is 51-inches wide x 66-inches long.  I need to think of the border like just large quilt blocks.  I want the first narrow border to measure 3-inches wide, so I will cut them out at 3 ½-inches.  Working with 40-inches of usable WOF, I will need to make two cuts per vertical border, for a total of four 3 ½-inch strips.  I can work the top and bottom borders a bit differently.  I can get by with only three 3 ½-inch strips for these.  The math works out like this:  With two cuts, I get a total of 80-inches.  The width of the quilt top is 51-inches.  I subtract 51 from 80 and get a remaining 29 inches.  I can add the left-over fabric 29-inch fabric from the first horizontal border to the remaining third strip and have plenty of material, even with diagonal seam allowances.  So, let’s figure the yardage – this brings the total of 3 ½-inch strips to 7.  When that’s multiplied out, we get 24 ½- inches, or 2/3 of a yard (24.5/36).  I need to add this to my chart. 
This is where the yardage requirements are at now. I will use the green from the large triangles in the block to make my larger outer border and the dark purple from the small triangles for the 3-inch inner border

4. At this point, my quilt now measures 57-inches wide by 69-inches long.  My next set of borders will finish at 5-inches, so I’ll cut those out at 5 ½-inches.  Let’s begin with the left and right borders (I always put my vertical borders on first, and then proceed to the horizontal borders – it was the way I was taught).  Since each side border will measure at 69-inches, and we’re still working with 40-inches of usable WOF, I will need to cut four 5 ½-inch strips.  The top and bottom borders work a little differently, because we’re adding cornerstones.  Normally, I would add the width of the two side borders to the center width of the quilt and get my length of fabric (57 + 5 ½ + 5 ½ = 68)  However, the additional two 5 ½-inch spaces will be filled by 5 ½-inch blocks of different fabrics.  I only need to make the horizontal borders 57 ½-inches long (the ½-inch is the seam allowance), and the sew the cornerstones onto this length to make the top and bottom borders the correct size.  I will need to cut three  5 ½-inch strips to make the horizontal borders.  Just like with the 3 ½-inch borders, I can take the leftover fabric from the first horizontal border I make and add that to the third strip and have enough material.  Let’s do the math:  That’s seven 5 ½-inch strips, which equals out to 38 ½-inches, or 1 yard and 1 ½-inches – or 1 1/8 yards of border fabric.  Add this to the fabric chart.

5. Okay, last border measurement – the cornerstones.  Each cornerstone will need to match the border width, so they will be cut at 5 ½-inches square and we need four of them.  When we multiply 4 x 5 ½, we get 22-inches.  With 40-inches of usable fabric, we know we can get all four cornerstones with one cut.  Divide 5.5/36 and we get 0.152778 or 1/8-yard.  Add that to the fabric chart.

Completed Birds in the Air Quilt

Just a couple of reminders about sewing borders.  Always sew the border strips together on a diagonal, just like you’re making binding.  There is some solid reasoning behind this.  First, a diagonal seam is less noticeable than a straight seam.  Second, it also holds up better to regular wear and tear.  I’ve also been giving you what I call “flat” numbers for this quilt.  We all know there are variances in construction – your needle or fabric will bobble.  Your ¼-inch seams may not stay consistent.  These “flat” numbers are figures done on paper (the paper is flat, therefore, they are flat numbers).  In other words, while fairly accurate, they’re not completely realistic.  Always measure your quilt top in three places both horizontally and vertically.  Take each set of these numbers and get the average.  That number is actually how long you’ll need to make the borders.  If you’re squaring up after every step, the three numbers shouldn’t be off by much.  The “flat” numbers are simply letting you know how much fabric you should plan to use.  And if you’re feeling really fancy and want to miter your borders, you’ll need extra fabric.

The last two steps in estimating the fabric for the quilt top concern the binding and the backing.  After putting on the last set of borders, the quilt should measure approximately 67-inches wide by 79-inches long. 

Step Six – The Binding Yardage. 

I’m working with a couple of assumptions here.  First, we’re using classic French Fold Binding, and second, we’re not cutting the binding on the bias.  Binding measurements work with the perimeter of the quilt — the sum of all four sides.  Simply add 67 + 67 + 79 + 79 to get the perimeter, and this measurement adds up to be 292-inches.  Our binding will need to cover 292-inches worth of quilt.  Binding strips are sewn on the diagonal, and this takes a bit more fabric.  We also will need to leave a “tail” of 10 to 12-inches to allow for joining the binding ends (I always use 12-inches – it’s far easier to cut extra binding off than stop and sew on additional binding). 

Let’s add 15-inches to the 292-inches of binding we know we need.  The extra 15-inches will take care of the additional bit of fabric needed for diagonal seams as well as the “tail” required for joining the binding ends.  This brings the total inches needed to 307-inches.  Divide this by 40-inches of usable fabric and we get 7.675.  Round that up to eight – we need to cut 8 strips of binding.  I always cut my binding 2 ½-inches.  Binding width is a personal preference.  Some quilters cut their binding 2 ¼-inch wide. I’m using 2 ½ with this blog.  I multiply 2 ½ x 8 strips, which equals 20-inches.  Divide 20/36, and I know I need ½-yard of binding fabric.  Usually binding is made from some other fabric that’s been used in the quilt.  Decide which fabric you want to construct the binding from and add the ½-yard to that.  I will make mine out of the fabric I used for the last border. 

Step Seven – The Backing Yardage

Backing is a personal preference issue.  For those quilters who quilt with their checkbook (pay a long or mid-armer for their services), it may not be so personal, but simply boils down to what the long or mid-armer prefers.  However, for those of us who quilt our own quilts, it gets a little more complicated.

With this quilt finishing at 67-inches x 79-inches, it’s well within the range to use the 108-inch quilt backing material.  And I’ll be honest right here – that’s my personal preference.  LeAnne the Long Arm just works better when she doesn’t have to go over a seam.  Big Red doesn’t care.  Neither does my Juki Mid-Arm.  If I need to purchase a quilt backing fabric, I must remember that the width runs along the vertical edge when it’s rolled off the bolt.  The 79-inch edge will be flush with that side of the fabric.  The shorter, 67-inch side will match up with the length of the backing material.  To math-out the yardage, divide 67 by 36.  This comes out to 1 7/8 yard.  The 1 7/8 yard will exactly cover the back.  However, I have to keep in mind since quilts generally draw up a bit in quilting, I need to have some additional margin in both the backing and the batting.  There’s quite a bit of debate among quilters about exactly how much the margin should be.  My personal preference is 6-inches per side.  I add this much because it leaves plenty of margin for my long arm clamps to grip (I baste the top of my quilt, but not the sides – I use the clamps).  So, I will need to add 12-inches to both the length and width of my quilt.  Now my backing needs to measure 79-inches wide by 91-inches long.  I’m still good with the 108-inch wide backing, but I need to divide 91 by 36 to revise my yardage.  That comes out to exactly 2 ½-yards.  If I’m purchasing 108-inch backing fabric, I need 2 ½-yards.  Add that amount to the fabric chart.

But what if (like me) you’re trying to be responsible about your stash and use what you have on hand?  And what if the fabric in your stash is the standard 45-inch wide, cotton quilting fabric?  Well…it’s completely doable, but there’s a little more math involved and some additional pre-planning before you start piecing the quilt back. 

The first step is measure your quilt top.  We know the top we’ve constructed in this blog is 67-inches by 79-inches, and our pieced backing needs to be 79-inches by 91-inches to allow for the quilting margin. 

The second step is picking the fabric.  This is where you can get all kinds of creative.  You can add leftover blocks (one of my favorite ways to piece a back).  You can use any fabric that’s left over from the quilt top.  You can purchase extra fabric.  Just remember the following:

  1.  Solid colored fabric will show up every quilting stitch.  If you’re a proficient quilter or your long arm artist is wonderful, a solid colored backing is great.  However, a “busy” backing can cover a multitude of quilting sins.
  2. There are other fabrics that can be used besides the 100 percent cotton quilting fabric.  Minky and flannel are also great choices and quilt beautifully.  Just be aware that they both are stretchy fabric and minky is so soft and slick it slides all over the place.  After backing my first quilt with flannel, I discovered washing my quilt top before quilting it is a great idea — especially if I didn’t pre-wash my fabrics from the get-go.  The reason behind this is while flannel won’t shrink, a 100% cotton top will.  If I washed the completed quilt, the top would shrink and the flannel back wouldn’t, and that can cause some issues. 
  3. It’s really tempting to use sheets.  They are certainly big enough and less expensive than quilt backing fabric.  I’ve tried using sheets as backing, but haven’t been happy with the results (this was years before I had a long arm – it may work out differently now).  The higher the sheets’ thread count, the more difficult it is to sew.  I have quilting friends that used 100 percent cotton flannel sheets as a quilt backing and loved the results – just be sure to wash and dry the sheets first. 

The third step is consider the seam allowance.  Pieced quilt backs have a larger seam allowance.  The standard ¼-inch seam allowance doesn’t work here.  Seam allowances for pieced quilt backs should be ½-inch.  These seam allowances need to be a bit bigger because the back of the quilt undergoes more stress than the top.  It’s always against something – the bed, couch,  or a wall.  Those extra-large seam allowances help the back deal with that stress.  Most of the time the added margin of 6-inches per each side of the quilt takes in the ½-inch seam allowance, but if you’re cutting it really close measurement-wise with your fabric, take those widths into consideration.  The last thing you want is to come up short on your backing. 

The fourth step is sewing it all together.  I touched on this in a blog in 2018.  Since that’s been a while, I will explain the process again.  The seams used to piece your back can run either horizontal or vertical.  What you don’t want to do is sew a width of fabric cut to a length of fabric cut.  Sew a crosswise grain to a crosswise grain and a lengthwise grain to a lengthwise grain.  If you don’t, the back will come out all kinds of lopsided.  And if what you’re making is a quilted wall hanging, the backing will “droop” noticeably. 

Typically, to make the most of your fabric, you will want the seams to run horizontally for quilts that are 40-inches to 60-inches. 

Quilts that are larger than 60-inches should have vertical seams.   

The quilt we’ve constructed in this blog is 67-inches x 79-inches.  Since it’s larger than 60-inches, we want the seams to run vertically.  We know when we add the 12-inch margin to the 67-inch width, it brings the measurement up to 79-inches.  Still working with 40-inches of usable fabric, we know we’ll need two pieces of 40-inch fabric for the backing.  The top is 79-inches long, and when we tag the 12-inch margin to that, we get 91-inches.  Divide 91 by 36 and we get 2 ½-yards.  Since we will need two pieces, we multiply 2 ½ x 2 and get five.  We need to purchase 5 yards of backing fabric.

As a fabric consumer, here’s where I really do some comparative shopping –especially if I have to purchase additional fabric for the back.  If I purchase 108-inch backing fabric, I only need 2 ½ yards, as compared to 5 yards of the standard cotton quilting fabric.  Sometimes (especially if you have a coupon or it’s on sale), the wide backing fabric is more economical than the 5-yards of standard fabric.  Either way, add what you need for backing to your chart.

Step Eight – Add it all up.

Now it’s time to add up the yardage you need to make this quilt.  This process takes some time, but in the end, you know exactly how much you need.  It’s much better than just trying to eyeball the quilt and assume the amount of material you need.  When I just guess at how much fabric I need, I either end up purchasing way too much or too little.  And if it falls in the “too little” category, it seems I can never find the exact fabric I need again. 

And always…shop your stash first.  Then shop at your LQS (if you still have one in your area). 

Until next week, Level Up Your Quilting!

Love and Stitches,

Sherri and Sam

Categories
Uncategorized

Mathing the Yardage I

How many times has this happened to you?

You see a quilt you want to make.  Maybe it’s from across a crowded quilt show…it beckons you over.  It seductively calls to you and mesmerized…yes, even hypnotized by its beauty…you stroll over.  You try to be cool about the whole situation.  I mean it’s probably a great looking quilt, but you’ve seen great looking quilts before….this is nothing new.

And then you examine it closely…every stitch is perfect.  The colors are divinely inspirational.  The quilting stitches ooze class.  It’s then you realize, somewhere deep down in your quilty consciousness, “I’ve got to make this quilt.”  Oh, you still try to be casual about it.  You snap a few pictures on your camera phone (making sure to get the name of the pattern on at least one of the pictures) and remark to the person next to you that this quilt is really beautiful and you either can’t understand why it didn’t win any ribbons or why it didn’t win more ribbons.

You’ve been bitten by the quilt bug and just like that rabid high school crush you had years ago, your quilting hormones are raging, and you know what you’re going to do when you get home. The minute you get through the door (or maybe on the way home if someone else is driving), you Google that quilt.  You search for it on Pinterest. 

All to find out that your search is in vain.  You can’t find it.  So, you begin to text your quilting friends – have they heard of this pattern?  Do they have it? (Seriously…I have been on group text with 30 people when one of us is searching for a pattern).  None of them know the pattern nor do they have it.  Last resort, you put it out there on Facebook, Ebay, and maybe even Twitter. 

And come up empty. 

Let me commiserate with you at this point.  I’ve had the same thing happen to me.  Usually this pans out in one of two ways.  Either I discover the pattern is out of print, or the pattern is the original property of the quilt maker.  If I find the pattern is out of print, Ebay has saved my quilting sanity more times than once.  However, if the pattern is an original design of the quilt maker…it’s more difficult.

But maybe this isn’t the scenario.   Perhaps you’ve come up with your own design.  You were inspired by a pattern in some tile or wallpaper.  No matter how it happened, suddenly you have this idea for your own quilt and your quilter’s soul won’t give you a minute’s peace until you’ve decided to make this quilt for yourself. 

Thus, the process begins.  Some quilters draw their quilts out on paper (usually graph paper) and some use a software program like EQ8 (I fall into that category most of the time).  This is the easy part.  You can get the quilt all drawn out but then you have to determine how much fabric you need.  With EQ, this is easy – it’s point, click, and print.  The program will tell you how much of each fabric you need.  I’m putting this right here though – EQ usually tells you exactly how much you need nearly down to the inch.  If you use EQ for this, add a little more fabric for margin not that any of us make mistakes.

I also realize not everyone uses EQ, and I also know sometimes inspiration strikes when you can’t access it the software.  You can sketch the quilt out, but how do you determine how much fabric is needed to make that quilt?  This is what I want to address today – because when inspiration strikes, it’s always good to have a plan.

So…

Step One:  Choose your design and your size.

Keeping the standard mattress sizes in mind, decide if you’re making a twin, double, king, queen, or crib.  If it’s a throw or cuddle quilt, figure out how big you want it (my standard size for cuddle quilts or throws for me is 76”x76” – exactly a foot bigger than I am tall). 

After you’ve decided on the size, then determine how much of the quilt area will be blocks and how much will be borders and sashing.  This can be determined by sketching your quilt out some paper.  Graph paper is a particularly wonderful tool to have at this step.  You can assign a size per block – for instance, five blocks are equivalent to 10 inches.  I’ve always found that ten is an easier number to work with than twelve because I seldom make quilts with blocks that are larger than 10-inches square.  If you want your blocks larger, you may want to assign your graph paper differently. 

Step Two:    Consider the overall appearance of the top.

The first item to consider is the block size in comparison to the size quilt you want.  For instance, if I were planning a standard queen-sized quilt, I’m looking at 84-inches x 104-inches (that’s the bigger end of a queen-sized quilt).  This is a fairly large area and I know  if I tap into my inner Dear Jane and make 4 ½-inch blocks, there will be lots of piecing in my future.  There’s nothing wrong with that, I just know heading into this project, lots of cutting and piecing will take place.  If I decide on 12-inch blocks, I won’t have as many blocks to piece or as much fabric to cut out. 

The second detail to consider is the borders.  Will I have them?  If I want them, do I want to cut them on the crosswise grain or the straight of grain?  How many do I want?  Do I want to miter them?

The last element to be considered is the actual setting.  Will the quilt be on-point or in rows?  If the quilt is straight set (rows and columns), the math is pretty easy.   If I decide to use an on-point setting, I simply multiply the finished size of my block by 1.41 to determine the width of the on-point block. 

If I do decide on an on-point setting, there is one last design decision I have to make – will the setting triangles be pieced or plain?  And I have to remember that the four-corner setting triangles are smaller than the setting triangles used along the sides.  In addition, not only are those triangles different sizes, they are also cut differently.  Either way, there’s lots and lots of math involved and it can be kind of daunting…

Unless you have one of these:

Quilting Calculator … oh, how I love this thing!

Either as a phone app or a physical calculator like I have, this is a wonderful tool to have in your possession.  Decimal numbers will figure into this process a lot.  This can be a bit intimidating, since as a whole society, we’re not fluent in how to convert decimals into yards.  A quilting calculator converts a decimal into a fraction with a touch of a button.  If you don’t have one of these little jewels, there are literally hundreds of conversion charts available  on the internet.  Download one and keep it handy. 

Step Three:  Analyze the quilt blocks for yardage needs.

This is where some graph paper or EQ8 comes in handy.  Generally, most blocks are considered to be four, nine, or sixteen patch blocks – they have the same number of block units both horizontally and vertically.  The proportion of these blocks may change, and the appearance of these blocks may change, but the fact remains most blocks are either four, nine, or sixteen patch blocks – with a nine-patch block being the most frequently used.  Please take a close look at the illustrations below:

Despite all the differences in appearance, all of the above blocks are nine patches.

This gives you a good idea about how much we can alter blocks by changing proportion and by dividing the grid blocks into HSTs, QST (quarter square triangles), or any other type of block we want to insert into the square on the grid. 

Instead of feeling creatively stifled by this proposition, this is really liberating.  If we know the grid of a block, not only can we alter it to fit what we want, we also can predict the amount of fabric we need.  Let me walk you through this process. 

Take this Birds in the Air block: 

Birds in the Air block

When we graph this block out, we determine that it is a 9-patch block – three horizontal squares across and three vertical squares.

Birds in the Air graphed out on EQ8.

Let’s say we want to make 20 of these blocks, each identical to the other.  The block finishes at 9 inches square. 

  1.  Divide the finished size of the block, 9-inches, by the number of rows across or down – which is three.  This figure tells us how big each square on the grid must be – and keep in mind as we are “mathing” a block, we always work with the finished sizes and add on the seam allowances at the very end.  It’s just easier this way.  
  2. Most of the nine grids in this block contains HSTs.  For sake of illustration here, we’re using the Sew and Slice method, since HSTs have a bias edge and I can wait until the last minute to expose the bias. At this point, I have to decide if I want to cut and sew the HSTs to the exact size or do I want to make them a bit bigger and cut them down.  If I make them true-to-size needed, I take the finished size of the HST unit (3-inches) and add 7/8-inches to it.  I will need to cut the fabric squares for the HSTs 3 7/8-inches.  Since I like to make my HSTs a bit bigger and then cut them down to the size needed, I’ll add one whole inch to the finished size – so I would cut my fabric squares at 4-inches.  Added caveat here – a whole number is easier to “math out” than a fraction such as 7/8.   
  3. Each block has three dark purple triangles that I plan on cutting out at 4-inches square each (since I plan on making them larger and then cutting them down for accuracy).  I want to make 20 blocks, so multiply that by three per block, making 60 triangles.  Since I’m using the Sew and Slice method, I can make two triangles per square, so I divide 60 by two and know I need to cut thirty 4-inch squares. 
  4. I know that most quilting fabric has about 40 inches of usable fabric (it just seems selvages keep getting larger and larger – I’ve seen some as large as 1-inch on each side).  Divide the 40-inches of usable fabric width by four and I know I can get ten 4-inch blocks per strip. 
  5. Now we take the 30 blocks we need and divide it by ten, which equals 3.  I will need to cut three 4-inch strips in order to get the 30 blocks.  So, 3 strips multiplied by 4-inches equals 12 inches.  To figure yardage I divide 12-inches by 36-inches (number of inches in a yard), and I get 1/3 (and for those of you really mathematically inclined, yes, you can simply reduce 12/36 = 1/3).  I will need 1/3 of a yard of dark purple fabric to make thirty 4-inch squares, which will in turn make 60 HSTs.  I will also need 1/3 of a yard of the light fabric to make the HSTs.  At this point, if you’re like me and are a pre-washer, you may want to bump the yardage up to a half a yard to allow for shrinkage – or if you want to give yourself a little margin for any errors, you may also want to consider ½-yard. 
  6. Let’s look at the large triangle now.  Each triangle is three grids high and three grids wide, making for a 9-inch finished square size.  The math in this one is not any harder than the HSTS, but we’re not going to round the fractions up to whole numbers and then cut the triangles down.  We will take the 9-inches (the measurement of the finished quilt block) and add 7/8-inches to it for the seam allowances – 9 + 7/8 = 9 7/8.  We will need to cut 9 7/8-inch squares from the fabric.  Now let’s figure how many blocks we need.
  7. We’re making 20 blocks and each block has one large triangle.  That’s 20 triangles.  However, we’re making these triangles by cutting squares apart on the diagonal, so we can get two triangles per square.  That means we only need ten 9 7/8-inch squares. 
  8. Now we have to determine how much fabric we need.  A 40-inch width of fabric divided by 9 7/8-inches (the size of the square needed), equals 4.05, or 4 squares per strip cut WOF.  The ten squares required divided by 4 per strip, comes out to be 2.5 strips.  We’ll round that up to 3 strips, each 9 7/8-inches wide. 
  9. To figure the yardage needed, multiply the 9 7/8 by the 3 strips and you get 29.6 inches.  Round that up to 30.  We need 30 inches of fabric, or 7/8-yard (30 divided by 36 equals 7/8).  At this point, you can either use 7/8-yard of your fabric stash or purchase 7/8 of a yard.  To me, it would be easier just to round it up to a yard wherever I get my fabric.

It’s important that I have some kind of chart or notes with this information on it because I may have to add to these amounts as I plan out the rest of the quilt, because this leads us to steps four and five, the sashing and borders — which we will discuss next week.

_____________________________________________________________________

Personal note here: This is how my sewing table looks right now.

Quilting has been set aside for awhile. In its stead, a steady stream of face masks are under my needle. Now, before anyone hops on the issue that these are not medical grade masks, I’m well aware of that. Wake Forest Baptist Hospital asked if some of us could make these as additional protection for their medical personnel. I couldn’t refuse — not after everything they did for my daughter.

As I stitch these up, I’m reminded that sewers (primarily women), have answered the call for medical supplies in the past — socks and bandages and bedding. I know for a fact I have ancestors that contributed to the need during times of war and hardship. I can do no less.

One day, hopefully in the not too distant future, there will be no more need of these and I will pick my projects up where I left off. I’m looking forward to that time — when I can see my mom again, hug my friends, go out to eat at a local restaurant, and quilt with my girlfriends.

Until then — wash your hands, practice social distancing, and be kind to others and yourself.

Love and Stitches,

Sherri and Sam

Categories
Uncategorized

The Eyes Have It

I’ve written prior blogs about balance in a quilt.  Colors should be balanced, and quilting should be equally distributed throughout.  This sounds intimidating, but fortunately, most quilters do this intuitively. And while the intuition may need some fine tuning, it’s not an instinct you have to start from scratch and build on.  Negative space is another aspect of a quilt top that must be balanced.  It’s no secret that quilts like this:

1718 Coverlet

Make me just a little bit crazy.  I know this is the 1718 Coverlet, and it was made literally hundreds of years ago, and styles were different back then.  However, I have two major issues with quilts like this:  First, there is nowhere for your eyes to take a breather, and second, I don’t know where to look first.  Truly this quilt is a thing of beauty and a joy forever (it was done in silk, and English Paper Pieced), but I can’t look at it very long because I have no idea where to look first.  It’s like my entire brain just shuts down.

I have no idea where to look first on this Crazy Quilt.

I have the same issue with most Crazy Quilts. 

I need a roadmap and rest stops when I look at a quilt.  I need to have some direction on where to look and some space where my eyes can rest while my brain processes what it’s just taken in.  And that’s really the topic of this week’s post – how you can design your quilt to help the viewer take in the entire quilt top and have a great time when they do this.  We’ve already hit on this topic in two ways:  The use of negative space in a quilt and connector blocks.  Both of those subconsciously help the viewer really take in the quilt and visionally digest it.  For those of us who love quilts that are set on point, the setting triangles and/or squares do the same thing.  And for some quilts, the blocks themselves, when set together without any sashing or setting squares/triangles, help our eyes move across the quilt top because the blocks give you visual cues where to let your eyes move.  Take for instance, this block:

Jacob’s Ladder Block

This block is Jacob’s Ladder and it’s one of my favorite “old” blocks.  When set either in rows:

Or on-point:

The triangles and four-patches seem to march across the top of the quilt and your eyes follow those paths.  Granted, there is little negative space, but these blocks are usually set with a limited color scheme and that makes up for the lack of open space. 

But what if you have a block like this? Most of the triangles are pointed inward.

If you set them together either on-point or in rows, this is what it looks like.

Horizontal Rows
On-Point — although I am digging the secondary design in this.

Not quite the same effect as Jacob’s Ladder, is it?  The outside triangles of the design block point inward towards the center of the block.  Your eyes aren’t quite sure where to look except for the center of the block.  This is where some well-designed sashing can come into play that will not only give direction to the quilt top, but will also supply a bit of negative space.

I’ve spent a great deal of time and blog space on triangles for a couple of reasons.  First, they are a basic unit in hundreds of quilt blocks and it’s important to know how to make them well.  It’s also important to be aware of what construction technique works best for you.  The second reason triangles are having a lot of play time in my blogs is they give direction to the quilt top.  Think about it.  Arrows are used to give direction.  At the tip of an arrow is a triangle.  We are used to triangles pointing in the direction we should go, and they serve the same purpose with a quilt block and sashing.  Just like this block

Prompts our eyes to look inward…

This block triggers our eyes to look outward.  When paired as part of the sashing with the design block, instead of your eyes being locked into the center of the block, they are prompted to look outward towards the rest of the quilt.  This takes a little planning and a little extra fabric, but it’s worth the effort. 

Why is forcing the viewer’s eyes outwards to the rest of the quilt important?  The first obvious reason is that it empowers the viewer to take in the rest of the quilt.  For as much dedication and detail you’ve put into those squares, you want the viewers to take in the entire quilt, not just the block(s).  Most quilters spend a lot of time on their blocks, whether those are appliqued or pieced.  But you’ve also spent a lot of time on the borders and quilting.  Those should have equal viewing time.  Any type of sashing that gives visual direction helps the viewer to look at the entire quilt.  There are other blocks that lend themselves to sashing cornerstone configurations that do the same thing.

Friendship stars:

Lattice Work:

And other pieced sashing:

Right now, some of you may be asking about on-point quilts.  With these, we’ve abandoned the structure of vertical and horizontal rows.  Everything is diamonds and triangles with these.  Do these quilts need visual cues?  Yup.

Let’s look at this quilt.

It’s a nice quilt.  And I’ve never hid the fact that an on-point setting is my favorite.   So, immediately, any on-point setting catches my attention.  However, when some sashing is included that adds some direction:

Or some connecting blocks that do the same thing:

You get an entirely different look, that in my opinion, is better. 

However, at this point, let’s delve into a different type of quilt.  Let’s talk about a Medallion Quilt.  I’ve mentioned these before, but to review a medallion quilt is a quilt whose layout has a central area that often dominates the overall design. Other design elements are sewn around the center, increasing the quilt’s size as new borders are added around the center.  A lot of work and thought can be put into the center block, as shown in my Halo Medallion.  The center block is a star, so the points naturally lead the eye outward to the rest of the quilt and all the detailed piecing. 

My Halo Medallion. Pattern by Sue Garman.

On this quilt, it’s a little different:

This is a quilt I’m making for my DH as part of his Christmas.  The center block is cut from a panel, so the borders I put around it would have to lead the eye outwards towards the rest of the quilt.  The block was also really colorful, and I decided I needed to use narrow, solid borders around it first for two reasons.  First, to calm it down and then to begin to introduce the fabric to be used in the rest of the quilt.  However, after that, I needed a border to push the eyes outward.  A sawtooth border did the trick.  A few more solid, fabric borders later (again to introduce my fabrics), and a star border made from HSTs was added.  More solid borders and then a square-in-a-square border will be added, again pushing the eyes outward towards the final border. 

In some ways, managing a medallion quilt is a bit more challenging than a row quilt or an on-point quilt because you’re balancing motion, careful introduction of materials, and space for the eye to rest.  To pull off an effective medallion quilt really shows your chops as a quilter and an artist. 

Between this talk of movement and visual cues with any of these quilts, what I am really emphasizing is interdependence.  Interdependence is defined as “the dependence of two or more people or things on each other.”  All quilts have interdependence – it’s a natural part of the design concept.  They have an order (rows, on-point, or medallion).  The interdependence comes into play when color, design elements, fabric, and borders are repeated.  As you plan your sashing to add movement, you repeat colors or fabrics you’ve used in the blocks.  If you’ve used triangles in your design blocks, you will want to use those in your connector blocks or sashing pattern.  If you went rogue and introduced circles as a design element, it would look…well, weird…

Unless you made a quilt like this, which uses circles in the design block and in the sashing.

Circle Jubilee

At this point, if you’re like me, you’re asking yourself, “How do I get myself to the point where I know I’m doing this right?  What do I need to do?”  Give yourself time, practice, and study quilts.   To some degree, a lot of this comes intuitively.  But the longer you quilt, the more it becomes second nature.  If you’re just beginning, I’d advise you to use good quilt patterns by designers that have a solid reputation as quilt teachers.  These folks have been around the quilt block (pun intended here) more than a time or two and by making their quilts you can gain a firm grounding on what elements make up a good quilt.  After a while, you can jump in with your own ideas and change up the quilt to make it more “yours” than “theirs.” 

Looking at historical quilts, award-winning quilts, and quilts made by stellar quilt artists (both in your local guild and those nationally/internationally known) will also give you some ideas of interdependence, movement, and good negative space.  It’s always surprises me a bit to acknowledge just how much my brain remembers from what I’ve read and looked at as I work on a quilt.  My brain just kind of files it away and pulls that information out when I need it.  I’m sure my brain isn’t the only one that works that way, so give yourself permission to Google or Pinterest in the name of quilting.  And a few great quilt books are a solid investment for any quilter’s library. 

To sum this up, it’s important to add some kind of design element to a top that helps the viewer move his or her eyes outwards to the edges of the quilt.  While the center of the quilt may be completely fabulous, you want people to look at the entire quilt you’ve spent time, blood, sweat, and tears designing.  You want to give them a chance to let their eyes take a rest (negative space), before moving on.  And you need the interdependence of repetition of colors, fabric, borders, and shape to keep the quilt in balance. 

Until next Week, Level Up That Quilting!

Love and Stitches,

Sherri and Sam

Categories
Uncategorized

The Missing Link

Before we get into this week’s topic, I’d like to give you fellow quilters a quick public service announcement:  Check your thread.

 The reason for this PSA is a picture I saw on my Facebook feed over the weekend.  A long arm artist was readying a quilt to put on her machine when the top literally began falling apart.  She checked the top’s stitches and tension and both of those looked correct.  She called her customer and found out that the quilter in question had used old thread.  We’re talking thread-on-wooden-spools old thread.  My guild had a similar situation a few years ago.  A member who was downsizing had some tops she had constructed but had never quilted.  Another member (who had a long arm) took these tops to quilt for our charity quilt program.  Since the tops were several, several years old, the long armer threw the tops in her washing machine before putting them on her long arm.  And the tops completely fell apart.  The issue, once again, was the thread. 

If you have thread in your stash wound on wooden spools, put them in a pretty jar to display in your sewing room.  That’s literally all they’re good for at this point.  Thread does have a shelf life, albeit a pretty long one.  According to the Superior Thread website (if you ever have a question about thread, this should be a go-to resource), “A good quality thread produced today will last much longer than thread that was produced 15 or 20 years ago.”  So, if you’re like me and still have those gold, plastic Dual Duty or Coats and Clark spools of thread – toss them.  A high-quality cotton thread that is manufactured today will probably still be fine to use 40 or even 50 years from now.  Why?  The difference is due to the advancements in spinning, dyeing, and twisting as well as the evolution of genetic engineering in cotton plants.  Since cotton is a natural fiber, it will degrade over time.  If you have older thread in your thread stash, the best way to determine if it’s still usable is to take a 12-inch section of the thread and hold it between your two hands.  Give the thread a sharp pull.  If the thread snaps (a nice, crisp break), then it’s probably okay to use.  If it separates and pulls apart easily (like pulling a cotton ball apart), throw it in the circular file and get another spool of thread.   

However, polyester thread is different.  With this thread, the color may fade over time, but there is no evidence that it deteriorates like cotton thread.  Synthetic fibers last longer than cotton ones. 

_________________________________________________________________

When we started 2020, I expressed a strong desire that by the end of the year, we all could take a pattern or design and make it our own.  I want us to get really comfortable about changing a design element in a pattern or coming up with our own pattern if a quilt drifts into our imagination and won’t let us go.  In keeping with this year’s theme about advancing our quilting skills and altering designs to fit how we want our quilts to look, I’d like to hit on the topic of connector blocks — also referred to as linking blocks.  These are secondary blocks in a quilt that serve to pull the main blocks together for an unexpected secondary pattern.  Often these blocks are what I consider the “backbone” of quilting – snowball blocks, square-in-a-square blocks, four-patch blocks, etc.  Let me show you what I’m talking about.  See this quilt?

This quilt has no sashing, because it has connector blocks and really doesn’t need any.  This is the main block.

And this is the connector or linking block:

The block that is used most often as a linking block is the snowball block.

This block can transform a quilt top in many ways and gives a nice, open area to have some serious quilting stitches. 

However, while the snowball block is the most often used connector block, it’s not the only one.  There are some more complicated ones that also serve as great linking blocks.

If you want to play around using linking blocks instead of sashing or an on-point layout (personally, I’ve found the regular horizontal layout much easier to use when I’m working with linking blocks), you’ll need to do a little planning.  Take your primary design block and draw it out on graph paper or throw it into EQ8.  (Personally, I find the software the easiest to work with, because you can insert numerous blocks of the same design just by pointing and clicking.)

Primary Design Block. You could also deconstruct this block beautifully.

Then draw your connector blocks or insert them into your computer layout.  Keep in mind the connector block   more than likely will need to echo the corner of the design block.  So, if the design block has a straight edge (such as a triangle, square, or rectangle) in the corner where it meets the connector block, the connector block will need to echo that straight edge.  In other words, don’t have a curved unit meeting up with a square.  Since there are few hard, fast rules in quilting, there are exceptions to this. 

My pick for the linking or connector block.

If you don’t like what you have come up with, work with the linking blocks until you create something that makes your quilter’s heart sing with joy. 

My Christmas Quilt with the chosen design and connector blocks. See what an important role the color choice and placement plays with this?

The really cool factor that can occur when you use a primary design block along with connector blocks is a secondary design can emerge.    Of course, color placement is an important factor in this process, so you may have to play around with fabric positioning as well as block design to get this to happen – such as using the same colors in the corners of the design blocks and the connector blocks.

Jacob’s Ladder with a Nine Patch forms a nice secondary design

What I really, really want you to have this year is “Own Your Quilting Experience.”  Quit depending on kits and patterns to dictate everything that comes out from under your needle.  I really hope that at the end of 2020, you have the tools and the confidence to look at a pattern as only the starting point of your design.  If you don’t like the way a pattern calls for making HSTs, you know the most effective way for you to make the HSTs and will use that method.  If you don’t want a border constructed out of four patches, you know how to redesign that border to look the way you want it to look.  And if you have a fabric panel in your possession, you have the know-how and the confidence to cut that sucker apart, put it in a layout that you like, and make that top sing in four part harmony. 

This is not to say I’m anti-quilt kit.  I’m not.  The Alaska quilt that’s under my needle now is a kit.  But I do think that a steady quilting diet of kits can really short-change your creative ability and stunt your growth as a quilter.  Change your patterns up.  Take one small thing at a time.  Substitute HSTs for plain patches.  Change the size of the blocks.  Do something to make it uniquely yours.  Garner confidence with each change you make and learn from the mistakes that happen (because they are going to happen, believe me).  Then try it again. 

Until next week, Level Up That Quilting!

Love and Stitches,

Sherri and Sam

Categories
Uncategorized

Handle with Care

We’re living in some fearful times. While the title of the blog, “Handle with Care,” concerns HSTs, I’d like to take minute to urge you to handle yourself with care during the COVID 19 pandemic. I’m not an alarmist, but I am a realist. We’ve all heard that we need to wash our hands. And we’ve heard a lot about Social Distancing (I’d wager that may be 2020 catch-phrase). However, this is where I’m coming from…

The average age of the average quilter is 62, according to the latest statistics. If that is true, then a lot of us now have parents that are in the “danger” zone of 80 and above. I’m in that group. I need to be conscious that everywhere I go, everyone I meet, everything I touch could have the virus on it and I could transfer that to my mom when I see her. In addition, my daughter, Meg, has a compromised lymphatic system, since her lower lymph nodes were removed in 2018 during her cervical cancer surgery. While she’s only 33, she could have a hard time recovering from COVID if she were to catch it.

We can’t live in a bubble, but there are things we can do to limit our exposure. My Tuesday night Sit and Sew has decided to halt our meetings for awhile. My guild cancelled its spring retreat. Area grocery stores are closing early to allow their staff time to sanitize the stores correctly each night. If I had five dollars for every email I’ve received this week from retail/on line establishments, explaining what they’re doing to keep us safe, I could afford to go to Paducah every year for the next five years.

And speaking of quilt shows, in my area, local ones have been cancelled. Word came out this week that several of the national shows have also cancelled. I live in Guilford County, North Carolina. The ACC was cancelled. Our International Home Furnishing Show has been postponed.

This results in a lot of area stores and restaurants hurting. The vast majority of these closings and cancellations affect the small business owner. Be conscious of that in the months ahead when we are able to get out and mingle freely. If you have to purchase fabric or quilt notions on line, see if you can order from a small quilt shop.

However, in the middle of all this fear, I’ve seen really good people step up to the bat. Local Door Dashers are offering free delivery to senior citizens. The food vendors from the ACC donated their meals to needy kids and families. Utility companies have agreed not to cut off services for non-payment during this time. We’re checking up on our older neighbors and fellow quilters. I hope we can hold onto this attitude after this passes — because COVID will pass.

Handle yourselves with care, my dear quilting friends.


Remember the blog I wrote a few weeks ago about triangles?  I’ve gotten quite a bit of feedback on that blog.  Most of it was in the form of questions about how to handle the triangles after they were cut but before they were sewn together.  The blog kind of took for granted folks were sewing the triangles together immediately after they were cut out.  We all know that’s often not the case.  Life happens and sometimes it can be days (optimistically) between getting our fabric units cut out and then sewing them together.  So, with this blog I want to posit that scenario and give you my thoughts about how to store and work with those triangles if there is going to be a bit of time between cutting them out and sewing them up. 

 If I thought there was going to be some time between cutting my triangles out and sewing them together (for instance, if I was prepping my fabric for a quilt retreat that was several weeks away), I would opt for the Sew and Slice Method.  I would go through every step of this process, except for cutting the square in half to make the two triangles.  A square can lie flat in a box for literally years and nothing will happen to stretch the bias.  When I’m ready to work on the quilt again, I would cut the square apart and expose the bias.  In any quilting situation where you’re dealing with bias, wait as long as you can to handle it.

In the situation where the bias is already exposed and you can’t immediately sew the triangles together, starch is your best friend.  I know lots of quilters like Best Press, and if that’s your thing, use it.  The point is use something to stabilize the bias edge.  In my own personal opinion, nothing stabilizes better than this:

When you use starch and then press the fabric with a hot, dry iron, the fabric can take on a paper-like quality, which makes it very stable. The triangles will store nicely, and the bias side won’t stretch.  The caveat to this is if you live in an area where you have issues with moths, be sure to store the triangles in a plastic container with a tight lid.  Moths are attracted to starch and may make a run to munch on your fabric.

If I knew for whatever reason I had to set aside my triangles for a while, I would also plan not to handle them again unless absolutely necessary.  The more the triangles are handled, the better the chances are the bias will become stretched.  If you know you can’t sew the triangles together soon as they’re cut out, hit the fabric pieces with some starch and a hot iron, and then immediately store them flat.  Handle them one time and then leave them alone until you’re ready to sew. 

And speaking of sewing those triangles, there are few things I would like to add in here that I inadvertently left out of my HST post. 

  • When sewing a bias edge to a straight-of-grain edge, sew with the bias on the bottom (next to the feed dogs).  The reason for this is that the straight-of-grain stretches the least and will support the bias edge.
  • If you do have to sew two bias edges together, use a walking foot or dual feed foot and slow your sewing down.  Speed is never your friend when dealing with two bias edges.  If your walking foot or dual feed foot is not clearly marked for a ¼-inch, do some test seams to see exactly where you need to position your needle and your fabric.  When you find this “sweet spot,” mark it with a dab of fingernail polish or use a black Sharpie to indicate the location. 
  • Once the two triangles are sewn together or the square is cut apart in the Sew and Slice method, press the unit with a hot iron (no steam) to set the seam and allow it to cool before opening the HST unit and pressing to the dark fabric.  This helps the unit to hold its shape better and be easier to work with.  After the seam is pressed to the dark side, again allow the unit to completely cool before moving. 
  • Don’t be afraid to pin.  As a matter of fact, I think pins are my BFF when I have to sew bias edges.  It keeps the bias from slipping out of place.
  • Eliminate all unnecessary handling.  I’ve hit all around this one, but make those triangles, sew where you need to, press them, and then put them somewhere you don’t have to move them again until you’re ready to sew them together, or onto another unit.  Store them flat – this takes the stress off the seam and the bias. 
  • Whenever possible, start sewing at the 90-degree angle.

One last thought on HSTs – if you’re still antsy about that bias, paper piece your HSTs.  Yes, you will use more fabric, but not by much.  Keep the papers on until you’ve sewn your HSTs together or onto other fabric units.  Then tear the paper off.  Even if you’re not crazy about paper piecing, this is one method that will pretty much guarantee that the bias won’t be stretched, and your HSTs are the correct size.  If you Google paper piecing half-square triangles, there are hundreds of free paper piecing patterns in every imaginable size that will pop up on your feed.  I am currently making a quilt where I wanted to use a sawtooth border (which is nothing but HSTs), and the HSTs had to be 3-inches, finished.  I had no 3-inch paper-piecing Thangles, but I did find the pattern that made eight HSTs at a time with a Google search.  Use the free internet patterns to your advantage. 

Since HSTs are one of the backbones of quilt blocks, it’s important to learn the best way for you to make the unit.  What’s my favorite way may not be yours, and that’s okay.  This is why we have so many ways to construct them.  Give yourself permission to experiment and find what works best for you.  And when they’re made, take care to keep them from stretching, whether it’s three minutes or three years until you get back to them.

Until next week, Level up that Quilting!

Love and Stitches,

Sherri and Sam

Categories
Uncategorized

Intuitive Designing

Back in 2018, this blog’s annual theme was Quilt with Excellence.  We undertook a series of topics that emphasized the basics and spent a great deal of time on them.  From a former teacher’s viewpoint, I knew the more the basics were emphasized, the better the outcome of any project.  During this time, I wrote a series of blogs about design and the Golden Ratio.  I am happy (and excited) to say that these posts remain some of my most popular, averaging 165 hits a month.  They’ve been read and re-read to the point there are some murmurings about a book. 

The issue some quilters have with the Golden Ratio is the math. The GR is an irrational numeral – 1.618….. The dots mean this number literally goes on forever, never ending, and that can be a difficult concept to wrap your mind around. We shorten it to 1.618 to work with sashing and borders, or we can half it to .618 and work with it this way. In these blogs (and I will post the links at the end of this blog), I explained how these two numbers worked ensure that the borders and sashing are in perfect proportion to your blocks.

Math can be intimidating.  It’s the language of computers and science. As a former chemistry and physics teacher, I’ve dealt with my fair share of arithmetic.  I tell quilters what I used to tell my math phobic students — “Math is your friend, because numbers don’t lie.”  However, even with calculators, a lot of quilters are just a little put off by trying to figure out how to “math” their own quilts.  I want to talk about Intuitive Design with this post and how you can use it with your quilts.  So set any math-y issues you have aside and hear me out.  No math is involved beyond this point.

What comes to mind when you hear that phrase “Intuitive Design?”  When I first heard it, I immediately thought about Art Quilts. 

Not my art quilt — this is for illustration’s sake.

I’ve only made one Art Quilt, and truly had a blast making it. Art Quilts are great because a lot of what is considered standard quilting “rules” go out the window.  These quilts may only have two layers.  They may have no binding.  They may be lop-sided.  And while quilters as a whole would frown on this in any other quilt, it’s quite acceptable with an Art Quilt.  In fact, as you gaze on this Art Quilt you may think that there is really no math or concrete design work involved at all.

And you would be dead wrong.

Let’s examine that quilt and the quilts we’re making and see what makes up design.

There are tons of tools on the market that help quilters design their own blocks and quilts.  Some quilters use graph paper.  Others use EQ (Electric Quilt).  There are the Golden Calipers for sashing and borders.  There are specialty rulers and color wheels.  But that’s not what I want to look at.  Shove all those tools back into the notions drawer (except maybe keep the graph paper out) and let’s examine Intuitive Design and how we engage it every time we make a quilt.  When we realize what it is, we can tune into it and use it better. 

First step:   Look around you.  Why are you wearing that pair of pants or skirt or top?  What makes your favorite chair your favorite chair?  Why did you choose that particular focus fabric for your favorite quilt?  Better yet, what part of the quilt store do you gravitate towards first?  If I asked these questions to 20 quilters and account for the law of averages, probably 15 of those asked would indicate color is the answer to these questions.  And choosing your color palette is one of the first steps in design.  Color in and of itself can evoke strong emotions or memories.  For instance, this red:

Brings to mind this logo:

What makes your favorite color(s) your favorite color(s) is a personal thing.  It’s no secret my favorite color is purple*, and I tend to gravitate towards that end of the color spectrum.  But I also favor either deeply hued colors or clear, bright ones.   It should be no surprise that Henry Glass and Fig Tree are my favorite fabric design houses.  I would encourage you to take note of what colors you repeatedly gravitate towards.  While I like purple, I do realize that I can’t paint every room in my house that color or make every quilt out of purple material.  When I began this process for myself, I had to back off a bit and see what colors I chose to go with the purple in my quilts.  For years I thought green was one of my least favorite colors.  Nope.  Green resonates throughout my home, my wardrobe, my office and my quilts.  Then again, it’s no secret that green and purple play well together.  Commit these choices to a written journal, pictures on your phone, or a Pinterest board – somewhere you’ll have easy access to them as you plan your next quilt.  Side note here – I do collect paint chips from the hardware store in the colors I like the most.  I don’t raid their collection, but do leave the store with about a half a dozen.  They come in handy in planning the colors for a quilt.

Second Step:  Look at what shapes you use again and again.  This one is a bit harder and you have to really think about it.  Let’s start with furniture. If we were furniture shopping for your living room right now, what kind of couch would immediately catch your attention?  Would you be drawn to the type that are more square-ish or rectangular-ish with sharp, 90-degree angles?  Or would your rather have something with soft corners and plump, round cushions?  Like color, shape can either make us happy or turn us off.  For instance, this shape:

Is not a popular one.  It’s not going to pop up in a lot of furniture or quilt designs because it reminds us of a coffin.  However, this shape:

Gets a lot of positive play.  Dishes.  Salt and pepper shakers.  Glasses.  Cups.  Cars. 

Art itself is the sum of shapes.  A flower is broken down into ovals and circles.  A sketch of a dog begins with circles, ovals, and rectangles.  All art can be broken down into rough sketches of basic shapes. The challenge we face in quilting is taking a one-dimension element (fabric) and producing a block with three-dimensional characteristics.  Applique is the easiest way to do this.  However, when you’re working with a pieced block – one with absolutely no applique – a quilter must consider how the shapes relate to each other in size, volume, perspective, and balance.

Before you start worrying too much about that challenge, or pull out a calculator to use the Golden Ratio on every part of your block – relax.  The great thing about Intuitive Design is that we do it naturally.  Somehow, wired into our brain is that 1.618 figure.  Visually, we tend to realize when a border is too narrow or that sashing is just a bit too wide.  The term most quilters use is off-balance.  Understanding and using that GR is important when designing your own quilts; however,  in most other quilt-related issues, your instincts are right.  Go with those.

The third step in Intuitive Design is texture.  Frankly, in other art forms, this is more easily achieved.  It’s a tad more difficult in quilting, because most of the time we use fabrics that are just that – flat fabric.  There are times when we can alter this.   I’ve always encouraged applique quilters to use whatever fabrics fits what they’re trying to convey – see-through fabrics for ice, wooly or furry fabric for animals, etc.  And Art Quilts can use a myriad of mediums to contribute to the desired appearance.  However, these are the exception.  With most quilts, quilters are dealing with 100 percent cotton material that is absolutely smooth to the touch.  This is where we rely on fabric manufacturers to supply us with material that gives the illusion of the texture we want.  Remember my earlier blog on ugly fabric?  How I encouraged you to look at fabric differently?  Look for material that gives the illusion of what you need – leaves, pebbles, clouds – whatever your block needs, take the time to find the appropriate fabric that gives the appearance of the texture you’re trying to convey.

By using color, shape, and texture, a quilter can add both dimension and fun to a quilt.  The best thing is most of us do in intuitively.  Go with your intuition.  Don’t doubt it.  Sure, we’re going to make mistakes, but that’s how we learn.  And how we make better quilts.

It’s here I really tried to insert the link for my blog on Sashing and the Golden Ratio, but for whatever reason, WordPress was being hard to get along with. If you’re interested, you can find it in the archives – it’s dated July 26, 2018.

Until next week, Level Up Your Quilting,

Love and Stitches,

Sherri and Sam.                                               

*True story about me and the color purple. A few years ago, my husband was having our offices repainted. He asked me what color I wanted my office. Without hesitation, I said, “Purple.”

“That’s not a business-y color,” he replied. 

“I like purple.  It makes me happy.”

Without missing a beat, he told the painter to paint my office a light gray.  The painter gave him a long look and left to purchase the paint.  I left for the day too, determined to make a stop at Target to pick up purple office accessories.

The next day when I opened my office door, the walls were purple — a lovely shade of lavender.

That painter is one smart man.

Categories
Uncategorized

Experiencing Technical Difficulties

Originally this blog was supposed to be about intuitive design.  I know that sounds really fancy and maybe a bit intimidating, but I felt it was needed.  The series of blogs I wrote back in 2018 dealing with the Golden Ratio are still getting lots of hits (YEA!!).  I get PMs and emails with questions several times a month.  So, my thought were that with this blog I would answer the most frequently asked questions to see if that would help fellow quilters out.

I had my outline.

I had my graphics.

I was ready to rock and roll. 

Enter technical problems.

As a whole, technology and I get along pretty well.  As soon as home computers became available, I had one (I think it was Radio Shack’s brand, back in the mid 1980’s).  I’ve manipulated software.  I was using Quickbooks for home bookkeeping back when it was in DOS.  As a high school science teacher, I would upgrade my Texas Instruments science calculators every time a new one came out.  Big Red is computerized.  My Babylock Spirit is highly computerized, as is LeAnne the Long Arm.  I have a new iPhone and Apple Watch.  Each time I upgrade something, I have a little niggling fear in the back of my mind – what happens if some of this stops?

So besides just seriously aging myself – because let’s be real, who remembers Quickbooks when it was in DOS besides me and maybe a few accountants – here’s where my issue with technology comes into play this week.  See this?

This is my present laptop screen.  And no, I didn’t program it to look like a rainbow.  It did that all by itself.  A few days ago, I was working on EQ8 when it happened.  I had left my desk to go get something to drink.  When I returned, I wiggled my mouse to bring my laptop back to life.  The screen went white, and then began to show these stripes.  So, I did what most people my age do when they’re suffering technical dilemmas – I talked with one of my kids.  In this case, it was Meg, because she can make computers not only talk, but sing in harmony —  in vivid (and sometimes colorful) detail. “Could be the screen,” she told me.  “It could be going bad.”

“What do I do?” I asked.

“Take it to your computer guy.  He can replace your screen.  It’s an easy fix.”

Which all makes good sense – except that means I have to surrender my laptop for a few days.  And you never know how computer dependent you are until suddenly you’re without one.  Yes, I have a great phone.  And an iPad.  And two android tablets (one is on LeAnne).  But I write and edit my graphics on my laptop because the screen is bigger.  I’m 58.  My eyesight can only deal with smaller screens for so long.  Thankfully my DH gave me an android with a keyboard for Christmas.  The keyboard is tiny, but hey, it’s a keyboard and it’s not a permanent way of blogging.  So, with those positive thoughts in mind, I packed up Larry the Laptop and drove him down to Archdale to my computer guy (You may notice at this point all my sewing machines have female names.  The laptop is a male.  I’m not sure what this says about me).  Time will tell what the diagnosis is.

So, while I am struggling through my laptop-deprived existence, I thought I would do a virtual show and tell so you can see what I’ve gotten done.

I have finished this – as I reported earlier.  This is the lap-sized Sunny Lanes.  I also have finished what I thought was the queen-sized sister to this one in the same fabrics.  However, it was an extra-large queen by the time it was complete and wouldn’t fit on my long arm frame.  While I have the type of  frame I can extend to 12 feet, my studio would only reasonably accommodate the 10-foot space.  And this never worried me because I never anticipated I’d ever make anything larger than a queen-sized quilt.  Anyway, the larger version of Sunny Lane is now winging her way to Missouri Star Quilt Company to be long-armed.  As soon as she’s back, I’ll bind her and she’ll go on my bed.

This is how far I’ve gotten on my second block of my Language of Flowers quilt.  I’ve gotten lots of prep work done but haven’t seemed to be able to settle down and get the rest of the pieces glue-basted on to this one to continue the applique.  Part of the reason is this:

That’s right.  We took time out to take the family to Disney World after Christmas.  We are a die-hard Disney family.  The DH and I honeymooned there, as did Meg and her DH.  My son and his DW have been there numerous times.  The big draw for us (at least for Matt and me) was Galaxy’s Edge.  We’re huge Star Wars fans.  However, we didn’t let the grand darlings know we were going until we were literally pulling onto the on ramp in Orlando to go to Disney.  Their reaction was priceless.

This will always be a highlight of my life.  Since I’m a Mimi, I knew I could do one of two things.  I could either plan and budget on spending a lot of money on souvenirs that would be broken and forgotten within six months, or I could give them an experience that they’d never forget.  I chose the experience.  We did the Bippity-Bopity Boutique. 

Oh. My. God.  I don’t know who had more fun, me or the girls, or their mom. 

So, I was a bit distracted from my quilty projects while I was plotting Disney.  However, I think I am back on track now. 

See this pile of hexi blocks?  I am happy to announce that I’ve completed all the blocks for my A Day in Grandmother’s Flower Garden.  I’ve steadily worked on these blocks for a year.  They’re pieced by hand using Cindy Blackberg’s hexie stamp.  These were my constant project at my Tuesday night Sit and Sew.  The girls have helped with the layout, so now I have to put on the connectors and get the whole thing together.  When I began this quilt, I honest didn’t know if I would enjoy hand piecing.  I had a plan B in place – if I struggled with it, I’d simply make a wall hanging or bed runner and be done.  But I found that hand piecing was soothing, and I believe I’m really going to miss this project when it’s completed.

I’ve also completed my Halo Medallion top. 

And I’ve set it aside.  This quilt deserves stellar quilting and to be honest, I don’t have the long arm skill set for this quilt yet.  It may be a couple of years before Halo is under my long arm needle.

I’ve also finished this quilt:

My BFF, Janet, introduced this quilt in 2019 as our guild’s mystery quilt.  There were size options, so I settled on the table topper after seeing how many biased edges this little sucker had.  However, there was another reason I settled on a smaller size.  I’ve been introduced to embroidery machine programs by Amelie Scott that allow you to quilt on your embroidery machine.  While I will never do a large quilt on my Baby Lock Spirit, I wanted to experiment with a small one.  So those lovely feathered circles were done on Barbara the Baby Lock.  The other quilting was done on Big Red.  For me, it’s more trouble to load a small quilt onto LeAnne than a large one.  By the time I go through all the hassle of loading it, I could throw it on Big Red and have it completed. 

I’ve started this quilt:

When I saw the kit on Laundry Baskets web page, I fell in love with the muted colors. Normally I don’t purchase quilt kits – I like the freedom to purchase my own fabrics with my own color choices.  However, this quilt kit was the exception, and since I had saved some birthday money, I purchased the kit that had the pieces already laser cut.  And I don’t regret it at all.  I am having so much fun making this quilt!

Then there’s this:

I know this looks like a pile of fishy confusion, but my DH asked for a fish quilt.  I purchased a fabric panel with bass and trout and cut it apart.  I have the basic layout, but the challenge will be putting the whole thing together so that it looks good.  The great thing about the panels is they are really colorful, so I can pull everything from my stash.  I hope to have it constructed and bound by Christmas…(notice I didn’t say which Christmas – because we all know how that goes). 

And I’ve made this:

My good friend, Karen, made one of these quilt planners and showed it to me at one of the Tuesday night Sit and Sews.  Since the page was a free download that could be customized, I asked her if she would email me her layout.  She did and I sent it to Office Depot.  They printed my copies and put it on a spiral.  So now I have this great quilt planner and these:

Lots of pretty pens to keep track of my projects.  I completely finished six quilts last year – pieced, bound, and labeled.  I’d like to finish eight projects this year. 

I’m afraid there’s not a whole lot of instruction with this blog.  However, I hope I have inspired you to finish a few of your own.  Meanwhile, my laptop is at Computer Guy’s shop.  I get it back tomorrow with a new screen.  Hopefully, it’s all fixed and I can resume my regularly scheduled blogs.

Until next week, Level Up That Quilting!

Love and Stitches,

Sherri and Sam

Categories
Uncategorized

Twisting the Traditional

Let’s talk modern quilts.  And let’s talk traditional blocks.  While at first glance those two may seem like mixing oil and water (there’s a bit of agreement, but then graduation and distinct separation), quilters can marry them off (quite happily, may I add), with a few twists. 

For years whenever anyone mentioned quilts and quilters, what came to mind was the traditional look:  Baltimore Album-type quilts or quilts that had the historically traditionally looking pieced blocks, such as churn dash, nine-patch, and stars.  And for years we quilters delivered on these preconceived images in our quilts.  Once in a while there would be a pattern designer that would shake things up a bit, but overall, we tended to stick with what we knew best.

Enter the Modern Quilt Movement.

In my opinion, nothing else has shaken up the quilt world more than the modern quilt movement and the internet.  I know that in the past there was some upheaval when we began quilting our tops on machines instead of by hand.  And I realize that Art Quilts also caused a stir when they were introduced.  But overall, I think the Modern Quilt Movement and the internet have done more to change the quilt arena than anything else in at least the last 50 years.  This is a good thing.  Modern quilting has introduced new colors, new designs, and a return to simplicity and negative space.  The internet has opened to the doors to products, patterns, and classes that we may not ever been exposed to otherwise.  But with this blog, I want to talk about Modern Quilting and how we all can embrace some, if not all, of its characteristics. 

I’ll be the first to admit, I’m more of a traditional quilt gal.  That’s the way I (along with everyone else) was taught in the early 1980’s.  A lot of us weren’t even introduced to rotary cutters until the 1990’s.  I still gravitate towards the traditional in both blocks and quilts.  A lot of us old farts are like that.  However, today I want to show you some ways we can take those traditional blocks and give them a modern twist. 

Modern Quilt Fabric

The first (and the easiest way) we can take a block and change it up is with our fabric choices.  The Modern Quilt movement has gifted us with some wonderful fabric.  The colors are bright and clear.  The prints are fanciful and current – while flowers still grace a lot of material, gone are the tiny, old fashioned renderings. You’ll find everything from bacon to butterflies on this fabric, all in a crisp modern palette. In addition, Pantone’s Color of the Year is predominate in a lot of it.   Gray and white are the workingng neutrals.  While designing the illustrations for this blog in EQ8, I surprised myself on just  much using a modern color scheme could change the way the block looked.  Take for instance this block, done in traditional fabrics.

Monkey Wrench in Traditional Colors

This is the monkey wrench block and one of my very favorites.  Now let’s take this sweet, little block and use some of the new fabrics:

Monkey Wrench in Modern Fabrics

Very different.  Set it on point, and it contrasts even more.

See how it can change the entire look of a quilt top?

Another way we can give our blocks a modern spin is to only use part of the block.  I call this block deconstruction, and it’s really a lot of fun.  For instance, take this block:

This is a great, traditional block used in the Double Wedding Ring Quilt. 

An entire Double Wedding Ring Quilt looks like this:

However, Victoria Findlay Wolfe took this pattern and put a Modern Quilt twist on it, and designed this:

It’s still a Double Wedding Ring.  But instead of using traditional fabrics, she went with a modern palette.  And then she substituted solids and her neutral in the rings where normally one would be piecing them with all kinds of material.  Instead, she pieced the rings’ inner centers and the outer “footballs.”  This gives a traditional quilt a completely different look.

While deconstructing a block is not difficult to do, it does take some pre-planning.  From what I can tell from just looking at Victoria Findlay Wolfe’s block, there still is a great deal of piecing going on, but neutrals are playing a larger role than normal in the piecing process.  So, let’s try this on another block. 

Let’s try this block: 

This is one of the antique mosaic blocks found in EQ8.  When you chose a block to deconstruct, you want to pick one that has several pieces of varying shapes – in other words a nine-patch or a four-patch will not make the same impression that a block like this would.  At this point, it may be a good idea to either sketch this block out or access it with a software program such as EQ8.  Either of these processes will allow you to play with color before cutting into your fabric.  For this first attempt, I will take all the colors and reduce them into a two-color palate – a bright and a neutral.  This immediately changes the look. 

Now let’s pull out some more of the print fabric and substitute with a neutral. 

This is even more of a dynamic change.

And just for fun, let’s add another color.

It’s still the same amount of piecing and the same traditional block, you’re just changing the number of fabrics used and the color placement. 

Keeping with the traditional block theme, another way you may want to twist those traditional blocks is to either blow them up or shrink them down.  Again, pictures are really telling the story with this blog, so let’s look at a Friendship Star Block:

I like Star Blocks.  They tend to lend themselves nicely to either traditional piecing or paper piecing.  They have a long history in quilting and there are numerous books and patterns written solely on Star Blocks.  When I’m making a quilt that uses one of these, my blocks tend not to be any larger than 10 ½-inches unfinished.  But look what happens if you enlarge one of these blocks to make up most (if not all) of your quilt top:

Completely different way of looking at a Star Block pattern.  And while in my opinion enlarging these patterns too much (like  a queen-sized quilt) does make them lose some of their beauty, for a wall hanging or cuddle quilt, this is a new way of looking at a traditional block.

Now let’s take this to the other extreme and shrink a traditional block.  I love shrinking Star Blocks as much as I do enlarging them.  When constructing a traditional quilt, I often use Star Blocks as cornerstones.  This causes your sashing to do wonderful things like this:

Likewise, I also will use a small nine-patch block made from the top’s scraps as cornerstones.  This helps pull all the colors in the quilt together.  And to be completely honest, the Star Blocks and the nine-patch block are used by a lot of quilters in this manner. 

However….let’s look at a block you may not of thought about shrinking – the log cabin block.  Before you blow a gasket about how difficult this could be (lots of small pieces, etc)., remember this block lends itself beautifully to paper piecing.  And with paper piecing, all small things are possible.  The point I want to make is that this isn’t a block most traditional quilters would think about shrinking much smaller than a 6-inch x 6-inch block.  But look what happens when you do:

These log cabin blocks are 4 1/2-inches square.

Talk about interesting cornerstones (for you traditionalists) or a way to spice up negative space (for you Modernists).

The point is, when you enlarge or shrink a traditional block, it gets a completely different look.  And thanks mostly to the Modern Quilt movement, we’ve seen how great this works.

Another way you a give your traditional blocks a twist is to alter the layout.  I make no bones that my favorite  way to layout blocks is on-point.  This is a personal preference, and it’s not that I don’t like regular horizontal and vertical rows, I just think an on-point layout is more interesting.  But if you do some research on Google images or Pinterest, you’ll discover that Modern Quilters don’t necessarily do either type of layout – at least at first glance.  Instead of blocks marching in rows or columns across the quilt top, there can be more breathing room between the blocks.  And in many cases, there aren’t as many “blocks” in these quilts, either.  There’s lots of “breathing” room between these blocks for the eye to rest.  So, there is at least one of the “traditional” layouts used (rows or on-point), but the setting squares, triangles, borders, etc. are in the same neutral used in the blocks.  This makes the blocks appear to float (an effect I absolutely love).  One word of caution here.  If you use the kind of layout, please note that your pieced blocks will need to shine.  But since there are fewer of them in this layout, you’ll have the time to make sure all the points match and that they’re perfectly square. 

Since we’re talking about negative space at this point, let’s park it here and discuss another aspect we can borrow from Modern Quilting to put a twist on traditional looks –the actual quilting process.  Most traditional quilts use one to three of these quilting components:  feathers, stippling or meandering (including micro), echo quilting, and some kind of ruler work, along with what I call “connecting units” (swirls, swags, and lines – both straight and curly).  Modern quilters use these, too, but they’ve changed them up a bit.  You’ll see more “matchstick” quilting:

I love this look and it’s easy to do on either a domestic or long arm. 

They’ll use simple quilting juxtaposed against geometric work.

There’s “pebbles” or “bubbles” and curved cross hatching.

And the technique I really love if I’m quilting on Big Red:  Straight line.

Straight Line Quilting has more space between the quilting rows than Match Stick Quilting

How much easier can it get?  Use some painter’s tape and just quilt. 

The best thing about these “new” quilting motifs is that they play well with everything traditional quilters like to use.  But they really do give a traditional quilt a unique, new look. 

The last characteristic I want to discuss is throwing the center of the block off.  Instead of placing it square and center as normal, make it off center.  And don’t play it slightly off-center (because then it just looks like you were sloppy in your construction) – throw it really off center.  This is different from what we discussed earlier – changing up the look of traditional blocks by replacing colored fabric elements with a neutral (see deconstructing a block as mentioned earlier in this blog). With this technique, you’re using all the elements in the way they were designed, but you’re playing with the block’s layout.  Not all blocks lend themselves to this change – they must have a dominate distinct center like this one:

Now look what happens when we move that center off kilter.

Completely different look.

The easiest block to use for this technique is the Log Cabin.  Since this block consists of strips of fabric that surround a center square, you can shift that center block to the right, left, up, or down and changes the block’s look

Now look how you can play with the layout!

This is an easy way to change up your quilt and unleashe the inner designer in you.

If you’re a traditional quilter like I am, let me challenge (and encourage) you to try some of these Modern Quilt techniques in your traditional blocks.  Start small – one thing a time.  Maybe begin with the fabric and then move to deconstructing the block.  I think you’ll be surprised at how much this alters the look of your quilt and how much fun these techniques are to try.

Until next week, Level up that Quilting!

Love and Stitches,

Sherri and Sam

Categories
Uncategorized

As Close to Perfect as You Can Get Four and Nine Patches

 We talked about half-square triangles a lot in last week’s blog.  This week we’re taking a look at the other two units in a lot of blocks:  Four-patches and nine patches.  Unlike triangles, we don’t’ have to worry about bias with these.  Strips are usually cut WOF and not sub-cut into any other unit that has an exposed bias.  And even though there is a numerical difference between a four-patch and a nine-patch, their construction is more alike than different.

Single Irish Chain Four Patches Surrounding Four Patch Stars
Jacob’s Ladder Block — it’s all four patches

Four-patches are often the first block unit (or in some cases, entire block) that beginning quilters tackle.  They’re easy to make and when set on point with setting triangles or in regular rows with sashing or plain blocks separating the two, they can be beautiful in their simplicity.  If color choices are carefully made, the units can serve as unifying connecting blocks or look like a chain winding its way across the quilt top (think simple Irish Chain or Jacob’s Ladder).  A four-patch looks just like it sounds:

Four Patch Unit

Four patches of fabric sewn together.  At first glance, it seems as if a quilter would simply cut four squares of the chosen fabrics and sew them together. 

In all honesty, that’s the most difficult and the most inaccurate way to make this block unit, unless you’re hand piecing it.  To make these units by machine, both four- and nine-patch units use the strip piecing method.  This technique lets you cut two strips of fabric, sew them together down the long side of the strip, slice the strip into the appropriate size, rotate one set of the blocks, and sew them together. 

Easy-peasy, right?

Yes, it is.  But since this year’s theme is “Level Up Your Quilting” I want to take the time to go over a few pointers that will make those four and nine-patches simply stellar, both in color choice and construction.  Nothing makes me feel better than having my points match perfectly and my colors sing.  So, let’s go over some basics and emphasize the steps that will help make your block unit come out as close to perfect as possible.

We’re looking at 2 ½-inch unfinished block units – that seems to be the size most widely used.  Most four-patch instructions will tell you to cut two strips of fabric (usually one light and one dark).  These strips are normally cut WOF and sewn together with an ¼-inch seam allowance.  I’d like to throw in a few pointers that I’ve found particularly helpful at this point. 

First, take the number of strips of each color needed and multiply that by the width of strip needed.  For the sake if illustration, since we’re working with 2 ½-inch strips with this blog, we’re using that measurement.  Let’s say we need to cut eight strips.  Multiply 8 by 2 ½ and you get 20.  Cut a 20-inch strip by WOF of each color needed.  Then we will sub-cut that into eight 2 ½-inch WOF strips.  Smaller chunks of fabric are easier to work with than the entire yardage.  It’s easier to handle and makes your cutting more accurate. 

Second, starch these chunks of fabric before sub-cutting.  This is especially important if you’re a pre-washer.  If you’re not a pre-washer, it’s still a good thing to add a little extra body to the material.  Spray the starch on the wrong side of the fabric and press it in.  This helps stabilize the fabric and makes it a little stiff, which makes the material easier to cut.

Third, cut the strips the appropriate width.  Be careful to fold the fabric with the crosswise and lengthwise grains perpendicular to each other at 90-degree angles.  After you cut a couple of strips, you may need to refold the fabric to keep those angles perfectly aligned – otherwise, your strips may have a hump in them. 

Make sure the Crosswise Grain and the Lengthwise Grain are Perpendicular Before Cutting

And you may find those ruler grippers we talked about a few blogs ago come in super-handy to keep your ruler in place while you make those long crosswise cuts. 

Fourth, after the strips are cut, then it’s time to sew them together.  In many ways, this is typical piecing.  You’ll sew the strips, right sides together, along the long side of the strips, using a ¼-inch seam allowance.  However, you may find it more accurate to sew shorter lengths of strips together.  I’ve found that when I sew two 45-inch strips together, for whatever reason, no matter how careful I am, my strips want to curve.  I discovered that if I cut the 45-inch strips in the middle to make two shorter 22 ½-inch strips, my four patches and nine patches come out much more accurate.

When you’re through sewing the strips together, you’ll have a unit that looks like this:

Four Patch Strip Unit

Press the long strip unit towards the darker fabric and then even up one of the ends of the strip unit and begin to sub-cut into units.  Since we’re using 2 ½-inches in this illustration, we would sub-cut the strip unit into 2 ½ units like this:

Four Patch Units

Now simply flip one of the units so the opposite colors are next to each other and sew into a four patch.  Since you’ve pressed towards the darker fabric and then flipped one of the units, the seams should nest nicely together.  To maintain accuracy, I do pin my units before sewing with a ¼-inch seam allowance. 

At this point, we need to reduce bulk on the backside of the units.  It would be really easy to break a needle when your quilting or have your machine stall out when it hits the point where all four seams come together.  Twirl the seams as shown below:

Then press the four-patch unit again.  I’ve found that a spray of this product:

Helps flatten those seam allowances up even more. 

Trim the unit (if needed), and you’re done with the four patches.

Four patches are extremely versatile.  If you’re making a block such as this

Using Regular Four Patch Units of HST Four Patch Units as the Center of a Star Block Can Pull All Your Colors Together AND Eliminate Scraps!

that has a large center square, you could always make that center into a four patch.  Four patches also make great cornerstones for sashing.  And if placed strategically in blocks, they can add real movement to a quilt, as they form a chain across the top. 

Standard Nine Patch Unit

Nine patches are similar in the construction process, but instead of working with two strips of fabric, you’re working with three.  Typically, one strip set will have two dark strips on the outside and a light in the middle and the other strip set will have a dark strip in the middle and two light strips on the outside.

Nine Patch Construction

There can be some variations on this pattern, so be sure to read the pattern’s directions carefully.

Construction of the three-strip set is similar to the four-patch set.

First, take the number of strips needed and multiply that by the width of the strip.  So, if we need 12 strips of one color and the strips are 2 ½- inches, that’s 30 inches.  Cut 30 inches from the yardage of that color.  Again, smaller pieces of fabric are much easier to work with than lots of yardage.

Second, starch the chunk of fabric.  Again, even if you’re not a pre-washer, that extra bit of body makes the material much easier to cut.

Third, cut the strips the appropriate width.  Be careful to cut accurately and to keep the crosswise and lengthwise grains perpendicular to each other.  Re-fold the fabric as necessary. 

Fourth, after the strips are cut, it’s time to sew.  Here’s where the construction of nine-patches really differs from four-patches.  When I’m ready to sew my strips, the first thing I do is organize them.  Some quilters look at this as an extra (and sometimes unnecessary) step, but I find it saves me time in the long run.  My very favorite strip organizer is this:

Bamboo Clothes Drying Rack

A clothes drying rack.  You can pick up one of these (if you don’t already have one) at Target, Walmart, and many hardware stores.  The rack gives you a lot of room to separate your darks and lights.  I position this next to my sewing machine so I can grab what I need and keep piecing.  I don’t necessarily do this with my four-patches – it depends on how many of those units I’m making and how many colors of fabric are involved.  If you don’t have room for a  clothes drying rack, try one of these:

Pants Hanger

Years ago, when I lived in a different house and my sewing room was a corner of my kitchen, I used a pants hanger.  It worked wonderfully. 

Once organized (or not), it’s time to sew.  Again, we’re using a ¼-inch seam, and again, I cut my 45-inch strips in half in the middle to make them shorter in length.  Just because we’re making nine-patches instead of four-patches doesn’t make the sewing process different.  It’s easier and more accurate to sew shorter strips together.  And here’s where the actual sewing process differs a bit – like with four-patches, you sew two strips together.  After this, you add the third strip, but sew it in the opposite direction than you did the first seam.  This will help keep things on-grain and keep your block from looking wonky.

At this point, let’s talk pressing.  Like with the four-patch strips, it’s important to press towards the darker fabric.  However, since we’re working with three strips of fabric instead of two, it’s up to each quilter to decide when pressing works best for them.  Some folks prefer to press after each strip is sewn (I do – I find it’s easier for me) and some like to wait until all three strips are sewn together and then press.  This is kind of an individual preference – neither way is inherently right or wrong. 

Once the strip sets are sewn together, now it’s time to cut them into units that are – for the sake of this example – 2 ½-inches wide.  Allow me to insert a personal observation at this point.   I realize that cutting fabric is not the most exciting activity in the quilting process.  As a matter of fact, I’ll be the first one to tell you, it’s the part I like the least.  However, it’s really super important to be accurate in this part, since it’s the first step in making sure your blocks (and thus your quilt) comes out beautifully square.  But since it’s not as interesting as sewing, it’s easy to want to rush through this process by stacking the strip units on top of each other and slicing your rotary cutter through all of them just to be done with the process.

Please.  Don’t.  Just don’t.

While you can stack a couple of layers of fabric on top of each other and accurately cut through those, you’re not dealing with seams.  With both the two strip sets and the three strip sets, you’re stacking fabric units that have the bulk of seam allowances.  These seams don’t allow the units to lie completely flat on top of each other.  This means they can wiggle out of place and your cutting wont’ be accurate.  Take a deep breath, put on some good music, and cut each strip set individually.  You may hate me now, but when your blocks come out perfectly accurate…you’ll thank me later. 

After all the cutting is complete, arrange your units as follows according to directions. One block will have more darks and the other block will have more lights.  Now it’s time to begin sewing.  Use an accurate ¼-inch seam allowance and chain piece them.  Since you’ve pressed towards the dark fabric, the seams should nest nicely – however, I still use pins for complete accuracy. 

Once complete, press the seams in one direction (these won’t twirl) and trim if necessary.  Then you’re done. 

Couple of added items at this point.  Again, like four-patches, nine-patches can add some serious movement to your quilt.  If used strategically, they can also form a chain across the quilt top or serve as attractive cornerstones.  As a matter of fact, nine-patches are one of my favorite cornerstones.  I make them from left-over fabric from my blocks and they serve to pull all the colors of my quilt together.  They can take the place of large squares of fabric in blocks, too. 

Quilt Block with Nine Patch as the Star’s Center

And they make wonderful quilt borders.

Nine Patch Set on Point for the Quilt Border — One of My Favorites!

Last item for consideration:  always make a few extra four- and nine-patches.  No matter how accurately you cut and sew, there always seem to be a few that come out wonky.  Instead of fussing with them, toss them in the circular file and move on.    

Yes, four- and nine-patches are easy units – often the first block units beginner quilters are taught.  But just because they’re simple, doesn’t mean they’re not beautiful and doesn’t mean they can’t be dynamic.  Accurate cutting, sewing, and careful color placement make them one of the most versatile block units we can use.

Until next week, Level Up Your Quilting!

Love and Stitches,

Sherri and Sam

Categories
Uncategorized

Perfect HSTs (or As Close to Perfect as You can Get)

Quilt made from HSTs

There is no doubt that half-square triangles (HST), four-patches, and nine-patches are the basis for hundreds of quilt blocks.  Just a brief look through quilt patterns or Barabra Brackman’s Block Base proves just how many blocks use these elements.  However, constructing any of these three can be tricky.  Last week I urged everyone to learn one new skill this year and get better at three you already know.  From beginner quilters to the most experienced ones, we all deal with HSTs, nine-patches and four-patches most of  the time.  You may want to push yourself to make these better.  I don’t think you’ll regret it.  I want to take each of these and talk about the different ways to construct them and how we can work from the first cut onwards to make sure these elements are as perfect as we can get them. 

First let’s talk about HSTs.  Half-square triangles can be a little difficult because we’re dealing with bias, and bias is inherently the stretchiest of all cuts.  Cross grain is a bit stretchy, and length of grain is the most stable, but with HSTs, no matter how you cut them, one side of the triangle will be cut on the bias and if you’re not careful, you can stretch that side out of shape. If that happens, then the HST won’t work well when you sew them into your block.  This can cause your block to be off as much as a ½-inch sometimes.  The first action I take to begin to avoid this situation is to starch the fabric I’m using to cut my triangles from.  And I mean starch, not Best Press or sizing.  Depending on how firm of a weave my fabric has, I may even starch it twice.  The starch helps to stabilize the warp and weft, and this can help avoid stretching the bias.  I say help because it’s still possible to stretch the bias if the triangles are not handled carefully. 

The next thing I do is slow down my sewing.  When you’ve quilted for a while, it’s easy to fly through the basics.  If we’re sewing squares or rectangles together, this is fine.  But there’s that bias issue again with triangles.  The faster you sew, the easier it is to stretch that bias.  It’s also easier to make mistakes and not keep a consistent ¼-inch seam allowance.  Which means you will have to rip out your stitches – an action which can wreck even more havoc on your bias.  So slow down and be accurate. 

Leader used to begin stitiching

You may also find that your sewing machine may not want to cooperate as you feed that tiny triangle tip over your feed dogs to start stitching.  To get the sewing process started, they need something that will cover their entire area to get the feed dogs fully engaged.  The tips of most triangles are not big enough to do this.  I use a leader (I’ve also heard them called a mouse) to do this.  A leader is simply a piece of fabric big enough to fully cover the feed dog area.  I begin sewing on this and then chain stitch my triangles.  The leader engages the feed dogs so that they’re already moving and will grip the triangle fabric and feed it cleanly through the machine.  This will keep your triangle tips sharp and make the HSTs square. 

I also use a stiletto  to help guide my HSTs across the feed dogs.  When I lift the presser foot to guide my HST onto the feed dog deck, the sharp stiletto point helps keep everything lined up.  I also slightly overlap my triangle points.  This seems to keep the sewing going smoothly without fabric getting lodged down in the feed dogs and causing a complete mess.   And as I’m feeding my triangles through, I stop about one inch from the end of the triangle I’m presently sewing and line up my next one.  Again, this action seems to keep the chain sewing moving right along. 

Half-square triangles are wonderful quilt block elements for several reasons.  The first reason is they can be used for literally hundreds of shapes and effects.  The second reason is there are multiple ways of making them.  We’re hitting most of these processes with this blog, but whichever way you decide you like to make HSTs there are two additional ideas bear in mind.  First, as you cut your fabric out, control your ruler. Except for paper piecing, most of the HST processes begin by cutting WOF strips.  When cutting the long strips, it’s easy for your ruler to wiggle out of place a bit or slide just slightly off to one side.  These little things:

Ruler Grippers

Are worth the money.  These are ruler grips.  They are tiny circles or squares of a rubber or sandpaper material that help your long ruler stay in place as you run your rotary cutter against it.  Some of these grips stay flush with back of the ruler and some stick out a little, adding a bit of height to the ruler.  The choice is personal.  Or you could simply purchase my favorite brand of rule, Creative Grids

Creative Grids Ruler.

These rulers have the grips already build into their rulers.  The great thing about HSTs is they really require no specialty rules.  Sure, there are some out there, but you don’t have to purchase them unless you really want to.  You simply need a long, WOF ruler and a square ruler – which you will use to true-up your HSTs (more on this later). 

The second concept to remember is use caution when pressing HSTs.  Remember HSTs have major bias issues, and care must be given not to stretch the long edges.  So, ironing (sliding the iron back and forth over the HSTs, like you were ironing a shirt) should be avoided at all cost.  Pressing (using the iron in an up and down motion) is what should be done, and that should be done sparingly.  I finger press my HST first, and then just barely hit them with an iron.  As mentioned above, starch is your friend here.  Starch your fabric before you begin cutting (especially if you’re a pre-washer) and add another spray of starch with the final press.  The starch stabilizes the bias edges and prevents stretching.

Now let’s talk construction.  I realize some of you may have quilted for years and making HSTs is like second nature to you.  But paying attention to the little details in cutting and sewing raises them to the next level – and that’s what we want to do.  The first method we’re looking at is Straight of Grain Triangles. 

Straight of Grain Triangles

This method makes us cut individual triangles and sew them together.  If you try this method and really like it, you may decide you want to make all your HSTs this way, no matter how the pattern directs you to make them.  It’s easy to figure out just how wide to cut the WOF strip.  Take the finished size of the HST and add 7/8-inch to it. For instance, if the finished size of the HST is 3 inches, simply add 7/8 to that.  3 + 7/8 = 3 7/8 inches.  If the finished size of the HST is 2 ½, simply add 2 ½ + 7/8 = 3 3/8-inches.  Once the strips have been prepped, cut the strip into squares, and then cut the squares in half on the diagonal.  It’s just that easy.  However, remember you’ve exposed the bias, so handle the triangles carefully. 

However….let me throw this in right here.  The formula I just gave you – adding the 7/8-inch to the finished size of the HST to get your measurement – is exact.  There is no wiggle room.  If your ¼-inch seam is off any or the seam bobbles at the end or the beginning, you’ve just lost some of the precise measurement.  I have found it better to make the HSTs a little larger and then cut them down to the correct size.  Yes, you use a little more fabric, but like paper piecing, you’re trading fabric for accuracy.  If the HSTs are a little big and they’re cut down to the correct size, you’ve just increased your odds that all of the HSTs will come out just perfectly.  Here’s how you do this – it’s super easy – instead of adding 7/8-inch to the finished size, add a whole inch. So, if the finished size is 3-inches, add an inch to it and make the strips 4-inches wide and cut 4-inch squares.  If the finished size is 2 ½, add an inch and make the WOF strips 3 ½ inches side and cut the squares 3 ½ inches.  It not only is more accurate, the math is a lot easier, too. 

From this point, proceed just as we did above.  Match the pieces (right sides together) that need to be sewn into the HST, taking care to avoid stretching the long bias diagonal.  Using a leader and a stiletto, and chain feed them over the feed dogs, overlapping the ends slightly.  Cut the chain apart into individual units, finger press the seam to the dark fabric, and then lightly press with a hot, dry iron and a shot of stray starch.  Some people like to press the HSTs while their still held together in the chain.  I don’t do this because it’s too easy to pull the triangle by the thread-chain and stretch them out of shape. 

Trimming HSTs to required sized

Once pressed, it’s now time to cut them down to the correct size.  Here’s where a square ruler with a diagonal line comes in handy.  You simply line up the diagonal on the ruler with the diagonal seam on the HST, and with the correct block size on the side and bottom of the ruler.  Since the block has been made bigger than needed, you’ll split the difference in the extra that needs to be trimmed off all four sides.  It is vital that the ruler be held firmly in place so that the diagonal line on the ruler stays exactly on top of the diagonal seam in the HST.  Some quilters find it helpful to place a finger as close to the edge of the ruler in the corner as they can comfortably do.  Fabric grippers on the bottom of the ruler are also very helpful.  A little trick I learned a while back that helps me keep my diagonals lined up involves painter’s tape. 

Painter’s Tape is great for marking quilting rulers!

On the side of the ruler that touches the fabric, place a piece of painter’s tape along the diagonal line.  Then add several more pieces of tape on top of that to form a slight ridge.  The ridge will not only help you line up the diagonals, it also will kind of fit into the groove the diagonal seam makes and helps keep the ruler in place while you’re trimming.  A sharp rotary blade is also important.  A dull blade can literally drag your HST out of position and make trimming inaccurate.  Trim two sides then turn the HST unit around 180 degrees and trim the other two sides.  When you rotate the HST, make sure to keep matching the diagonals so the trimming is as close to perfect as possible.  Check each HST to make sure that the seam runs exactly to the cut corner.  If the seam is even a thread or two off the corner, you won’t get sharp 90 degree corners and that will make the HSTs difficult to piece as you’re assembling your blocks. 

If this kind of trimming makes you slightly antsy, then you may want to invest in this ruler:

OMG, I LOVE this ruler!!!!

I don’t normally endorse one-use rulers.  If I purchase a ruler, I like to use it for several techniques – not just one.  But this ruler by Eleanor Burns is the exception.  I was introduced to the ruler when I made this quilt:

My twin-sized Sunny Lanes. I also made a queen-sized.

This is Sunny Lanes  by Pat Speth/Charlene Thode.  I made two quilts by this pattern – a twin-size and a queen-size.  I cut hundreds of HSTs for these – literally hundreds and had enough left over to make this:

My Charity Quilt

A chemo quilt for someone at High Point’s Hayworth Caner Center for my guild’s charity quilt program. 

I took the workshop for Sunny Lanes with Augusta Cole and she recommended Eleanor’s ruler.  With this ruler, you cut the HSTs slightly bigger than required by the pattern, but you trim them before you press them open, which means you only make two trim cuts instead of four.  I found it’s highly accurate, easy, and quick – which means a great deal if you have a lot of HSTs to trim.  It doesn’t stretch the bias and keeps the corners sharp.  In other words – it’s worth every red cent. 

The next technique we’re looking at is the Sew and Slice method.  This is actually my favorite way to make medium-sized and large HSTs.  It’s similar to the Straight of Grain method in many ways, but it’s different in that you sew the triangles while they’re still squares and then cut them apart and trim.  I like because you don’t have to sew a bias edge, therefore,  you’ve significantly reduced your odds of stretching the long side of the triangle.  If it sounds confusing, it really isn’t. 

Step 1 — draw the diagonal line

First cut your strips the required width.  Then take one of the light-colored strips and put it right sides together with one of the other colored strips of fabric.  It’s a good thing to give these matched strips a quick press while their right sides together – this seems to help them stay together better.  Then cut the matched strips into squares. 

Step 2 – Sew 1/4 inch away from either side of the drawn line

Take the square pairs of fabric and on the light-colored fabric, draw a diagonal line from one corner to the other.  This is your cutting line – but don’t cut the squares apart now.  Take the squares to your sewing machine and sew a seam exactly ¼-inch away from the drawn line.  Do this on both the right and left side of the line, so you’ll have two sewn seams on either side of the drawn diagonal.  In order for this technique to work correctly, you need to be sure your presser foot is a true ¼-quilter’s foot.  Some quilter’s feet are true ¼-inch feet and others are a scant ¼-inch foot.  If you chose to use this technique, it is a good idea to make a couple of test samples to be sure that your HST comes out accurately. 

Step 3 — Cut the square on the drawn diagonal line

Once the seams are sewn, you can cut the square apart on the drawn diagonal line.  You’ll have two HSTs.  Finger-press the seam and then hit it with a hot iron and a shot of starch. 

If you’re unsure about your ¼-inch foot, there is this tool:

Quick Quarter

This is called a Quick Quarter and it comes in two lengths.  It’s an easy tool to use.  You line the slotted part of the ruler up with the corners of the square.   Using a sharp pencil (pencils seem to work best with this tool), draw a line in each of the slotted areas.  Then run your pencil down either side of the Quick Quarter to make a solid line.  You will stitch on the solid lines and cut on the dashed line.  The same recommendations for sewing Straight of Grain triangles apply here:  Use a leader and stiletto and overlap the corners slightly.  Even though you’re not sewing triangles per say, you’re engaging the feed dogs with only the corners of the square and those won’t cover the entire feed dog deck. 

Since the bias isn’t exposed until nearly the last minute, the chances of stretching it is lowered significantly with this technique.  However, care still must be taken.  These can be chain pieced, but cut the chain apart before pressing, and then finger press, followed by spray starch and a hot, dry iron.  And if you’re wondering if the Quick Quarter is a uni-tasker, it’s not.  I constantly grab mine for cutting small pieces of fabric that I need a straight edge for my rotary cutter.  Some of the Quick Quarters also come with inch-measurements marked on them, so it can double as a small ruler.

If you try this technique and really like it, you’ll want to use it all the time (I do as much as possible).  You’ll find that a lot of quilt pattern designers like this method and may include it in their directions.  But what if they don’t and you want to use the Stitch and Slice technique? The formula is pretty simple.  Take the finished size of the HST and add 7/8-inch (sound familiar?).  Of course, this formula will give you the precise unfinished size of the HST.  If you want to cut them down for complete accuracy, you’ll want to add a full inch to the finished size to allow for trimming.  Square rulers and the Eleanor Burn’s Half-Square Triangle Tool work great with this method. 

Marti Michell’s Perfect Patchwork Templates

The last two HST techniques we’re looking at are the Template Method and the Angle Ruler methods.  The Template Method is just that – templates are used to cut the triangles out and then the triangles are sewn into HSTs.  The great thing about triangle templates is that there are several different sets of acrylic templates in different sizes and different angles.  My favorite template-maker of all time is Marti Michell.  She not only has just about any template imaginable, her templates are also shaped so that you don’t have dog-ears to trim off.  Her templates are high-quality, last for years, and her customer service is stellar.  This method is similar to the other ways to make HSTs.  Cut two WOF strips the needed width.  Take the light strip of fabric and the dark strip of fabric, and iron them right sides together.  Place the template on the strips and cut them out.  There are two ways to do this.  You can use a small rotary cutter (the smaller size allows for more control) and cut them out, or you can take a pencil and draw around the templates and cut them triangles out with a pair of scissors.  I have found that a scant ¼-inch seam allowance works best with Marti Michell’s Perfect Patchwork Templates, but that is with my sewing machine.  Always make a test HST no matter what method you use to be sure the finished unit is the correct size.  Do this first, before cutting into the fabric you’re using for your quilt.  This may seem tedious, but it could save you serious time in the long run, not to mention having to purchase extra fabric because the HST units came out the wrong size.  The only downside to the Perfect Patchwork Templates is it’s difficult to make the units larger and then trim them down.  But then again, the PPTs are perfectly precise, so a seam allowance adjustment may be the only action needed to make the HSTs work perfectly in your block.

Easy Angle Ruler

The Angle Ruler Method requires some type of specialty ruler to cut out your triangles.  There should be no need to trim any of the units down when using one of these rulers.  Simply cut two WOF strips – one of the light fabric and one of the dark – and place them right sides together and press.  Usually the ruler will give instructions on how wide to cut the strips in order to make the correct size triangles, as well as how to line up the angle tool.  Once the angle is lined up correctly, cut along side it with a rotary cutter – again, I find the smaller rotary cutter allows for more control with this method.  Once the first cut is made, rotate the tool 180 degrees and make the second cut.  Then rotate again and cut.  Continue with this method until all of the triangles are cut.  With both the Perfect Patchwork Templates and the angle tool, I’ve found that some kind of fabric gripper placed on the wrong side helps to keep them from sliding out of place.  Like the templates, the angle tools generally leave a blunt tip on the corners, thus eliminating dog-ears.   My favorite angle ruler is this:

Creative Grids Triangle Ruler

This is a ruler by Creative Grids that allow you to make two kinds of triangles – the 90 degree kind needed for HSTs and the wide, fat kind needed for units like Flying Geese.  This tool is super-great because it allows you to make HSTs out of Jelly Roll strips and it already has the fabric grippers built in. 

I will be completely honest here and tell you that if I’m making HSTs that are less than 3-inches, I don’t use any of these methods.  Nope.  I paper piece those suckers.  I personally have found that the smaller the HSTs and their triangles, the more difficult they are to sew without stretching the bias (no matter how much I starch them).  The bias is easier to control with paper piecing, and you can make more than two HSTs at a time.   The paper piecing templates often come in sheets like this:

Paper Piecing HSTs

You cut out a piece of the light fabric and a piece of the dark fabric to fit the sheet, shorten the needle stitch on your sewing machine and follow the arrows in the direction they tell you to stitch.  Cut them apart according to the directions and you have a nice pile of HSTs that aren’t stretched and are the perfect size with no trimming involved.  There is a method you can use without the paper, but by the time you grid it out on your fabric, you can download the free paper piecing pattern from a number of websites and be done. 

Diagram of bias strip HST construction

There are a couple of more obscure methods to make HSTs.  With both of these you cut bias strips, sew those together, and then cut out the HSTs.  To me, these techniques just increase the chances of stretching the bias since so much of it is exposed during the entire construction process – the bias is literally sewn twice and handled at least four times.  I don’t care how much starch you use on the bias, I’m not crazy about the odds of the HSTs coming out perfectly.  I’d rather stick to the methods above. 

We will look at four-patches and nine-patches in the next blog.  This is enough information this week – probably more than you needed!

Until next week, Level Up that Quilting!

Love and Stitches,

Sherri and Sam