How many times has this happened to you?
You see a quilt you want to make. Maybe it’s from across a crowded quilt show…it beckons you over. It seductively calls to you and mesmerized…yes, even hypnotized by its beauty…you stroll over. You try to be cool about the whole situation. I mean it’s probably a great looking quilt, but you’ve seen great looking quilts before….this is nothing new.
And then you examine it closely…every stitch is perfect. The colors are divinely inspirational. The quilting stitches ooze class. It’s then you realize, somewhere deep down in your quilty consciousness, “I’ve got to make this quilt.” Oh, you still try to be casual about it. You snap a few pictures on your camera phone (making sure to get the name of the pattern on at least one of the pictures) and remark to the person next to you that this quilt is really beautiful and you either can’t understand why it didn’t win any ribbons or why it didn’t win more ribbons.
You’ve been bitten by the quilt bug and just like that rabid high school crush you had years ago, your quilting hormones are raging, and you know what you’re going to do when you get home. The minute you get through the door (or maybe on the way home if someone else is driving), you Google that quilt. You search for it on Pinterest.
All to find out that your search is in vain. You can’t find it. So, you begin to text your quilting friends – have they heard of this pattern? Do they have it? (Seriously…I have been on group text with 30 people when one of us is searching for a pattern). None of them know the pattern nor do they have it. Last resort, you put it out there on Facebook, Ebay, and maybe even Twitter.
And come up empty.
Let me commiserate with you at this point. I’ve had the same thing happen to me. Usually this pans out in one of two ways. Either I discover the pattern is out of print, or the pattern is the original property of the quilt maker. If I find the pattern is out of print, Ebay has saved my quilting sanity more times than once. However, if the pattern is an original design of the quilt maker…it’s more difficult.
But maybe this isn’t the scenario. Perhaps you’ve come up with your own design. You were inspired by a pattern in some tile or wallpaper. No matter how it happened, suddenly you have this idea for your own quilt and your quilter’s soul won’t give you a minute’s peace until you’ve decided to make this quilt for yourself.
Thus, the process begins. Some quilters draw their quilts out on paper (usually graph paper) and some use a software program like EQ8 (I fall into that category most of the time). This is the easy part. You can get the quilt all drawn out but then you have to determine how much fabric you need. With EQ, this is easy – it’s point, click, and print. The program will tell you how much of each fabric you need. I’m putting this right here though – EQ usually tells you exactly how much you need nearly down to the inch. If you use EQ for this, add a little more fabric for margin not that any of us make mistakes.
I also realize not everyone uses EQ, and I also know sometimes inspiration strikes when you can’t access it the software. You can sketch the quilt out, but how do you determine how much fabric is needed to make that quilt? This is what I want to address today – because when inspiration strikes, it’s always good to have a plan.
So…
Step One: Choose your design and your size.
Keeping the standard mattress sizes in mind, decide if you’re making a twin, double, king, queen, or crib. If it’s a throw or cuddle quilt, figure out how big you want it (my standard size for cuddle quilts or throws for me is 76”x76” – exactly a foot bigger than I am tall).
After you’ve decided on the size, then determine how much of the quilt area will be blocks and how much will be borders and sashing. This can be determined by sketching your quilt out some paper. Graph paper is a particularly wonderful tool to have at this step. You can assign a size per block – for instance, five blocks are equivalent to 10 inches. I’ve always found that ten is an easier number to work with than twelve because I seldom make quilts with blocks that are larger than 10-inches square. If you want your blocks larger, you may want to assign your graph paper differently.
Step Two: Consider the overall appearance of the top.
The first item to consider is the block size in comparison to the size quilt you want. For instance, if I were planning a standard queen-sized quilt, I’m looking at 84-inches x 104-inches (that’s the bigger end of a queen-sized quilt). This is a fairly large area and I know if I tap into my inner Dear Jane and make 4 ½-inch blocks, there will be lots of piecing in my future. There’s nothing wrong with that, I just know heading into this project, lots of cutting and piecing will take place. If I decide on 12-inch blocks, I won’t have as many blocks to piece or as much fabric to cut out.
The second detail to consider is the borders. Will I have them? If I want them, do I want to cut them on the crosswise grain or the straight of grain? How many do I want? Do I want to miter them?
The last element to be considered is the actual setting. Will the quilt be on-point or in rows? If the quilt is straight set (rows and columns), the math is pretty easy. If I decide to use an on-point setting, I simply multiply the finished size of my block by 1.41 to determine the width of the on-point block.
If I do decide on an on-point setting, there is one last design decision I have to make – will the setting triangles be pieced or plain? And I have to remember that the four-corner setting triangles are smaller than the setting triangles used along the sides. In addition, not only are those triangles different sizes, they are also cut differently. Either way, there’s lots and lots of math involved and it can be kind of daunting…
Unless you have one of these:

Either as a phone app or a physical calculator like I have, this is a wonderful tool to have in your possession. Decimal numbers will figure into this process a lot. This can be a bit intimidating, since as a whole society, we’re not fluent in how to convert decimals into yards. A quilting calculator converts a decimal into a fraction with a touch of a button. If you don’t have one of these little jewels, there are literally hundreds of conversion charts available on the internet. Download one and keep it handy.
Step Three: Analyze the quilt blocks for yardage needs.
This is where some graph paper or EQ8 comes in handy. Generally, most blocks are considered to be four, nine, or sixteen patch blocks – they have the same number of block units both horizontally and vertically. The proportion of these blocks may change, and the appearance of these blocks may change, but the fact remains most blocks are either four, nine, or sixteen patch blocks – with a nine-patch block being the most frequently used. Please take a close look at the illustrations below:


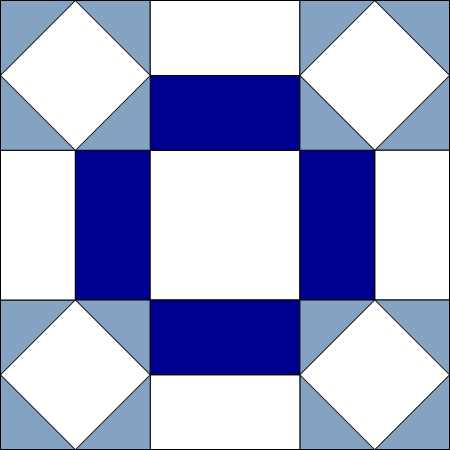


This gives you a good idea about how much we can alter blocks by changing proportion and by dividing the grid blocks into HSTs, QST (quarter square triangles), or any other type of block we want to insert into the square on the grid.
Instead of feeling creatively stifled by this proposition, this is really liberating. If we know the grid of a block, not only can we alter it to fit what we want, we also can predict the amount of fabric we need. Let me walk you through this process.
Take this Birds in the Air block:

When we graph this block out, we determine that it is a 9-patch block – three horizontal squares across and three vertical squares.

Let’s say we want to make 20 of these blocks, each identical to the other. The block finishes at 9 inches square.
- Divide the finished size of the block, 9-inches, by the number of rows across or down – which is three. This figure tells us how big each square on the grid must be – and keep in mind as we are “mathing” a block, we always work with the finished sizes and add on the seam allowances at the very end. It’s just easier this way.
- Most of the nine grids in this block contains HSTs. For sake of illustration here, we’re using the Sew and Slice method, since HSTs have a bias edge and I can wait until the last minute to expose the bias. At this point, I have to decide if I want to cut and sew the HSTs to the exact size or do I want to make them a bit bigger and cut them down. If I make them true-to-size needed, I take the finished size of the HST unit (3-inches) and add 7/8-inches to it. I will need to cut the fabric squares for the HSTs 3 7/8-inches. Since I like to make my HSTs a bit bigger and then cut them down to the size needed, I’ll add one whole inch to the finished size – so I would cut my fabric squares at 4-inches. Added caveat here – a whole number is easier to “math out” than a fraction such as 7/8.
- Each block has three dark purple triangles that I plan on cutting out at 4-inches square each (since I plan on making them larger and then cutting them down for accuracy). I want to make 20 blocks, so multiply that by three per block, making 60 triangles. Since I’m using the Sew and Slice method, I can make two triangles per square, so I divide 60 by two and know I need to cut thirty 4-inch squares.
- I know that most quilting fabric has about 40 inches of usable fabric (it just seems selvages keep getting larger and larger – I’ve seen some as large as 1-inch on each side). Divide the 40-inches of usable fabric width by four and I know I can get ten 4-inch blocks per strip.
- Now we take the 30 blocks we need and divide it by ten, which equals 3. I will need to cut three 4-inch strips in order to get the 30 blocks. So, 3 strips multiplied by 4-inches equals 12 inches. To figure yardage I divide 12-inches by 36-inches (number of inches in a yard), and I get 1/3 (and for those of you really mathematically inclined, yes, you can simply reduce 12/36 = 1/3). I will need 1/3 of a yard of dark purple fabric to make thirty 4-inch squares, which will in turn make 60 HSTs. I will also need 1/3 of a yard of the light fabric to make the HSTs. At this point, if you’re like me and are a pre-washer, you may want to bump the yardage up to a half a yard to allow for shrinkage – or if you want to give yourself a little margin for any errors, you may also want to consider ½-yard.
- Let’s look at the large triangle now. Each triangle is three grids high and three grids wide, making for a 9-inch finished square size. The math in this one is not any harder than the HSTS, but we’re not going to round the fractions up to whole numbers and then cut the triangles down. We will take the 9-inches (the measurement of the finished quilt block) and add 7/8-inches to it for the seam allowances – 9 + 7/8 = 9 7/8. We will need to cut 9 7/8-inch squares from the fabric. Now let’s figure how many blocks we need.
- We’re making 20 blocks and each block has one large triangle. That’s 20 triangles. However, we’re making these triangles by cutting squares apart on the diagonal, so we can get two triangles per square. That means we only need ten 9 7/8-inch squares.
- Now we have to determine how much fabric we need. A 40-inch width of fabric divided by 9 7/8-inches (the size of the square needed), equals 4.05, or 4 squares per strip cut WOF. The ten squares required divided by 4 per strip, comes out to be 2.5 strips. We’ll round that up to 3 strips, each 9 7/8-inches wide.
- To figure the yardage needed, multiply the 9 7/8 by the 3 strips and you get 29.6 inches. Round that up to 30. We need 30 inches of fabric, or 7/8-yard (30 divided by 36 equals 7/8). At this point, you can either use 7/8-yard of your fabric stash or purchase 7/8 of a yard. To me, it would be easier just to round it up to a yard wherever I get my fabric.

It’s important that I have some kind of chart or notes with this information on it because I may have to add to these amounts as I plan out the rest of the quilt, because this leads us to steps four and five, the sashing and borders — which we will discuss next week.
_____________________________________________________________________
Personal note here: This is how my sewing table looks right now.

Quilting has been set aside for awhile. In its stead, a steady stream of face masks are under my needle. Now, before anyone hops on the issue that these are not medical grade masks, I’m well aware of that. Wake Forest Baptist Hospital asked if some of us could make these as additional protection for their medical personnel. I couldn’t refuse — not after everything they did for my daughter.
As I stitch these up, I’m reminded that sewers (primarily women), have answered the call for medical supplies in the past — socks and bandages and bedding. I know for a fact I have ancestors that contributed to the need during times of war and hardship. I can do no less.
One day, hopefully in the not too distant future, there will be no more need of these and I will pick my projects up where I left off. I’m looking forward to that time — when I can see my mom again, hug my friends, go out to eat at a local restaurant, and quilt with my girlfriends.
Until then — wash your hands, practice social distancing, and be kind to others and yourself.
Love and Stitches,
Sherri and Sam
One reply on “Mathing the Yardage I”
[…] Mathing the Yardage I […]