Several weeks ago – way back when we were constructing the LeMoyne Star block – we dealt briefly with a technique called partial seams. I kind of glossed over it, because I was much more interested in everyone getting good and comfortable with Y-seams. The traditional LeMoyne Star requires both kinds of seams, as do many of the Feathered Star blocks. And while getting those Y-seams accurate is important, it’s just as essential to know how to make a great partial seam, because those can be used for wonderful effects in lots of different blocks. Bonus: They’re easier to make than Y-seams. As a matter of fact, if I’m constructing a quilt block with partial seams, I don’t look for an easier way out. They’re really not that difficult.
Let’s start by defining what a partial seam is and where to use them. A partial seam is just that – a part of a seam. Instead of sewing down the entire length of the pieces of fabric, there comes a point where you stop and add another piece of fabric. These seams are used when the fabric pieces attached to the center shape extend past the beginning shape. You stitch the first part of the first seam, add pieces to the sides, and end by attaching the last piece of fabric and stitching the last part of the first seam.
I realize all of the above sounds confusing. This is one of those techniques that’s much easier to show than tell. So, I’m going to walk you through the process step by step. And if you’d like to sew along with me, you will need the following:

One 4 ½-inch square
Four 1 ¼-inch x 5 ¼-inch strips. For this exercise, it will help if all four strips are cut from different colored fabrics. This will help you see how the partial seams work their magic.

Step One: Lay out your block. Since the center of the block we’re constructing is large-ish, this is a great way to showcase a fussy-cut piece of fabric, an applique piece, or some embroidery,

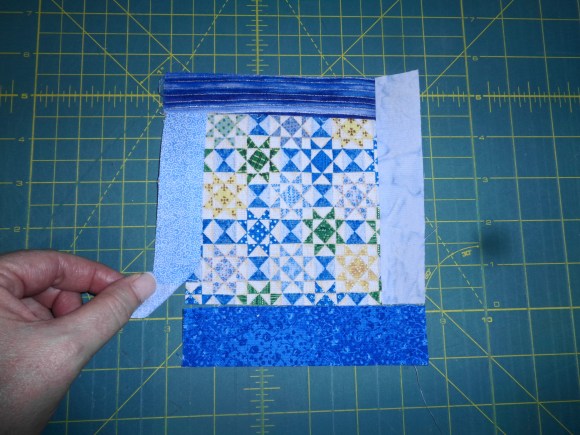
Step Two: You can start on any side of the block. I start on the left side, because…well… I always start on the left side. Then I work clockwise around the center. Place a strip of fabric right sides together with the center block, aligning the top edges. The strip will hang off the bottom side of the block and that’s okay. It’s supposed to.
Step Three: Sew the seam down the block, stopping and backstitching (or use a lockstitch if your machine has one) about 1-inch before the end of the square. Your block should look like this:

Press your seams as desired.
Step Four: Now we will lay a strip (right sides together) on the top of the block. When we do this, you’ll notice that this strip is the exact length of the block. Sew this seam as normal, down the entire side. Press the seam as desired.

Step Five: Repeat step four for the right side and the bottom strips.

Step Six: Now we’re ready to finish the original seam. Fold the unsewn part of the left strip back over the sewn block, aligning the unsewn edge and pin in place. Starting where you backstitched (or locked stitched) in step two, finish sewing down the seam to complete it. Press the seams.


There…

Much easier than Y-Seams.
I like the effect that partial seams give a center square. If the center square is small, the partial seam technique makes the block look like a type of log cabin square. Per request by Laura, one of my regular readers, I want to pause and focus on log cabins and partial seams for a bit.
I love log cabin blocks. I want to devote an entire blog to them soon. In my opinion, they’re one of the most perfect quilt blocks. You can make them super-easy or change them up to be more challenging. And depending on your color choices, the effects produced can be stunning. They’re a great way to use of scraps or showcase your best fabric. Let’s start out by looking at a “traditional” log cabin block:

As you can see, a “traditional” log cabin block is comprised of a small square in the center (historically, these squares have been either red or yellow, symbolizing the hearth in a home, but we don’t always choose these colors in our quilts today). The small block is surrounded by strips of fabric, placed in such a way that one side of the block is made out of light fabrics and the other side is comprised of darker fabrics. It’s this layout of the blocks that give log cabins quilts such striking effects:
Now, let’s take a look at a log cabin block in which we’ve replaced the normal seams with partial seams:

With every round of strips, we have one partial seam. And by changing out the traditional with a different technique, we’ve altered the look of the block just a bit. This one minor construction adjustment makes the block look like we’ve taken the trouble to use set-in seams, when we haven’t. Switching from traditional seams to the just-as-easy partial seams alters the look of a quilt enough to make folks pause as ask, “How did they do that?”
Squares are not the only shape which can utilize the partial seam treatment. Triangles can, too. The method remains the same, but the appearance is stunning.

Partials seams can be substituted in nearly any block that has borders. The block we worked through today used solid pieces of fabric as the strips. But what if you pieced those strips like this:

This gives a new and exciting perspective to a center square.
A partial seams is one of those quilting techniques that’s easy to do and generally doesn’t require extra fabric if you decide to switch out your pattern to use this method. Once you’ve gotten the hang of it, it really doesn’t even take extra time. But the effects it can give quilt blocks, and in return, a quilt top, is stunningly different. Master it. Tuck it away. Pull it out and use it.
Until next week, Level Up Your Quilting!
Love and Stitches,
Sherri and Sam

6 replies on “Partial Seams — Way Easier than They Look”
How do you figure out what size square to use for the center block?
The block in the example is 4 1/2-inches. If you’re designing your own block, it depends on two items: First, how large do you want your finished block to be, and two, how do you want it to look. There really are no hard and fast rules to this. If you want a large center block and smaller strips around it, that’s fine. Likewise, if you want a smaller center block, shrink the size down. However, if you go too small, you’ll have a lot of trouble adding the outer strips. I usually take the finished size block I need and make the center square 3/4 of that amount. For instance, if I wanted an 8-inch finished square, it would work like this: 8 x .75 = 6. I would make the center block 6-inches (cut it at 6 1/2 to allow for seam allowances), and then my outside strips would be 2-inches (cut 2 1/2 inches to allow for the seam allowances). I hope this helps!
Wouldn’t a 6 inch center square and 2 inch sides yield a 10 inch block?
No, because you must take into account the seam allowances.
Thank you for answering my question from a year and a half ago. I apologize for being super late in not thanking you. Life is a bugger sometimes but anyway your answer helps me tremendously. Thank you again.
You’re welcome!