Here’s the scenario…you’ve cut your fabric.
You beautifully pieced or appliqued all your quilt blocks.
You’ve sewn those blocks into rows.
You’ve put on the borders (correctly…so they’re not waving at anybody).
Now you get to the last line of the quilt pattern instructions: Quilt as desired.
Aaaannnnnndddddd that’s where a lot of us freeze. Quilt as desired? Really? After all of the effort I just put into that quilt top now the last line of the instructions contains only three words?
While more and more quilt patterns and magazines do give suggestions, there still are quite a few sets of directions out there that leave the quilting entirely up to the maker’s imagination and creativity. And while some quilters seem to have no trouble coming up with ideas to execute themselves or give to their quilting artist, others of us struggle. Prior purchasing my long arm, I quilted a good deal of my tops on my domestic machine. Then three years ago, Loretta became a reality and I learned how to quilt on her. However, I’ll be the first to admit, I often have a hard time deciding how to quilt a top. I will tell you that it gets easier with time and practice, but I still sometimes have issues with the quilting. This blog will be divided into two sections (and possibly two blogs, depending on the length). The first section will discuss ideas about quilting on your domestic sewing machine. The second section will deal with long arm quilting, no matter if you’re doing the long arming or you’ve farmed it out to your long arm artist. This blog does not address the technique of how-to free motion quilt on a stationary machine or long arm. It simply offers ideas and few tricks. Learning to free motion on either machine requires a book, not a blog. This blog also does not discuss batting.
I firmly believe that everyone needs to quilt some of their own tops. I think this process makes you a better quilter because it forces you to thoroughly deal with each step of the quilt-making process. You see first-hand why squaring up is important. You understand the need of keeping everything (as much as possible) on-grain. So, if you haven’t already, take the plunge and quilt some of your own tops – even if it’s just small ones.
I’m also assuming with this blog that everyone has access to a domestic sewing machine, as hand quilting is another blog unto itself. Even if you have a small machine, such as a Featherweight, you can manage to quilt small tops. Quilting on a regular sewing machine is also called “Stationary Machine Quilted.” This is a term that’s commonly seen at quilt shows either on the information attached to the quilt or in a brochure available at the show. This simply means that the machine cannot be moved, the quilt sandwich has to be moved in order to quilt it. If it’s a smaller show, this can also mean a mid-arm machine, as some of those are also stationary. At other times, mid-arms will have their own category, especially if it’s a bigger show. A mid-arm quilter is (generally) larger than a domestic sewing machine, but smaller than a long arm.
First some ideas that need to be considered whether you’re quilting on a domestic machine or long arm.
What is the technique and design used on the quilt top? Is it an applique quilt or a pieced quilt? Is it a little of both? Each technique requires a different approach. With pieced block, you can quilt in the ditch and then echo quilt that if desired. With applique, you echo around the appliqued pieces, but then have to consider what will be put in the background. Typically, you don’t quilt over the applique pieces, but again, that’s not a hard, fast rule. If my applique pieces are large (such as in Country Inn), I will stitch over the pieces in some facet because if I don’t, the batting may sag there over time.

What is type of fabric is used? Here’s where you have to love print fabric: It hides your quilting mistakes better than a solid will every time. If you’re new to the quilting process, the tiny little “blips” are not as visible as they would be on a solid material. Also, if prints are used (and I’m talking about pieced quilts here, not applique), fancy quilting, such as tight crosshatches or feathers, will not be as visible. Unless you’re just jonesing to use those quilting techniques, they can be left off. A meander, looping stitches, or a simple all-over design works well or simply stitch in the ditch and echo it. The choice of a printed fabric should also be considered with the backing fabric – it won’t show obvious stops and starts or other goof ups as readily as a solid back.
However, if you’re a confident quilter, a solid fabric can showcase your quilting chops beautifully. Please use that solid fabric and let your talents shine.
What is the purpose of the quilt? Generally, if it’s a cuddle quilt, play quilt, or a charity quilt an all-over design works well. That type of quilting is quick and pretty mindless. These types of quilts tend to be washed more than other quilts, so the quilting has to really secure the backing, batting, and top together and hold up to a washing machine and possibly a dryer. A close meander or other edge-to-edge quilting is perfect for this. If the quilt is destined for a bed, you may want to have a more custom quilted look. And if you plan on entering the quilt in a show, you definitely want custom quilting. More of this a bit later in the blog about long arm quilting.
Now let’s get into quilting on a standard sewing machine. For years I quilted my tops on either this machine…
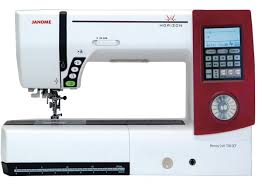
Or this one.
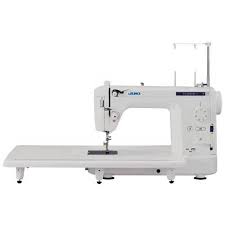
The Juki is a commercial machine, and probably could be classified as a mid-arm. I love quilting on Big Red – she has hundreds of specialty stitches and she’s a dream to sew on, but she is computerized. While this New Horizon machine was the second in a line that Janome designed for quilters (these have a larger throat that enables you to manipulate your quilt easier), I got kind of antsy about how continually dropping the feed dogs on a computerized machine would affect it. So, I purchased the larger Juki, which is a heavy-duty, commercial machine. It only sews a straight stitch and doesn’t give so much as a whimper when you drop her feed dogs and free-motion the life out of a quilt.

With either of those or any other domestic machine, the first thing I would urge any quilter to do is fall in love with your walking foot. I’ve mentioned a walking foot before, in the blog I wrote about paper piecing. A walking foot is wonderful because it uses a dual-feel mechanism that can push multiple layers over your feed dogs as one unit – nothing shifts out of place. If you’re just beginning to quilt your tops on your sewing machine, a walking foot (when paired with good basting or pinning) keeps the quilt top, batting, and backing together and they don’t wiggle out of place. If your machine doesn’t come with a walking foot, read through the sewing machine manual and find out if the machine is a high-shank or low-shank. Then do a Google search to find if a generic walking foot is available or if your sewing machine brand has one available specific to your machine. They’re not too terribly expensive. I use my walking foot for paper-piecing, sewing on my binding, and quilting.
There are several options for walking foot quilting. You could stitch-in-the-ditch (sew along the seams that join the block units together) and then echo quilt out from that about a ¼-inch. Let me also throw in here that some machine brands have a stitch-in-the-ditch quilt that is very helpful with this technique.


“Gridding” the quilt is another option. This quilting technique includes crosshatching, regular grids, grids with wavy lines, and the hanging diamond grid. When I first began quilting my own tops, these were always my go-to quilting patterns. There were no obvious stops and starts – I quilted completely off the edge with each line of stitching.

You can use the walking foot on some applique quilts. My standard quilting technique for quilting applique is to stitch closely around the applique design and then echo stitch one or more times out from the initial close stitching. If the applique block is small, I may just echo stitch the entire thing. But if it’s a larger block, once the initial stitching and echo stitching are complete, I do some kind of close stitching in the background to make the applique “pop” off the block. If the applique is large and has gentle curves, the walking foot can go around the applique just fine – you don’t have to use your darning foot and drop the feed dogs for this, although you may have to when you’re dealing with the background.
There is one process that you must serious consider when quilting with the walking foot, and that’s how to mark your quilt. If you’re stitching in the ditch, the seam serves as a guide to help keep the stitches straight. But if you’re echo quilting, crosshatching, stitching a vertical and horizontal grid, or making hanging diamonds, the quilt top usually needs some kind of marking. And it’s always easier to mark the top before you make the quilt sandwich. A long rotary ruler is handy to use as a straight edge. It covers more space. My favorite ruler to use for marking is this:

This is an extra-long yard stick my BFF Janet gave me a few months ago. It came from her father’s business all the way from the great state of Indiana. It is a handy, handy thing and I love it.
Almost any pen/pencil can be used to make your guidelines. My favorite is this:

Once the quilting is completed, simply run a hot iron over the top and the marks disappear. I know there’s some debate about these (and other similar pens), but I make a really light mark, not a bold line, so I’m not too concerned. There are also the wash-out pens…

After the top is completed (but not bound), toss the top in the washer and use cold water to rinse the top out. Hot water may make the marks permanent. After the top is rinsed and spun out, continue to block the quilt and let it dry. Then bind.
And of course, there’s the good, ol’ #2 pencil. Just don’t make a really dark line.

Then there is always Painter’s Tape. If you read my blogs from last year, you may remember during my guild’s Small Quilt Challenge, I learned to use Painter’s Tape as a guide to quilt one of my small quilts. I liked it so much that I went back to Walmart and purchased a roll of that tape in every available width. It’s a great way to mark your quilts because it makes no marks on your quilt top, permanent or otherwise. The trick with Painter’s Tape is you use it after you’ve made the quilt sandwich. And one strip of tape can be used several times (just move it over as you quilt) before the sticky wears off and you need a new strip.
Most walking feet come with this little gadget:

You may have wondered what it is. It’s a quilting guide. If used properly, there is no need to mark the quilt by any method. It inserts in either side of your walking foot and can be moved according to the width desired between the quilting lines.

This is a handy-dandy accessory and I have found it works well with small quilts. However, with larger quilts, where I’m manipulating a lot of bulk through my machine, the guide will shift and I’m constantly re-adjusting it. Just beware that if you decide to use this, you will need to make sure that that the width between your quilting lines stays consistent.
If you’re walking foot is similar to mine and it has an open area,

chances are you can also use some of the “fancy” stitches on your machine in the quilting process without changing to an open-toe foot. The walking foot can continue to move the quilt sandwich over the feed dogs and beneath the presser foot and those fancy stitches can be used to outline blocks or fill in empty spaces. If you machine has stitches other than a straight stitch and zig zag, use them. The really do add a touch of whimsy to the quilt top.
Part of using other stitches can include the buttonhole stitch used for raw-edge applique. I do this a lot with my raw-edge applique quilts. I find it especially useful in quilting the background before I applique the block. Simply put a thin layer of batting behind the background fabric, just like you were making a quilt sandwich, but don’t put a back on it. Go ahead and meander or crosshatch the background as usual, but stop and start 1/4-inch away from the edges. This keeps the batting from being caught in the seam allowance when the blocks are joined together. Then applique as normal and finish as desired. The quilting process won’t take as long because you’ve already performed a good deal of it during the piecing.
Whew. This blog is getting longer than I anticipated, so next week we’ll pick up free motion quilting on your domestic sewing machine.
Until next week, Quilt with Passion!
Love and Stitches,
Sherri and Sam

6 replies on “Quilt as Desired? Seriously?”
Thank you 😊. Read some very useful information.
Glad it’s something you can use!
Really great article and so easy to understand… thank you.
Thank you!
I just finished my quilt top and had that same thought- “quilt as desire-REALLY!” No suggestions ( this was a kit so I would have appreciated a pro’s suggestion as I am not that creative. Thanks for your helpful tips as to deciding what technique to use!
If I’m stuck, I Google the quilt or search for it on Pinterest. From there I can enlarge the quilt and see how different folks handled the quilting. If that doesn’t work, YouTube Angela Walters. She’s amazing and breaks down the quilting process into super-easy steps. She’s so encouraging!