
I know you all remember who Loretta is. For newer readers to my blog, Loretta is my long arm. She joined my family of machines about two years ago. And while she has been a welcome addition, she has thrown me a learning curve or two. She doesn’t like certain threads. She takes a different kind of needle. Her rollers and track need to be cleaned, just like the area around her bobbin case. And she takes a bobbin case! My other machines have build-in cases and all I do is drop the bobbin in it.
Couple all of that with the fact that I was just a little afraid of her. Sure, a long arm is just a straight-stitch sewing machine, but she is a big straight-stitch sewing machine. After about six months of trial and error (mostly error), she and I began to develop a good working relationship. After the first year passed, I wondered how I ever lived without her. I was actually finishing my quilt tops as I got them made and was making a fairly serious dent in my backlog of tops. Go me! Go Loretta!
And then something terrible happened. Not life-threatening terrible, but it put a screeching halt to my productivity level.
Loretta’s tablet went out.

For those of you who may not know, every long arm runs via a tablet, whether it is a “computerized” long arm or not. Loretta’s long arm tablet was a wonderful little android and the android held all the soft ware that was used to make Loretta function. The Great Malfunction began when I purchased a digitized design from Willow Leaf Studios to use. While Loretta is blue-tooth and wireless equipped, for whatever reason, I couldn’t download the pattern directly via the internet to her memory. I had to download the digitized pattern to a thumb drive and then transfer it from the thumb drive to the long arm. In the process of doing just that, the thumb-drive port in the tablet fell out.
Annnnndddd …. I panicked.
A quick call to Sewing Machines Plus (wonderful company, by the way), confirmed the inevitable: the tablet would need to be replaced. The good news was that the tablet was still under warranty. The bad news was that it would take me a couple of weeks to get it delivered.
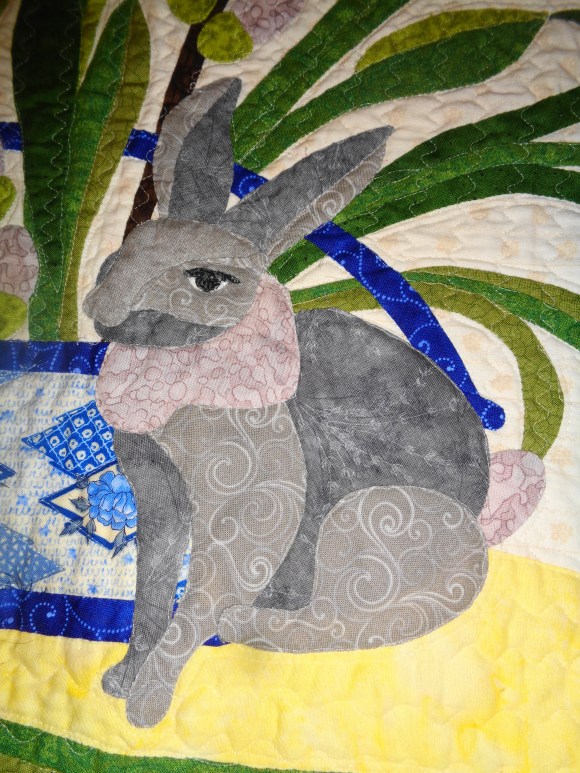
This really was bad, because I had just basted the edges down on this quilt:

I’ve been working on this little jewel for over a year. I finished it at Janet’s lake house back in the fall and had it on my list of UFOs to complete as part of my guild’s challenge. Two to three weeks without access to Loretta was going to put a serious kink in my timeline. Then the thought occurred to me that I had quilted for years without a long arm. I had quilted all my mini-quilts from the 2018 guild challenge on my domestic machine. Other than basting the quilt down, Loretta hadn’t put a stitch in this quilt top. There was absolutely no reason at all I couldn’t throw this wall hanging on Big Red and have at.
However, there was a problem with me at this point. It had been a long, long time since I dropped the feed dogs on Big Red and quilted. I had used the walking foot and straight-lined stitched all of the mini-quilts I made last year. But then the fact hit me that there were 250 stitches programmed into Big Red.

Surely, I could use some of these stitches to quilt my little wall hanging.
I knew how I planned to quilt this top on Loretta. The challenge was to get that plan transferred as closely as possible with my domestic machine.

The first quilting I did was around all the tulips, basket, table, and bunny. I did use a straight stitch and the walking foot for this, getting the stitches as closely as possible around the applique pieces. I used Superior Thread Micro Quilter in an off-white color. I absolutely love this thread. It’s strong and so fine that the stitches melt into the background of the quilt, allowing the applique and piecing to shine, but giving a definite texture. Then I echo-quilted around the designs again, leaving about ¼-inch space between the initial echo and the second one. This is exactly what I would have done on Loretta, had the tablet not wonked out on me.
The next step was to consider what to do with the background and table. If I had known the tablet would go down and that I would be quilting on Big Red, I would have quilted the background before I sewed on the applique. My original plan was to use a tight crosshatch stitch in the background. And while this is easier to do on a long arm when the top is completed, it’s harder to do on a domestic. It’s not impossible, but there are just a lot of stops and starts. If you’re planning on quilting a crosshatch for your applique piece and the quilting will be done on a domestic machine, you may want to consider pinning the background to a thin piece of batting and quilting that before you sew the applique pieces on, like I’m doing with my quilt, Language of Flowers, designed by Kathy McNeil. This is the method she suggests with her pattern, and it really saves time in the long run, not to mention lots of starts and starts.

But it was too late to do that now, so I pondered all the decorative stitches on Big Red and chose this one:

It’s curvy and I thought it would be a nice contrast to the stripes in the background fabric. The plus to this stitch was it was walking foot compatible, which meant I didn’t have to worry about my top, batting, and backing slipping, as the foot would help feed the quilt sandwich over the feed dogs. Since I was using the Micro Quilting thread, I quilted over everything. If Loretta had been up and running, I probably would have done a small meandering in the background and avoided the applique. But since it had truly been awhile since I had worked with dropped feed dogs, I thought this was a good compromise. The stitch was a good contrast and the super-thin thread wasn’t too obtrusive over the flowers. I did not, however, stitch across the little bunny or basket. I treated both of those differently. I quilted the table with the same curvy stitch, only I turned it horizontal instead of vertical.


When the background and table were completed, I turned my attention to the rabbit and the basket. I had outlined the basket handle when I stitched around the tulips and willow branches. I finished outline stitching the basket and then went around the diamond-shaped designs in the fabric (Isn’t that basket fabric wonderful? It reminds me of blue delft work.).

The bunny was so cute, and I had put in so much work on the thing, I decided to just let all that applique effort shine. I simply outlined each applique piece with straight stitches.
Then it was time to work on the borders. I have to admit, quilting borders on any machine, gives me a mental hiccup. While I’ve grown much more comfortable quilting the center of a quilt top, the borders still give me grief. I’m always second guessing myself with this part of the quilt. My over-all quilting idea for this wall hanging, even with my initial plan for Loretta, was areas of very tight, close quilting juxtaposed next to areas of sparse quilting. This method allows certain areas to appear to almost pop off the quilt top. The close, tight quilting causes the spaces next to it to appear almost trapuntoed.

The large, parrot tulips were easy. I treated them the same way I did the tulips in the center – I merely outlined them, only this time I went around the applique just one time. Then I decided to stay with my initial plan of tight meandering as closely as I could. While I still wasn’t comfortable dropping Big Red’s feed dogs, I did have this stitch:

Bonus – I could keep my walking foot on my machine.
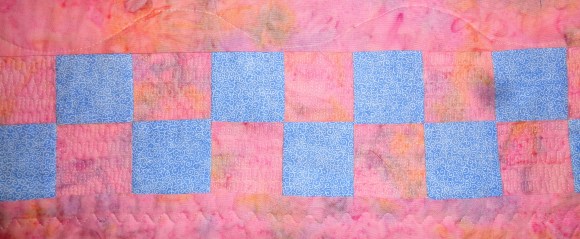
So, I used this stitch on all of the pink squares in my four-patches and used nothing in the blue ones. Then I extended the idea of four-patches into the large, pink areas by stitching those with a straight stitch and then alternating the tight meander in those outlines. I added a bit more of the stitch here and there and then decided that was all that part of the border needed. Then returning to the curvy stitch I used in the background, I used that in the last border and decided this quilt was done.

I am happy with this little quilt. While I was disappointed that Loretta’s tablet gave me issues, I really like the way the quilting turned out. And I was very pleased that I lost no time in finishing this project up because I simply played the hand I was dealt: When Option A doesn’t go as planned, Option B worked just as well. It’s always good to have a Plan B with anything in life!
Until next week, Quilt with Passion!
Love and Stitches,
Sherri and Sam

4 replies on “Necessity is a Mother…or How to Make Do When Your Long Arm Malfunctions”
I’m a new reader and I love your website. I love this article. I have begun quilting some of my own quilts using rulers. I recently got a second machine with a bigger harp/throat and more stitches. This article makes me aware of stitches I may be able to use on the new machine with a walking foot.
Thanks for stopping by to comment and thanks for reading!! You’re gonna love that bigger harp. It makes your quilting life so much easier.
Just loved this blog, Sherri. My 7570 Pfaff still sews like a dream, but I no longer use the embroidery unit since the technician told me parts are rarely available, or if they are, a good number are used and not reliable. Because of this, I now leave my lamp and machine plugged into a surge protector and turn them on/off from there so I don’t wear out any buttons and am unable to get replacements of any kind. I do not have a curvy stitch on my machine, and I can’t change the stretch stitch zigzag so there’s still that sharp pointy zigzag. With the wrist surgery yearlong recovery and the 10 Project Linus quilt tops waiting for me, I’ll continue to use green frog tape and straight stitch quilting to get mine done…when I can finally pin the sandwich layers together. February 27th will be the milestone. I’ve always wanted a longarm, but SO not in the cards with no space available (and age creeping up too fast). Please keep the Loretta Sage going. We’re all sending positive vibes for you both to continue on your journeys in 2025 and beyond.
Thank you! February 27th will be here before you know it and hopefully you’ll be fully recovered and ready to rock. There’s nothing wrong with straight line stitching. It’s quick, easy, and holds everything together.