At some point in your quilting experience, you may have to deal with bias tape — especially if you like to applique. Stems and vines are generally constructed out of some type of bias tape. For those that like to make Baltimore Album quilts, I’ve seen tiny, tiny bias tape used as rigging on boats. So, bias tape has a place in the quilting world, just as it has in the garment making end of sewing.
At this point, do not want you to confuse bias tape with bias binding. Bias binding has its own job to perform and that is to cover the edges of the quilt once the quilting is completed. Binding is just one of the many ways to finish the edges of a quilt and I plan on writing a couple of blogs about different ways to finish your quilt before the year is out.
Bias tape is a different animal. It’s versatile and can easily be made without a lot of fancy gadgets. It can be single-fold or double-fold – although most quilters use the single-fold (the exception to this is bias tape made with bias bars … and we’ll get into that later).

Let’s start with what bias tape is, since we know it isn’t bias binding. This is single-fold bias tape.

One side is flat and the other has two folds on the sides, but no fold in the middle– hence the name singe-fold bias tape. There is such an animal as double-fold bias tape, (see illustration near the beginning of this blog) but that’s primarily used in garment construction, not quilting. You can make your own bias tape, or it can be purchased in packages.

The packaged bias tape comes in a rainbow of colors, but I will be honest with you…while plunking down a few dollars for something that’s already made can seem like a great time-saver, in the long run, it may not work. Pre-made bias tape is generally used for garment sewing, so it’s not made with quilters in mind. And in my opinion, the fabric used to make this tape is inferior to a lot of quilting fabric. My strong suggestion is this: pull from your stash and create your own bias tape. If you’re making stems and leaves, the same shades of green used for the leaves can be used for the stems. Scraps of black fabric can be used for tiny bias that can serve as rope on a block that has swing sets or boats. Brown can be used for vines, tree trunks, and limbs. And if you’re using the same fabric in the applique as you are in the pieced blocks, just purchase about an eighth of a yard more. The colors will coordinate and give your quilt a great finished look.
So how do you make your own bias tape? It’s not hard. There are gadgets out there to help and then there are ways you can make it without anything but a few basic quilting tools. We’re going to start with bias tape makers.

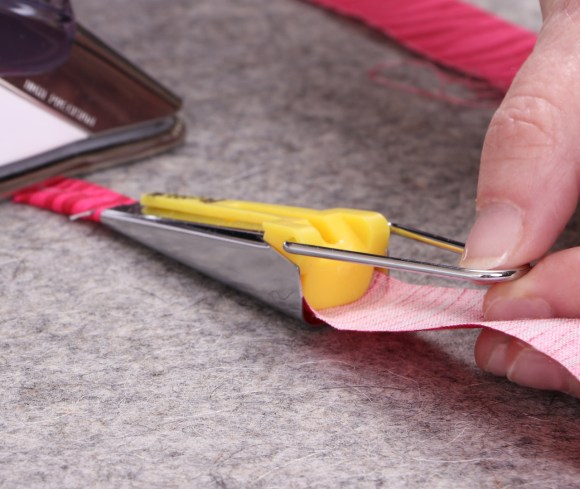
These little tools are bias tape makers. They can make bias tape in widths ranging in size from a quarter of an inch to two-inches wide. These are very versatile pieces of equipment to have in your sewing box.
Making bias tape with these is really easy. I use the ¼-inch tape maker the most, as it makes really wonderful vines and stems. Directions come with the makers, but they’re written on tiny pieces of paper that’s easy to misplace, even if you’re super organized. However, if you simply remember that you multiply the size of the maker by 2, that’s the width you cut your fabric strips. So, if I’m using my ¼-inch maker, I cut my fabric strips ½-inch wide (1/4 x 2 = 1/2).
Before you cut your fabric strips, decide if you need to cut them on the straight-of-grain or on the bias. Straight-of-grain strips will give you some curve, but if the applique pattern calls for really tight, small curlicues and curves, a bias cut will be better. The bias handles tight spaces much more effectively.
After the decision is made to either to cut the strips on the straight-of-grain or bias, you can either sew the strips together as you do quilt binding — to have one really long piece of bias tape that you can cut off in the size you need as you go along — or you can make several smaller pieces of bias tape. Personally, I think making the smaller pieces is easier. Getting the seams to go through the bias tape maker has always been a bit tricky. I’d just rather not deal with them.
With your rotary cutter or a pair of scissors, trim one end of your fabric to a point.

Turn your iron on, find your spray starch, and park yourself at the ironing board. With the right side of the fabric facing the surface of your ironing board, feed the strip through the tape maker. There is a slot on the bottom of most tape makers where you can see the fabric moving through the maker. If the strip needs a little “encouragement” to move through the bias tape maker, I’ve used a pin or awl to help move the material forward.

Once it gets through the end, use the little handle on top of the maker to start sliding the tape maker backwards. Before pulling the fabric through the maker, I use a shot of spray starch on the material. As the fabric is pulled through the maker, press it with a hot iron.
The starch will help the folds will stay pressed into place. If the material “hiccups” a little, re-adjust the fabric in the bias taper maker and keep going. Chances are any little blemish can be manipulated with needle and thread, covered with an applique piece, or will be cut off when you trim the bias tape down to the size you need.
When an applique pattern calls for a lot of bias tape – the pattern is loaded with stems or vines or such – I try to make all my bias tape at one time. I do this for a couple of reasons. First, making bias tape is not my favorite thing to do. Making it all at once gets it all done at one time and over with. Second, it does save time when I am appliqueing. I don’t have to stop, cut more fabric, run it through the bias tape maker, and then sit back down to applique. I can just keep stitching. To store the bias tape, I simply wrap it around an empty paper towel cardboard center and pin or clip it into place…

Or use another storage method as shown.


Next week we’re going to move ahead with bias tape and I’ll show you a few other ways you can make this wonderful stuff. Then it’s on to binding treatments, peek-a-boo blocks, and we’ll end the year with my annual “State of the Quilt” blog.
Until next week…continue to Quilt with Excellence!
Love and Stitches,
Sherri and Sam
