So, let’s get back to our raw-edge applique. I have made the pieced background and decided on my applique pattern. Now I trace my pattern pieces onto my fusing agent. I prefer Steam-a-Seam light or SoftFuse for applique work on quilts. Both of these fusing agents finish without being too stiff for a quilt top. There are two important rules to remember at this point, whether you’re using a pattern from EQ or another commercial pattern. First, unless the pattern tells you the applique images are reversed, you will need to reverse them yourself. You can tell EQ to reverse the images in the print dialogue box. If it’s a commercial pattern with the templates printed on paper, you can simply flip the paper over, put it on a light box, and trace them on the fusing agent this way.

The second rule you need to keep in mind is if the templates include a ¼-inch seam margin, you will need to omit that from your raw-edge piece. Lots of pattern templates, including those from EQ, will include that ¼-inch margin for you in case you decide to do needle turn applique, or use freezer paper, Mylar, or Appliquik. With raw-edge applique, that ¼-inch margin is not needed, because nothing is turned under.


See the dotted lines that echo around the solid lines on these applique templates? That dotted line is the ¼-inch margin for finished-edge applique. Since we’re working with raw-edge applique, we need to trace the templates on the solid lines, omitting that ¼-inch margin.
Because I had a chance to purchase SoftFuse in bulk a couple of years ago, I’m using that as my bonding agent. It comes on rolls, which can be difficult to work with because rolls, well…roll. They can roll off the table you’re working on and generally just be a hassle. So, I cut of small sections at a time, which are easier to handle. If I have large chucks of the pieces left over, I stash them in a plastic baggie for later. I also make sure that I number each SoftFuse piece with its corresponding number on the pattern. This was especially true for this applique work because there were so many pieces involved in each flower.

Speaking of all those petals for all those flowers, I also prepped a small baggie for each flower and labeled them.

As each template was cut out from the bonding agent, I put them in the appropriate bag. This way I could grab a bag, the fabric that I needed, and spend quality time at my ironing station instead of quantity time. This is also a good time to re-visit my decision about using batiks. Because most batiks have a firm weave, they do stand up to the abuse that machine applique can dish out. However, also remember I wanted my flowers to have a somewhat realistic look, so at least two colors of fabric would be needed for each head. With my fabric selection, not only do I have two colors for each flower, but since the dying process causes the batiks’ coloring to undulate, it gives the impression of even more hues popping through the petals.
As I cut the templates out of the SoftFuse, I made sure I didn’t cut exactly on the solid line. Instead I left about a ¼-inch margin around them. Then I fused each template onto the wrong side of the fabric.

When I trimmed the template from the fabric, that’s when I cut on the solid line.

I know all of that sounds like a lot of extra work, but it goes a long way with accuracy. During the initial SoftFuse cutting, if I had cut directly on the solid line before I fused the piece to the fabric, when I trimmed the template from the fabric, I would have had to cut just slightly inside the solid line, making the applique piece smaller than needed. One piece wouldn’t matter that much, but when this difference is carried over lots of pieces, the applique pattern will come out smaller and not fill the background the way it needs to. It’s attention to these little details that make your block and then your quilt really stand out.
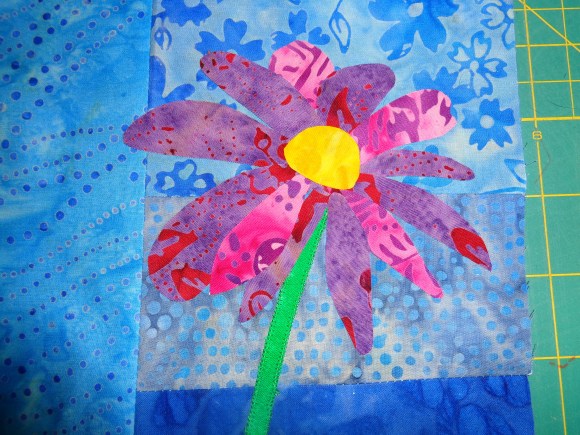
After all the SoftFuse templates were fused down and then cut from the fabric, now it was time to determine what pieces are pressed on first. Some patterns will tell you what is fused first. In my case, EQ just assumes I know. And since I’ve appliqued enough flowers to open a fabric florist shop, I can tell you that usually with those, the stems go down first because the flower has to have something to grow off of. Let me stop here and talk about stems. Nine times out of ten, I make stems from bias tape that I’ve produced from my bias tape makers or from bias bars. The stems on this block vary in width, with the widest about ½-inch. The narrowest is less than ¼-inch. All of these could be made with either the tape makers or the bars, but I decided to go ahead and simply make them with the templates, since there are no tight curves or bends. One thing I do with all stems, whether I’m hand appliqueing or machine appliqueing, is sew them down first. I will get those fused on (and any leaves or other pieces that go behind them) and stitch them down. I do this, so they won’t “wiggle” out of place as I handle the fabric.

Since we’re talking about stitching, it’s a perfect time to consider two things: thread and the stitch – both type and length. I decided early on in this project that the applique thread would not be used as part of the quilting process (as it had been with my Sunbonnet Sue block for April). I wanted my fabric choices to shine and my quilting to take center stage. The thread I chose for the applique was Mettler 50-weight. It in no way overwhelms any of the fabric in the applique pieces and sinks quietly in the background. With raw-edge applique, I change thread color to match my fabric. I used two to three colors of thread with each flower (petals and centers). One rule I have for myself is that I keep all my thread out and together until the last stitch of the binding is sewn down. With blocks such as this, there are a lot of pieces and inevitably I will miss sewing down one of the pieces and catch it later. To save the time of finding that spool of thread, I keep all my thread for that project in a small basket until it’s complete.
Now about my stitch. I prefer the blanket stitch for raw edge applique. There are a couple of reasons for this. The most important one is that the blanket stitch will not cause “fabric tunnels” on the wrong side of the fabric.

Machine applique usually involves either the zig-zag stitch or the blanket stitch, and if your machine does not have the blanket stitch, the zig-zag stitch will work fine. As a matter of fact, there is little difference between the two stitches when setting up raw edge applique. However, with the zig-zag stitch, sometimes an extra layer of stabilizer must be added to the back of the applique to avoid getting those fabric tunnels on the wrong side. These “tunnels” are sort of like little pleats that will eat up your fabric. The stabilizer prevents this. For me, since Big Red has a wonderful blanket stitch, I prefer to use that one.
The second reason I like the blanket stitch is pure, personal preference: I think it looks nicer than the zig -zag stitch.
Now about the stitch length and width. Most of the decorative stitches on sewing machines come with preset lengths and widths. The default on Big Red’s for the blanket stitch is 2.5 length and 2.5 width – that’s pretty big for these tiny pieces, or in fact, most of the machine applique that I do. My “go-to” settings for machine applique are 1.8 width and 1.8 length. However, take a look at these narrow stems.

Even the 1.8 setting for both length and width would be far too big for these. If you look closely, you can see the 1.8 stitches on the wider stem. But that narrow one? I lowered both the length and width to 1.2 on both of these.

I said all of that to say this: The size of your applique pieces should decide your stitch length and width, not a pattern, or personal choice. That also means you may have to change both the width and length as you move through the pattern – smaller stitches for smaller pieces and larger stitches for the larger pieces.
After I had the stems stitched into place, then I had to begin to think about the flower heads. Some applique artists will trace their applique pattern onto their background in order to know where to place all of the pieces. I’m slightly too paranoid to do that. I am always afraid that what ever marking tool I use will leave an indelible mark that I won’t be able to remove. I simply lay the pattern beside the area where I am playing the unit out and “eyeball” the placement.

Sound hard? It was when I started applique, but after awhile you get used to it and become pretty good with the process. I lay out all the pieces in one of the units I’m working on and then fuse the whole thing into place.
Then I applique the entire thing down before moving to the next unit. Let me also throw in here that I sew slowly. This isn’t a race. Sewing too fast can lead to sloppy work…which leads to lots of unsewing…which isn’t fun at all. In small pieces or in tight places, I’ve literally used the need up/needle down button to sew that applique piece on one stitch at a time. If you begin to have issues with the thread (such as the machine continually comes unthreaded or the thread gets caught around the top or bottom of the spool), consider using your vertical pin to hold the thread instead of having it lay horizontal in the machine. Sometimes that will help put an end to any thread issues you may have.
Bobbins, needle, and lighting also need to be checked before starting too much of the intense work. It’s a good idea to have at least two full bobbins waiting in the wings because it’s no fun to stop and wind bobbins when you’re having such a good time. A top stitching needle works terrific for raw edge applique – just make sure the needle you’re using is either new or free from burrs. And I cannot emphasize how important good lighting is in this step. I’ve even wore my magnifiers while machine appliqueing tiny pieces to make sure my stitches were accurate. And after an hour of sewing, get up. Walk around. Give your body some water and your eyes a rest for about 10 minutes. Your accuracy (and enjoyment) actually improves after these breaks.
Every single petal now appliqued in place, now it was time to consider my quilting thread. I wanted this thread to shine in my block but didn’t want it to be too obnoxious. I chose two threads from Superior Thread to pick from to quilt with. Both are Fantastico brands.

This spool is all blues and originally, I assumed this would be the best choice. But when I allowed the thread to drape over the background, it was too dark.

I had assumed this one would be too limey yellow to use, but guess what? I was wrong. This Fantastico thread looks wonderful! It blends well in the background and isn’t too obnoxious on the flower petals.

Since Matthew had challenged us to use at least one new technique in this quilt, I decided to try the straight-line quilting that’s seen on a lot of modern quilts. I did the quilting on My Janome 7700 and used the walking foot. And unlike the Sue quilt, I didn’t mark the top with a Frixion pen. Instead I used 1-inch painter’s tape as a guideline – another new technique for me.

And here’s the finished product!

It’s a little big for my table top rack (so it looks like it’s sagging), but it really brightens up my entry way. Now if I can get the flowers in my garden to grow as well as the ones did in this block, I’ll be a happy gardener!
Until Next Week, Quilt with Excellence!
Love and Stitches,
Sherri and Sam

We had a wonderful time at the beach with all of our family. Now it’s back to reality and a sense of normalcy…even if it’s an altered sense of normalcy. Meagan returned to work on Tuesday. She’s going back full-time and is doing great! The company she works for is so supportive and understanding. I am very grateful for them. Along with this new normal, Lilith-Lou has gone back home. I enjoyed having her stay with us very much, but Sam was born to be an only fur-child and they both are happier apart. For the next couple of years, our new normal will exist from Pap Smear to Pap Smear, trying not to worry about things we have no control over, loving each other a little harder, not taking anything for granted, and living each day to the fullest.
This is our “new” normal. Yes, it’s stressful, to some degree. But it’s becoming a life filled to the brim with faith and love. Not a bad thing. But yes, I will breathe just a little easier after we get through the first year of post-surgery follow up. Thank you everyone for your thoughts and prayers; texts and emails; phone calls and meals. Quilters are truly the “bestest” people. Continue to pray as we wait out the next five years.
S.