I know we all have them.
I have them. You have them. Your friends at Guild or in your Bee – they
have them, too. You know what I’m
talking about.
The
Quilts that Haunt Us.
I’m not talking about the quilts that we think about – the
ones we want to make but haven’t gotten around to yet. No.
I’m talking about the ones we made years ago that are either stuffed
into the back of a closet, or hoisted high up on a shelf, discretely hidden in
an old, cotton pillowcase.
Those
Quilts.
The quilts we made when we first started piecing and
appliqueing and quilting. The ones that
at one time we were so proud of … until we got better. We began to learn to match corners and
seams. We learned how to make our
applique stitches so tiny they could barely be seen with the naked eye. We mastered the art of dropping those feed
dogs on a domestic machine and meandering the life out of a quilt. You know what I’m talking about…
Our
first quilts.
And while, yes, they do hold some sentimentality for us,
those are the quilts best loved from a distance – like from the top shelf in
our linen closets, behind the Christmas bath towels that are only pulled out
after Thanksgiving. Those first quilts
are kind of like that high school crush most of us had. We remember that person fondly, but can’t
help asking ourselves, “What was I
thinking?” We can’t for the life of us
remember why we thought Williamsburg blue and Old Rose were just the best
colors ever or why we thought that making templates out of empty cereal boxes
was the only way to cut our patches. We
love those quilts, but cringe anytime they’re mentioned or brought out. There is just so much wrong with those quilts, we kind of want to forget them. And in the process, we forget just how much
they taught us.
This is my first quilt.
My very first quilt, circa 1988-89
It’s a homely little thing, isn’t it? I made this little quilt for my second child,
but my third pregnancy. I had been
sewing for a while, but at that point, I was only making garments for myself
and my daughter. After my second pregnancy
ended in a miscarriage, I hesitated in making any clothes for my third
baby. But a quilt? That would be just fine. This is my first attempt at a quilt and my
son literally loved the stuffing out of it.
It’s sparsely quilted, then tied.
At that time, I didn’t know any better than to buy the fluffiest batting
out there. The seam allowances aren’t
consistent (after sewing 5/8-inch seams for clothes, a ¼-inch seam was just so
small), and the colors are typical late 1980’s.
I was self-taught and was immensely proud of this crib quilt until I
took a quilting class.
Then I learned just how many mistakes I had made. But process of making that first quilt planted a desire in my being to learn more and get better. If I had never made that first quilt, I wouldn’t have this area of my life that I love so much. I would have never met other quilters that have enriched my life. So, while this little quilt is truly down-right ugly, it’s a time capsule of my progress.
Let me explain.
This is one of the quilts I finished a couple of years
ago. It’s pieced and appliqued.
Here is top I finished two weeks ago.
And here is my Farmer’s Wife (that I still need to finish
designing the borders for).
None of these quilts would be possible if I had not made
that first quilt. And while that crib
quilt is safely tucked away in my closet, I do bring it out a couple of times a
year. I do this at times when I don’t
feel I have grown as a quilter, or I think that everything is wrong with the
quilt I am presently working on. It’s
tangible evidence that I have developed as an artist and that I will continue
to do so. It’s proof that no matter how
much I may be struggling with the quilt I’m currently working on, I can master
it – I have become more skillful with each quilt I make and will continue to do
so.
I think it does us all good to take a look back at our
quilts – from the first ones we made to the one that’s currently under our
needle. They show us how far we’ve
developed as quilt artists and reinforces our confidence – we can master new
techniques and new patterns. At one time
half-square triangles were the scariest
and trickiest thing in our quilting world.
Now we don’t blink twice about them.
This week, I’d really like you to take the time to pull
out a quilt (or pictures of a quilt) that you made several years ago. Look at it closely. I know at first, you’re going to see every
mistake you made on that quilt. Close
your eyes, take a deep breath, and then try to see everything that quilt taught
you. Was it how to nest your seams? Was how to meet corners? Was it how to sew on a border? Then look at the quilty thing you’re working
on now and understand how far you’ve come and how a great deal of what you’re
successful at today, wouldn’t be possible without the quilts of yesterday.
If those first quilts are going to haunt you, let them be
friendly ghosts and not some kind of poltergeist moving thing. And if you’re new to quilting, know that
every quilt you make teaches you something.
Don’t let them daunt you. Keep
working away at it and learn the lessons it wants to teach you.
I was looking through my 2018 blogs last week and had a sudden epiphany: I never talked about batting. With all the techniques I covered, I never specifically talked about batting and why choosing the right kind and using it the correct way makes all the difference in the world with your quilting. Let’s rectify that this week.
Batting, of course, is the center of your quilt
sandwich. There’s the top you’ve spend
so much time piecing and/or appliqueing, and the back. Between these two, there has to be a batting
(at least there has to be if you want it to meet the true definition of a
quilt). And when you talk about
batting, most quilters assume you’re referring to a fluffy substance. Nearly 99 percent of the time that’s true,
but technically the batting is anything that’s used as the center of a
quilt. In antique quilts, it’s not
uncommon to find an old quilt or blanket that’s been used as the batting. For summer quilts, I’ve used a cotton or
flannel sheet as batting.
However, for the sake of this blog, we’re referencing the
“fluffy stuff” that’s sold in bags or rolls clearly labeled as batting (or
“wadding” if you live in some European countries). Batting can be cotton, cotton/poly blend,
wool, polyester, silk, or even bamboo.
The batting sold in bags are labeled queen, king, twin, or
crib-sized. If you only complete one or
two quilt tops a year, the bagged batting may work best for you. For those of us who have long arms, generally
rolls of quilt batting work better, since we try to finish several tops a year. Some of it has scrim and some of it
doesn’t. So how in the world do you
choose which kind of batting to use with your quilt? Well, just as the colors of fabric we pick
determine the look of the quilt, so does the batting. There’s no right or wrong choice, it just
depends on how you want your finished quilt to look.
My go-to batting is 80/20. It’s made of 80 percent cotton fibers and 20 percent polyester fibers. It washes well, holds up to abusive quilting (close lines of stitches), and is generally a great all-around batting. It doesn’t break the bank and I can buy rolls of it at just about any store that sells quilt fabric or most quilting websites. If I’m making a charity quilt, a child’s play quilt, or any quilt for general use, this is the batting that goes in the middle.
However, it’s not the only batting that I use. If I want my quilt to have great drapability
or have a slightly puckered, antique look, I reach for my all-cotton
batting. I also use cotton batting in
show-bound quilts, as this batting seems to show off the piecing the best. That’s because cotton batting is low-loft – it’s a thinner batting. This showcases the piecing more than the
quilting. I also use it for any quilts I
consider heirloom quality.
But….if the quilt is appliqued or pieced and appliqued, I
order wool batting. Wool batting has a
thicker loft, which means my quilting stitches will take the spot light. And when those stitches are around my
applique, that means the applique
will appear to “pop” off the quilt top
and also be showcased. If I really want
my applique to shine, I double-batt – I
use a cotton batt next the backing and a wool batt next to the quilt top.
Hand quilting requires batting that a needle will easily go through without much force. When this is the case, I use polyester batting. I know that 100 percent polyester batting has a bad reputation – the kind manufactured years ago had thin spots in it. However, it’s gotten much better and makes the perfect batting for hand quilting. A needle pushes through without a lot of effort, making it easy to get at least eight stitches to the inch with some practice. If my hand quilted piece is show-bound, I prefer silk batting, which is even easier than polyester to get a needle through. However, silk batting is on the pricey side and I only use it for small, hand quilted pieces.
With any batting, you should read the directions before
making your sandwich and proceeding with quilting. There are a few terms that may appear in the
instructions you need to understand.
Scrim
Scrim – This is a light layer or grid of woven fibers added to some cotton battings. It acts as a stabilizer and helps to hold the batting together while quilting. This can be a good safeguard if the quilt will be frequently washed – the fibers won’t separate.
Bonded – Quilt battings contain a type of glue or bonding adhesive, which means the batting may separate if the quilt is washed. In order to avoid this, close quilting lines are needed to make sure the batting holds up over time.
Bearding – This is something to avoid. It refers to any wispy fibers that eventually seep out of the quilt top. This generally happens with lower-quality batting.
Fusible – While I am not a huge fan of fusible batting (I think it’s stiff), for small projects and quilted items such as bags, it’s a wonderful thing. I’ve found myself struggling with it if I use it for larger quilt tops and I can’t seem to get it to bond evenly and without wrinkling.
Bearding on a Quilt Back
Now for a couple of things you should be aware of with
batting.
If you choose cotton batting, give it a close
eyeballing to make sure there are no seeds in it. Most cotton batting is very high quality, but
even with this, occasionally a seed or two will pass through inspection. Use a pair of tweezers or your fingernails
and remove the seeds. The reason? Over time they will leave a stain.
Again, if you’re going with a cotton batting,
chose white over the natural color. And
I admit at this point, this is more of a personal preference thing. I tend to use a lot of white in my quilts and
the dark flecks in the natural cotton batting can show through.
If
you’re machine quilting on your domestic sewing machine, a low-loft batting may
work best. The high-loft batting is
thicker and takes up more room, thus making it more difficult to maneuver
around your machine’s throat.
Know
when to use black batting. Just like the
other battings, black batting comes in a variety of blends and lofts. I don’t use black batting often, but it is
important to know when to use it. If I’m
making a quilt that has a lot of black and white in it, I will use black
batting. However, I will also plan on
quilting the black areas more densely than the white areas.
I will also use black batting if I’m using vivid reds, greens, blues, and purples. The black batting actually enhances the warmth and richness of the quilt top’s intense dark hues. And of course, if my quilt uses black background fabric, I will use black batting
Needle Punched Batting
There is a right and wrong side to some
batting. Yup – there is. Just like there is a right and wrong side to
some fabric, there’s a right and wrong side to some batting. And if you place your batting wrong-side up,
you can have issues with thread tension as well as bearding. If the batting is needle-punched, there is a
right and wrong side. You can tell if
your batting is needle-punched by giving it a close look. If the surface looks like it has tiny dimples
in it, it’s been needle-punched. And
that side with all the tiny dimples is the right side. The wrong side of needle-punched batting
looks like it has tiny balls all over the surface. That side needs to go next to your quilt
back. If you don’t put it next to the
back, then there is more tendency for your quilt to beard on the front. Here’s the reason why: If you place the wrong side of the
needle-punched batting next to the quilt top, as your quilting needle pierces
the tiny balls, the needle will pull up fibers.
There is a right and wrong side to some
bamboo batting. If the bamboo batting is
needle-punched, you need to make sure you have the dimpled side next to your
quilt top.
If the batting has a scrim, the side with
the scrim surface is the wrong side.
Make sure it goes against your quilt back. The reason behind this is that the side with
the scrim should be the against side of the quilt that receives the most abuse. So, while the topic of which side of the
quilt – top or back – receives the most abuse is a hot one, most batting producers
agree the back of the quilt receives the most abuse since it’s always against
something – a bed, a wall, etc. If the
batting has a scrim and is
needle-punched, go with the dimples against the quilt top.
However, if you’re working with bonded
batting, you can rest easy – it doesn’t have a right or wrong side. And if you’re in any doubt, take a piece of
the batting and push a hand sewing needle through it from each side. Whichever side is the easiest to needle is
the right side.
If you’re quilting on your domestic machine,
always use a new needle. It will cleanly
punch through all layers of the quilt, so bearding for whatever reason won’t be
an option. My favorite domestic machine
quilting needles are microtex and top stitching needles. The size of the needle will depend on the
thread used. Long arm needles are more
heavy-duty and can take the abuse of quilting a top or two (or more depending
on the sizes of the quilts) before being replaced
The longer you quilt and the more different brands of
batting you try out, you will probably find yourself liking one brand over the
other. My very favorite brand is Hobbs,
followed by Quilters Dream and Warm and Natural. I like Hobbs for lots of reasons: They have different lofts and blends, so I can
find just about anything I need for any quilt I’m making, and their customer
service is awesome. They also have a
very informative website, so if I have any questions about what to use, I
generally can find the answer there. And
if not, an email to a customer service rep is answered quickly.
If you plan on quilting your tops (either on a domestic
machine or a mid-arm or long arm), here’s one reason you may want to give Hobbs
a try. They have a sample pack of their
13 most frequently used batts in large 18-inch squares. Purchase a pack, sandwich them with some
quilters-quality muslin and experiment.
This is an economical way to determine which type of batt works best for
you.
Before closing, let me encourage you to quilt as many of your own tops as you can. For years I quilted on Big Red, moved to a mid-arm for a short while, and now am learning Loretta the Long Arm as quickly as I can. I love the quilting process as much as I love everything else (except for cutting out the quilt). Give it a try. You may love it as much as I do.
Hobbs Batting Chart
Until Next Week, Quilt with Passion!
Love and Stitches,
Sherri and Sam
PS – The usual disclaimer applies here. I am not employed by Hobbs Batting nor do I receive any type of reimbursement or fee for endorsing their product. I only promote products that I have a history of using and that history includes consistently great results and superb customer service. In my over 30 years of quilting, Hobbs is one of those companies.
I receive Southern
Living Magazine. My wonderful mother
(who truly is the wisest woman in all the world) gives me two magazines
subscriptions each year at Christmas.
One is Reader’s Digest. The other is Southern Living. I like Southern
Living for many reasons. First is the fashion ads – primarily the
jewelry (drooling over expensive jewelry
is another hobby of mine) and the second reason is the recipes (I gain
ten pounds reading them).
However, one of my favorite columns in that magazine is
one called “The Grumpy Gardner.” Steve
Bender writes the column, answering questions that have been sent into him with
great knowledge of all things involved with photosynthesis. He even has a small side bar called “Grumpy’s
Gripe of the Month.” And sometimes, kind
of buried tongue-in-cheek in his responses is the tone, “I can’t believe you
just asked that question…did you not read the directions that came with your
plants/sprinkling system/fertilizer?”
I mention Southern
Living, Steve Bender, and Steve’s grumpiness as a lead in to this
blog. Several weeks ago, I wrote about the Dumbing
Down of Quilting and received a huge response to it – mostly in my favor. But whether folks agreed with me or not, the
one thing they did consistently tell me was that I was certainly passionate
about it. So, while I’m batting a
thousand on the passion meter, I want to gripe talk about something else
I’m passionate about in quilting and why it makes me as grumpy as Steve and it also
angers me a great deal.
Sharing quilt patterns and books.
There. I’ve said
it. I know at this point I may have made
those of you who do this regularly upset with me. But hear me out and we can talk about it in
the future if I really offend you.
First, let me define what I mean. I do not mean loaning quilt books or patterns out to your friends for them to use and then the books or patterns are returned to you. I mean those quilters that scan or copy patterns and give those copies out to their friends. If you want to get down to brass tacks about why you shouldn’t do this: It’s illegal. Plain and simple. These works (or at least most of them) are either copyright protected or in the process of obtaining the copyritght, so any reproduction of these works for personal gain or not, is illegal. Even if you’re only making one copy of a pattern for sweet Betty at guild and are not charging her one red cent for the copy, it’s still illegal.
“But it’s only one copy…”
I can hear some of you saying that now.
I realize that it’s just one copy and sweet Betty from guild may be a widow living on a limited income. However, that doesn’t negate the fact that you just distributed a copy of pattern that is under copyright protection. And that’s wrong.
Will you get caught?
Probably not. As I’ve said many
times before, there are no quilt police and unless someone takes the time to
contact the pattern designer or the book author and they, in turn, get their
lawyers involved, you will probably continue to skate on the thin line of the
wrong side in this ethical dilemma.
But let’s set the laws of copyright protection aside for a minute and consider the second reason that copying a pattern or book in any form is wrong – and that’s the ethics of the issue. As a published author, here is where this issue hits me the hardest. Let me explain. It’s not easy designing patterns or writing books. It takes time. It takes talent. You pour yourself onto the blank screen of a laptop and rework drawings (if it’s a pattern) and words until you get them just about as perfect as you can. You research. You re-write. Then you upload it and send it off to an editor who proceeds to tell you what else you need to do to make your writing or pattern even better. The editor returns it to you. You make the corrections. The writer or the designer goes through this process several times until they and the editor feel like the project is the best it can be.
And then somewhere in the print world, someone hits
publish. Gears whirl, cyber space churns…then BINGO BABY … you’re
published. The craft world is similar to
the academia world that I have my background in … it’s publish or perish. If you don’t keep yourself out there in the
public eye, showing what you know, that same public that adores you today may
forget you tomorrow. This process takes
time, and for some of those writing and designing in the quilt world, this also
takes money. Many of our favorite designers have to
self-publish their first projects in order to get their books and patterns out
there. At least in the beginning. Then later larger publishing companies may
pick them up and actually pay them as their going through the publication
process.
Once the patterns or books are printed and the designer or
author pays for them, they are usually delivered to the designer or author and
they must sell them. Some of them have
direct lines into stores or websites.
Some of them use the products in the workshops or classes they
teach. Some of them trek across country,
following the line of quilt shows that begin in January and end in October,
setting up a vendor booth and selling to the crowds there. Most of the time it’s a combination of all
three. These are people that are doing
what they love and they’re trying to make a living at it. Every copy they sell helps pay their expenses
and puts bread on their table.
And when you make copies of a book or pattern and
distribute them, you’re stealing.
Yes. That’s right. That sounds harsh, and I mean it to sound
that way. You’re taking away potential
income from that person who probably needs to it pay bills, buy groceries, and
foster their next book or pattern. Every
copy that is illegally made without permission from the designer or author is
taking income away from them.
I get it that some patterns and books can be
expensive. I do. But it’s not inexpensive to produce these
things, either. However, most patterns
and books are reasonably priced. The
designers and authors make sure that their products are priced within most
quilters’ reach so everyone can afford them, and more product will be
sold. If sweet Betty from guild needs
that pattern, buy it for her. Make her day and use it as a tax right-off. Just
don’t steal from that hard-working designer or writer.
Let’s look at another end of this subject: books or patterns that are out of print. This is area is a little more black and white
for me. I’ve had the situation arise
when I’ve seen a quilt that I really, really want to make. The first thing I do is Google (what did we
ever do before the internet?) the pattern and see where I can purchase it. If I keep finding out it’s out of print, I
try contacting the designer/author.
Sometimes this can be a fairly easy process – in today’s world, you can
find people on Facebook and Instagram quickly if they have an account with
either of those – or I may find them through another Google search. I ask them if they have additional patterns
for sale or where can I possibly find one for purchase. If said pattern or book is available for
purchase, that’s what I do. However, if
the author or designer is deceased or directs me to Ebay or Etsy, I have no
issue with getting a copy of the pattern or book from a friend. At that point, there is no additional income
from the product going to the author or designer.
Now I’ll posit this situation: What if you take a pattern,
twist it a little bit, put your own flair to it, and enter it in a show? How would you treat that? It’s certainly not all your work – you didn’t
design the pattern – but a large chunk of it is. Take a look at this little quilt I made:
Those of you who are like me and are avid Esther Aliu fans, know that my quilt is very similar to her quilt, Easter Blessings, as shown below.
Esther Aliu’s Easter Blessing
I based this Springtime wall hanging on Easter
Blessings. I changed the border up,
eliminating Esther’s Easter eggs so I could keep my wall hanging up from March
through the beginning of Summer. My
plans are (if I can get this bugger quilted in time) to enter it in my Guild’s
quilt show in August. On my label and my
paper work I will give Esther Aliu credit for part of the quilt by stating
“Based on the quilt pattern Easter Blessings by Esther Aliu.” I realize that this is a little thing, and
it’s certainly not putting any additional income in Esther’s pocket from me, but
it gives her credit where credit is due. In addition, someone else may like my
wall hanging so much, they may want to make it.
With this extra credit on my label and paper work, that person now knows
where to go and purchase it.
This is a little thing, but it’s an ethical issue. It lets the quilt judge know that the quilt
isn’t all my original work and it gives recognition to the original
designer. Plus, it helps me sleep better
at night knowing all my bases are covered.
One last topic on this subject before I close out this blog. I’ve discussed what is copyright and how to treat those patterns and books that are under that auspice. But you and I both know that quilting has been around for a long time – hundreds, if not thousands of years. There are quilt blocks and quilts that we have no idea where the idea originated. I’m talking about quilts like Storm at Sea, Sunbonnet Sue, Double Wedding Ring, and Irish Chain. Is there a way to give credit to the designer on these?
Unfortunately, no in some circumstances. These blocks and quilt patterns have been around so long that there may not have been copyright available for them in the first place. And they’ve certainly been in circulation long enough that any copyright they may have had has long expired, which makes them part of public domain – they can be used freely without any thought of illegality. My personal rule of thumb is this: If I make a quilt using traditional quilt blocks and no pattern or book is purchased (or copied — for you out who are still going to pilfer copies from your quilting buddies), I don’t give any credit to anyone other than to myself. I simply don’t know who else to give it to. However, if I’ve purchased a pattern or book, the credit goes to the author and designer. My quilt label and any paperwork will list them as part of the quilt process.
I hope this has explained why honoring copywrites is so
important. And I hope it gives you pause
the next time someone offers to make you a copy of a pattern or book. Everyone has bills to pay and mouths to feed
– even if it’s just their own.
And I promise I won’t be so grumpy in the next blog.
There’s an area out in the Western United States that’s
known for its…other-worldly happenings.
Little green men (or little gray men, if you’re an avid X-Files fan)
supposedly have landed in Area 51. You
approach this desert area and Keep Out signs abound – primarily because it used
to belong to the US Armed Forces. Weird
stuff, such as flying saucers, are everyday experiences out there…supposedly.
However, I call bunk on this…not because Area 51 doesn’t
exist…but because I know for a fact that my quilt studio closet is the home of
a large number of UFOs. Probably far
more than NASA has called in by people that may have had one beer too many and
spent too much time in the desert.
And you must understand that when a quilter tosses out the term “UFO” it doesn’t mean Unidentified Flying Object. It means Unfinished Object. Most quilters have a closet full or at least a few. I do myself. Why is this? Why do we quilters, in general, have a difficult time completing one project before starting another? Why do we have several projects we’re working on at the same time?
I can’t say for certain, but I believe it’s primarily because
quilters as a whole are a creative bunch and this creativity is the
culprit. We have a difficult time
working on the same thing day after day.
We get bored. One of the reasons
I particularly adore Sampler-type quilts is that each block (or row or border)
is different. If there is one particular
block (or row or border) I’m not particularly fond of, I know there’s something
different waiting for me in just a few more stitches. I can ride out the discomfort for a little
while and be rewarded soon. There is no
boredom and creativity abounds.
However, I don’t think you can hang all those UFO’s on the
creativity peg. There are other reasons
quilters don’t finish what they’ve started.
The project is a lot harder than what we
thought it was.
We decided we didn’t like the fabrics we chose
after all (or just got tired of them).
We got to a part of the quilt we don’t
particularly like to do in any quilt,
not just the one we’re working on right now.
We think we’ve made too many mistakes.
We misjudged, miscounted, mis-ordered, or
mis-bought and now we don’t have enough fabric to finish the quilt and we can’t
find anymore of what we need anywhere.
We simply got bored with the project.
I’m sure there are even more reasons, but these six seem
like a good place to start. Let’s look
at them one by one.
The
project is a lot harder than I thought it was. This is a big issue with beginning quilters
and even some veterans like me run into this situation. I’ve always been a big proponent of quilting
classes for beginners. These classes can
break down the solutions to lots of quilting problems into easily managed
chunks of knowledge. However, if you’re
working on a quilt at midnight on a Friday, that’s not a great time for a
class, let alone calling or texting your teacher with a question about
binding. What I have found very helpful
is to Google the name of the quilt pattern in question. There may be blogs or YouTube videos on
it. Those are invaluable.
If it’s not the pattern that’s giving you a hard time, but
a quilting technique, you’re still in luck.
Google the issue that’s giving you issues…such as binding. In a matter of seconds literally hundreds of
blogs and videos pop up. Find the one
that looks like it suits your needs the best, point, click, and learn. In my opinion, the internet is still the best
tool today’s quilters have in their possession.
Sometimes it’s not the pattern or a technique that’s the
real problem. Sometimes the methods
employed are tedious or take too much time.
I ran into that problem a few years ago with Lucy Boston’s Patchwork of
the Crosses. The original Patchwork of
the Crosses quilt is old, and like a lot of our treasured older quilts (think
Dear Jane), it was experiencing a resurgence of popularity. This heyday was at its height a could of
years ago when a friend of mine purchased several kits while she was in Florida
and brought them back to show us at one of our guild’s quilt bees. Most of us immediately fell in love with
it. The fabrics were fussy cut and the
resulting tiny blocks were simply gorgeous.
I signed up for the kits and
began receiving two a month. I dutifully
made them, but after the tenth block, I knew Lucy and her Patchwork Crosses
were not for me. I love to fussy cut,
but this fussy cutting was very, very exacting.
And it was English paper pieced – the entire thing. All the background, every piece of every
block…all English paper pieced.
It was too tedious and time-consuming, even for me – and I
love hand work. So, I had a choice. I could either modify the pattern or…
Sell the whole thing.
By this time, I had about 30 kits.
When another friend mentioned she wished she had gotten in on the bottom
floor of Lucy Boston, I made her an offer she couldn’t refuse. I sold her everything – even the blocks I had
so painstakingly made.
And I’ve never regretted it. It wasn’t the fussy cutting that really got
to me, it was the English paper piecing.
By this time, I had experienced the joy of Cindy Blackberg’s hand
piecing stamps and English paper piecing drove me nuts. Will I make a return to the Patchwork of the
Crosses? Probably. It’s still on my Quilting Bucket List. But this time I will use Cindy’s elongated
tile stamp, chose my own fabrics, and it will be a much smaller quilt – not the
56 blocks the original quilt called for.
So, if you’re a veteran quilter and the project just
becomes to difficult, you have some options – alter it, give it away, or post
it on Ebay. One quilter’s headache is
another quilter’s treasure. And let me
assure you, there is no shame in that game.
We decided we didn’t like the fabrics we chose, or we just got tired of them. Right now, let me encourage you to go with your gut with your fabrics. If there is a certain line of fabrics that you always love (such as French General) or a certain type of fabric that makes you happy (like batiks), there is absolutely nothing wrong with seeking these fabrics out when you are designing your quilt. The reason I’m telling you this is a personal experience I had about seven years ago. A group of ladies I quilted with at Dragonfly Quilt Shop decided to make the quilt Hop to It! by Edyta Sitar. It’s a wonderful quilt with vines and flowers and berries and this cute, little bunny in the center block. I was pretty new to this group and let the leader influence me in the fabric selection. Everyone in that group was using the same fabrics as the leader. Instead of standing my ground and picking my own fabrics out, I let myself be influenced too much. As a result, I made three or four blocks and set the thing aside. As much as I wanted to make that pattern, after about six months, those fabrics got on my last nerve. The book, my applique patterns, the fabric – everything – is in a large project box in the bottom of my closet with about six other project boxes on top of it.
Will I return to it?
Probably. With those
fabrics? No. More than likely they will go in my stash.
Take my advice. No
matter how pretty the picture looks on the front of the pattern, if you don’t
like the fabrics or the colors, you have the option to switch it up. Make it something you will love or at
least can live with for several months.
We
got to the part of the quilt we don’t like on any quilt, not just the one we’re
working on right now. As
much as I love to quilt, there are a couple of steps I really have to push
myself to get through. I dislike cutting out the quilt most of all. That’s why I’ve disciplined myself to go
ahead and cut my quilt pattern out as soon as I’ve purchased my fabric and
prepped them. This is a good idea for
two reasons. First, it gets the part I like
the least over with first. And I do mean
I cut everything – borders (I cut these a little longer and then shorten when I
square up my quilt), binding, backing, applique pieces, stems –
everything. If I do this now, then I
don’t have to stop and return to the cutting table. I can keep on sewing and am not tempted to
put the thing back in a project box and put it out of sight.
At this point, I also may discover I haven’t purchased
enough fabric, or I may mis-cut something and need more fabric. By cutting the pattern out immediately after
making my purchases, I’m pretty much assured that I can still get the
additional fabric I need. Three years
later, I may not be so lucky.
The other area I struggle with is binding – the part when
you sew it down to the back of the quilt by hand. It’s not that I don’t enjoy the handwork, it’s
just that I would rather be sewing on Big Red or Marilyn or even Loretta. To get me through this part, I promise myself
a large cup of my favorite latte at my favorite coffee shop when I’m done. I try to find a good movie on Netflix and
watch it as I’m hand sewing. My favorite
way to get through this is to take it to a Sit and Sew or Quilt Bee and do it
there. It’s amazing how great handwork
can be when you’re chatting it up with friends.
In other words, I develop coping skills to get me through
the part I dislike, always with the knowledge that the part of quilting I
really enjoy is just a few stitches
away. My coping mechanisms may not work
for you, so search your soul and decide what will motivate you to work through
the parts you don’t like and keep you from that project becoming a resident of
area 51.
We
think we’ve made too many mistakes. This
can be a real kill-joy. And a lot of
quilters are guilty of this. It’s easy
to look at another quilter’s work and think “She/He is so much better than I
am. I could never to that – or at least
do that as well as they did. Their work
is perfect.”
No. No, it’s
not. It can be really close to perfect –
great, even – but not perfect. No one’s
quilting is perfect. Ever.
Every quilt should be a learning experience. If you come away from any quilt without
learning at least a thing or two (even if it’s a little thing, such as this
quilt needs three bobbins wound before I start sewing), then that quilting
experience has failed you. I always try
to do my best (and I always encourage other quilters to do so, too), but I have
never made a perfect quilt. Every quilt
of mine has mistakes in it, even the ones that have won ribbons. My rule of thumb is this: If I think I’ve messed up, I set that part
aside for 24 to 48 hours and then come back to it. If whatever the mistake is still bothers me
after that, then I redo it. If not, then
to borrow a phrase from Frozen, I “Let it go…”
My point is this: If we redo everything we think we did wrong,
we will never get anything done at all.
Finished is way better than perfect.
And perfection is a destination none of us will reach this side of
Glory. Don’t let perceived mistakes stop you from finishing that project.
We
misjudged, miscounted, mis-ordered, or mis-bought and now we don’t have enough
fabric to finish the quilt and we can’t find any more of what we need anywhere. Quilters are no different
than any other artist. This happens to
us all at one time or another – we run out of material or run short. Usually this happens late on a Friday
night when all the stores are closed and even Amazon Prime can’t promise us our
fabric until…oh, maybe Tuesday. The
BEST way to avoid this situation is to do what I have suggested several
times: As soon as you’ve purchased and
prepped your fabric (if you’re a pre-washer), go ahead and cut the quilt out.
That part will be over and done and if you’re running short or make a
mistake, it can be quickly and easily rectified by another trip to the store or
a quick point and click venture on the internet.
But….what if this didn’t happen? What if, between the time you’ve purchased
the fabric and started the quilt, several years go by (hey…life happens…this is
a judgement free zone). Or what if you
simply purchased some eye-catching fabric several years ago and now it just
works for the quilt you want to make. In
the first situation, a mistake could be made cutting the quilt out or there may
be an error in the pattern. In the
second case, you had no idea how much fabric to purchase for the quilt to begin
with – you just bought several yards because you liked it. In either case, now you’re looking at a
fabric shortage and it’s breaking your heart.
Don’t despair.
There are a couple of ways to overcome this obstacle. The first one is the easiest: Make the quilt smaller. Instead of making a queen-sized quilt, make a
throw, twin, or lap-sized quilt. This
down-sizing should take care of the fabric short shortage.
However, if you still want to try to keep the quilt the
size desired, and if the fabric is several years old, the first place I’d look
is Ebay. Ebay has saved my quilting
sanity more times than once. If it’s not
there, try Facebook Marketplace. And
Facebook (I know…it’s a love/hate relationship with good, ol’ FB), has lots of quilting pages that will let
you post what you’re searching for. Most
quilters have been in the same situation you’re in, and if they have it in
their stash, they’ll either sell it to you at a reasonable price or give it you
if you pay postage.
Just don’t let a fabric shortage permanently derail your
project. There are options out
there…work them.
We
simply got bored with the project. This
one is a little more difficult to manage because what works to get me out of a
boredom funk may not be effective for you.
I can tell you how I manage my quilting life, but again, this works for me.
You know yourself better than anyone and some of what I’m going to
suggest may help you, none of it may work, or one or two ideas may be very
effective.
First, I’m not one of those quilters who can work on one
and only one project from beginning to end.
I learned early on that I need a minimum of two projects going at one
time to keep my interest – one that’s heavily handwork (so it’s portable and
can be worked on while watching television) and one that’s primarily machine
work (because I do love my machines).
The maximum number of quilts
I’m happiest working on at the same time is three. Currently, that is enough. There is always another quilt I can turn to
if I get bored with the one I’m working on.
Three is also not an overwhelming number to me. Remember, quilting is not my vocation. I work full time. While some women have the wonderful
opportunity to spend several hours a day up to their elbows in fabric and
patterns, that is not where I am in my life right now. Three is a comfortable number at this point,
but that number may increase when I retire.
So, my suggestion is to have a couple of projects in progress at the
same time, this way when you get bored with one you can turn to another. Then return to the other quilt a bit later. Just
don’t have so many in progress that you feel overwhelmed.
Second, I bribe myself.
Don’t judge. It works. If I get really stymied on a quilt, I
promised myself a cup of my favorite latte or tea, a good piece of chocolate,
or something else my little heart desires if I get to a certain point on the
quilt pattern. Often this act of
progress is enough to push through the boredom and spur me on to the finish
line. You know what works for you…go
with it.
The third thing I do – and this is a completely LAST
resort – I put the thing in time out. I
put the quilt top, pattern, and everything else that I need for that quilt in a
project box and put that box under my sewing machine table. Why there? Because I will see it several times a week,
and this reminds me that while that project and I are spending some quality
time apart, we still need to get back together, and I need to finish it. And this time apart is not a divorce, it’s a
vacation. I give myself a time limit –
three weeks, a month – something reasonable.
I mark it on my calendar. At the
appointed date, I take it back out and resume the making the quilt. Most of the time, this is all I need. If not, then I seriously consider finding this
project a new home.
In closing, at this point, I could get really cutesy and
trite. I could tell you to avoid making
your studio an alien destination like Area 51 full of UFOs. But I won’t.
I will tell you this: Every
minute you make time to sew, even if it’s just a few stitches, hastens the end
of a project. It propels you towards the
finished line and finished is better than perfect (just ask anyone who’s made a
Dear Jane). Learn how to work your
project and what to do with yourself if you get into a funk and can’t seem to
finish that project. This is like a lot
of things with quilting – and with life itself – trial and error are the names
of the game. Take the time to find out
what works for you.
It has been a long time since I’ve written a blog with lots of pictures of projects I’ve been working on. I quilted a lot last year. It was my therapy when everything seemed to be going south in my life. Even a stitch or two, here and there, gave me a few minutes of clarity and peace.
My guild’s vice-president issued a challenge last year. Matthew challenged us to make a mini-quilt each month, roughly 12 x 12-inches square, to reflect a theme that he would give us. With some of these themes, he’d issue an additional challenge, such as use a technique you never have before, or use a certain color.
I love a challenge, and even with everything going on in my life, I couldn’t say no. I started out obeying the 12 x 12-inch standard; however, pretty soon that became merely a suggestion and not a rule — not only with me, but with a lot of my guild friends. The mini quilts were never smaller. Many times they were bigger as the design would dictate. By the end of 2018 they had became wall hangings. I had a ton of fun and my binding game really improved as well as my domestic machine quilting. I also worked out quite a few of these designs using my EQ8 software, so I also had the opportunity to get proficient on that. All of the quilts I made are below, along with what I learned along the way.
February’s Quilt
Matthew announced the challenge in January, so our first mini-quilt was for February. At this point, you can see that I stuck to the 12 x 12-inch size. I paper pieced hearts for this this month and I learned that you really must pay attention when a design needs to be reversed. This pattern is one I designed using the EQ8 software.
March’s Quilt
March’s challenge was to use green. I’ve always thought that green and purple played well together, and I love my basket weave binding. This little quilt was completely pieced. Now let me set that sentence in perspective. Do you remember that blog I wrote about atrophied skills? That warning came into full play at this point. Prior to making this quilt I had paper pieced two huge quilts – The Farmer’s Wife and The Halo Medallion. My piecing skills were sub-par of my expectations and standards. What should have been a 12 x 12-inch quilt meandered out to 13-inches. I am happy that my points all meet, but oy-vey. At this point I began to push my piecing skills again.
April’s Quilt
For April I came up with a sweet Sunbonnet Sue block. Sue has always been one of my favorite quilt characters. The challenge for April was to use some kind of embellishment. The applique on this block was raw edge and I used the machine applique stitch as part of the quilting process. Since April showers were called for, I had Sue taking a stroll through the rain and I used crystals as the raindrops. That fulfilled the embellishment part of the challenge.
May’s Quilt
If April showers bring May flowers, then I did well with this block. Of all the mini-quilts I made, I had the most fun with this one. It came from a pattern in EQ8 that I modified slightly. At this point, you can tell I was definitely straying from the 12 x 12-inch rule. The background is pieced with blue batiks and the flowers were just a delight to applique. Matthew asked us to use a technique we’ve never done before as part of May’s challenge. When you’ve been quilting as long as I have, that in itself can be a challenge. By now, I’ve tried almost everything I’ve wanted to undertake. The stuff I haven’t done yet is generally techniques I simply don’t want to try. However, I’ve always wanted to use painter’s tape as a guide for quilting and that’s what I did with this quilt. Did I like this new-to-me technique? Absolutely. So much so that I now have blue painter’s tape in every width available. Old quilters can be taught new tricks and they may even like them.
June’s Quilt
For June, we were told that the block had to represent either a place we’ve been on vacation or want to go to get away from it all. Of all the quilts I did in 2018, this represents me the most. Anytime I go on vacation, I want the ocean, quilt shops, coffee shops, wine shops, friends, and family. It doesn’t seem like a get-away unless all of these come into play. I went narrow and long on this quilt and ended up putting thick books under my small quilt rack so that the thing would hand straight.
July’s Quilt
July was red, white, and blue or anything patriotic. Again, I turned to EQ8 (I had the most fun with that program this year) and came up with this. The Applique Society used this as their cover quilt picture for July on their members-only Facebook page – and I was very honored. I really enjoyed appliqueing the stars on this one.
August’s Quilt
By August I was challenging myself in all kinds of ways. I quilted the block in a crosshatch pattern before I appliqued it. And again, I used the applique stitch as part of the quilting process. The EQ8 program was once more used to design this sweet block. There were tiny circles and paisleys and I employed the embroidery stitches on Big Red to make the tiniest circles on the butterfly and the watering can. Up to this point, this has been the most challenging mini-quilt I had made in 2018.
September’s Quilt
September was a bit of a tossup for me. As a former high school chemistry teacher, September always meant lesson plans, school rooms, and labs. At some sweet spot in my career, I received a paper piecing pattern that had the molecule for coffee in it. I nearly made that but thought that only a few people would truly understand that quilt. Instead I opted for apples. This was made from a down-loadable pattern from Keepsake Quilting. I’ve rarely use red in any quilt (except Christmas ones), but I gotta say, I’m in love with the red in these apples. I think red will be showing up in more of my quilts.
October’s Quilt
There was no doubt that October meant Halloween and this little quilt was fun from start to finish. The Jack O’ Lantern came from my EQ8 software. I added a gray kitty for Sam and threw the whole thing on a purple background. I quilted a spider web in the background and bound it with fabric that had candy corn on it. I also used the same fabric for backing. As soon as Meagan saw it, she claimed it. I haven’t given it to her, but I will probably end up making two more – one for her and one for my son.
November’s Quilt
By November, I was itching to go big or go home. Since the wall in my home’s entrance was could use a bit of updating, I decided to make a fall wall hanging. This pattern came from The Big Book of Table Toppers published by The Patchwork Place (which is a really wonderful book to have in your library). I cut the quilt out at home and took it with me to retreat to finish. I appliqued it by hand using the Apliquick method and began quilting it at retreat on Big Red.
December could have meant so many things. I love a good old-fashioned looking Santa. I love stockings and candy canes and presents. I love going home and spending time with my family. I love get togethers with my friends that have become like family. But the Heart of Christmas means the most. I wanted to do something different. At some point in time I saw a quilt with a similar block in it. I cannot remember the designer (if you know, please tell me so I can give him or her credit), but I love the block. To me it means you can have all the traditions you want, as long as you know the real meaning of the season. Everything else pales in comparison to the Baby in the Manger.
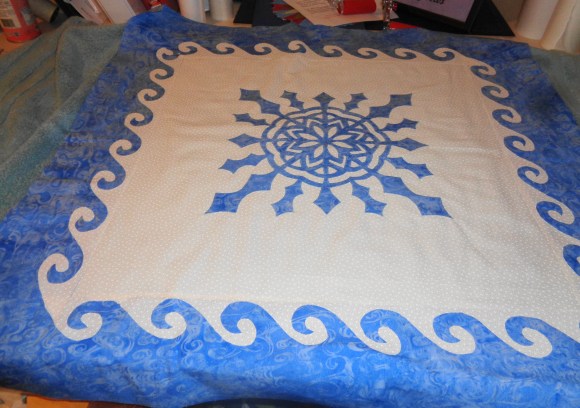
The last quilt was for January. I decided I wanted to go with a snow theme and found this wonderful pattern in Fons and Porter’s Our Best Seasonal Quilts. The applique on this thing is outrageous. Remember cutting out paper snowflakes in grade school? This is very similar and allllllll those tiny spaces that show white through the snowflake alllllll had to be cut out. And then stitched around. It was challenging, but fun. I quilted it with Superior Threads Metallics #31. It gave the top a sparkle but didn’t give it too much “bling” factor. I did alter the pattern and omitted the mitered border, so I could make the quilt bigger than the pattern called for.
There you go… my year in stitches. I learned so much. I got the chance to push myself creatively as a quilter and it opened up my mind to new ideas I had never entertained before. It was fun and challenging. And that’s what a good challenge should be. If you’ve never participated in a quilt challenge, there’s all kinds of ones out there on quilt sites, in magazines, and of course in conjunction with a local guild. I encourage you to try one or three. They can teach you so much about quilting and yourself.
I am talking this week about a topic I feel verypassionate about.
So…
If you are a sensitive person, this blog is probably notfor you.
If you think consistent seam allowances are merely asuggestion, this blog is not for you.
If you think turning out quilts en mass is the best thing since sliced bread, this blog isdefinitely not for you.
If you think that good technique is optional, then do meand you both a favor and just stop reading right now.
And if you think just anybody can turn out a great quiltpattern…you’re delusional.
The topic I would like to discuss is this: The Dumbing Down of Quilting. This is not a new idea. Around 2011, when the Modern Quilt Movementwas getting its legs, this was a fairly hot topic floating around the quiltsites on the internet. I kept quiet atthat time, still sifting the topic through two filters: That of a quilter and that of a high schoolscience teacher.
See, as a teacher (of both science and quilting), I realized something – in order to get folks starteddown the path of success in either field, you couldn’t throw advanced topics atbeginners and expect them to grasp those immediately and be successful. You had to start with the basics, emphasizethem until the student fully understands them, and then build on those precepts. What I saw in the quilting arena was theopposite. We had one group of moreexperienced quilters who were expecting a younger group of quilters to be justlike they were, perform just like they did, make quilts just like everyone elsedid, and be completely successful without much teaching.
And from the younger quilters I saw more attachment toblogs, the internet groups, Facebook groups, Instagram, and Pinterest than Idid actual personal contact with quilters who had been toiling at their art foryears and knew a few things that the latest, greatest quilt blogger didnot.
There was a great deal of arrogance on the part of bothgroups.
In my mind, we more experienced quilters had to realizethat the new generation of quilters probably lacked two things that we took forgranted: We had sewing classes in highschool (where I attended, those classes were mandatory), and we had mothers orother family members that sewed. Wecould go to them with questions. The next generation lacked one or both ofthose factors.
Thus, the Dumbing Down of Quilting began.
Allow me to explain my way of thinking about this topic.
Like all great wars (and I do consider this a battle), thejump to a full-fledged assault didn’t begin with just one issue or oneaction. As the Arts and Crafts movementbegin a resurgence in popularity, fabric designers saw an opportunity to cashin on the development. This process ledto more lines of fabric, more attention to popular colors (such as the PantoneColor of the Year), as well as more internet sites from which to purchasematerial. We were barraged with the newcolors and patterns. This wasn’t a badthing. Pretty fabric attracts new sewersand quilters. Fabric websites wereselling their goods a brisk clip – which unfortunately eventually led to thedemise of many LQSs.
Along with the fabric came a new bunch of folks thatthought they could design patterns and instruct quilters. If there’s that much fabric in the retailmarket, sewers and quilters had to have something to make with it, right? So, enter new patterns designed by peoplewe’ve never heard from before. Andthere’s two-pronged blame for this: The fabric producers and the publishingcompanies. The fabric manufacturersneeded patterns that would highlight their material and the publishingcompanies needed to sell more patterns.
There is nothing in itself wrong with this. This is what drives the retail market andconsumerism. This is what keeps fabricand pattern production profitable and allows both fields to reinvest intechnology, employees, and better-quality goods. This keeps material and patterns affordablefor the consumer. The problem is, thatat least as far as some of the pattern production goes, it seems fact-checkingthe pattern went out the window.
Let me give you an example. I hope that you have heard of the Mountain Mist Batting Company and their patterns (if not, stop right now and Google it).
From 1929 until 1970, Mountain Mist Batting Company included a free pattern printed on the wrapper of their batting. These patterns consisted of traditional pieced blocks or applique quilts. The batting company had a group of quilters that worked with them, and each pattern was made several times by different women in this group in order to ensure the patterns were correct, clearly written, and easily understood.
If you understand the timeline of 1929, you realize thatthis was the beginning of The Great Depression. Paying these women was an added expense, but it was one that MountainMist surmised was necessary in order to keep their product not only sellingwell, but also to have return customers. And it was wildly successful – far beyond anything anyone expected. Their quality product was both profitable andpopular.
Let’s take a look at today’s market. It’s faster-paced than Mountain Mist ever wasat its zenith. There are digitaldownload patterns as well as books and paper patterns. The quilt pattern market is flooded by namesof designers we’ve never heard of before and some I hope to God never hear fromagain.
Why?
Many of their products are seriously lacking in clear instructions, correctness, and are difficult to understand. I’ve experienced this on a personal basis. Remember this quilt?
Well, I am still working on it. But the directions are horrible. One of the first things I do when I begin anew pattern is to Google it and see if there are any blogs, YouTube videos, oranything else out there written by quilters who have made this particularpattern. In this case, there was nothing. That should have been my first hint and Ishould have backed off. But I hadcommitted to the project with a couple of my quilting buddies.
Now as I have lamented before, the book for this quilt iscrap. There are few directions, lots ofline drawings, and a few helpful odd and ends, but that’s it. Here’s what I think happened (I can’t proveit, but I think it’s a plausible theory). Mary Buvia made the quilt, never thinking that it would become a book orpattern. She started the quilt as a wayto deal with her husband’s cancer. Shemade the quilt, entered it in an AQS show and to her credit, she won aribbon. And with this ribbon came thequestion: What pattern did you use? Well, it was her pattern. It came fromher heart and her head…from her advanced knowledge and experience. I bet she never imagined that AQS would askher to write a pattern for it and that pattern would become a book.
This is where I lay the blame at AQS’s feet. They probably took Mary’s notes and goteverything in book form while the interest in the quilt was at itshighest. I can say with more than a fair amount of certainty:
They never proofed the book for more than just grammaticaland spelling errors.
They never had anyone else construct that quilt in orderto make sure the directions were clear.
Because if they had, the book would be much, much betterthan it is.
And from what I hear, this same issue is coming up in moreand more quilt patterns. I have gottento the point that if I use a pattern, it’s from someone that has a track recordof producing really, really good patterns with real accuracy and really cleardirections. I firmly believe that todaythe race is to get the pattern on the market at the same time as the fabric –not to quality-test it before it’s released to the quilting community.
In some ways, this factor (erroneous patterns) has led tothe second aspect of The Dumbing Down of Quilting: Lack of attention, respect, and commitment onthe part of quilters. They not onlyaccept these poorly designed quilt patterns without so much as a whimper, butthey have also sacrificed technique on the altar of speed.
Before everyone stops reading at this point, let meplainly state There Is Nothing Wrong With A Quick Quilt. As a matter of fact, every quilter shouldhave two or three quick quilt patterns in their files for baby quilts, hospitalcomfort quilts, and surprise gifts. Butthe steady diet of these has led (IMHO) to a dumbing down of the quilter.
The act of quilting is a gift. Not just to others, but to you. Quilting works both sides of the brain – the theological, mathematical side and the artistic side. It’s a gift to your mental state andemotions. Difficult patterns andtechniques allow both sides of your brain to stretch and exercise. It helps alertness and there is some medicaltalk about it preventing Alzheimer’s and dementia.
However, this is not the only reason to execute goodtechnique or difficult patterns. Let’sstart with technique.
When you began to quilt, what did you learnimmediately? Most likely it was to keepa consistent ¼-inch seam allowance, be accurate in your cutting, and careful inyour stitching. More technique camelater, after the basics were grasped. However, I feel that many times in today’s quilting world, with thelatest and greatest quilt patterns along with the latest and greatest quiltfabric, we’ve given up technique for cleverness.Let me explain. Sometimes – many times –we admire a new quilt designer for her patterns and those patterns fly in theface of good, standard quilt technique. Points don’t match? No bigdeal. Blocks aren’t a consistentsize? Don’t take them apart, just throwsome coping strips around them. Appliqueis off-center? No one will notice. Top stitching is all wonky? It doesn’t matter. Your quilt top isn’t squared up? Surely that will quilt out…
I am all for cleverness, dear readers. If there’s a quick, accurate way to makehalf-square triangles, pinwheels, and do set-in seams, I am in line to learnhow – as long as it doesn’t sacrificeaccuracy and solid, quilting technique. I’ve seen too many times in recent years where quilters’ work has justbeen down-right sloppy. Maybe this isthe look they were going for…maybe some of them just hadn’t been taught ortaken a class…but to continue to accept this as the “quilting norm” does asmuch harm for our art as a fire would roaring through the National QuiltMuseum. It kills off what makes ourcraft unique and wonderful. It erasespart of our history.
For awhile many “traditional” quilters tried to lay this lazinessnew phenomena on the backs of Modern Quilters. And in the beginning, since a lot of these new quilters were new toeverything – the sewing machine, quilt patterns, etc., – that could have heldsome truth. But we’re at least ten yearsout from the Modern Quilt beginnings and that no longer rings true. Sure, these quilts are many times simplerthan what a lot of my generation makes. However, there is nothing wrong with simple, especially when it’s executed well.
Frankly, we have accepted poor designs without so much asa whimper and have also allowed ourselves to accept less than our best with ourwork. And in the process the entire artof quilting is suffering what I consider to be a Dumbing Down.
I’m fighting this battle hard. Here’s what I’m doing, and I hope you willjoin me in the war.
If one of the less-than-stellar patterns fallsinto my hand, I contact the designer and let them know. If it has errors, I let them know that,too. Sometimes I get a response andsometimes I don’t. But primarily, I letmy dollar do the talking. If I use yourpattern, and your pattern is crap, I don’t buy from you again. And I tell my quilting friends your patternstinks.
Withevery quilt, I do try to keep the basic techniques as perfect as I can getthem. No quilt is ever completelyperfect, but if I try as hard as I can with each quilt, pretty soon my quiltswill be as close to perfect as they can get. And I may catch a handful of show ribbons along the way.
Irefuse to make the same quilt over and over again. Part of quilting is learning. And you can’t learn new things if you don’ttry new patterns. Or try making your ownpatterns. If you keep doing the samething over and over, you’re getting the same results. I only make the same quilt twice if it canteach me new things. Dear Jane is one ofthese quilts. So is The HaloMedallion.
Ibelong to several Quilt Bees, groups, and a couple of Quilt Guilds. These members are generally pretty seriousabout their quilting. They are generouswith their knowledge, but they do not suffer fools lightly. If your work is bad, they pull no punches. They’ll tell you. And then they offer suggestions on how to fixit.
This topic has weighed heavily on my mind for a while nowand The Dumbing Down of the Quilt is the primary reason my 2018 blogs were so“teachy.” I wanted quilters to have areference point – for the folks that are quilting today and the others who maytake it up five years from now. Goodtechnique is part of our culture as quilters. We lose it, we’ve lost part of who we are.
I like having a theme for each year of quilting. In 2017, we were Quilting Fearlessly, and in 2018 we were Quilting with Excellence. Each of those themes were a deliberate choice on my part. In 2017, I wanted everyone to realize that they had the power to change things up in their quilting – no one was holding them back but themselves. In 2018, I had a strong desire to make sure that everyone – new quilters and experienced ones alike – had the basics down pat. But for 2019, I want passion involved in everyone’s quilting.
There are a couple definitions of Passion. When you Google the word Passion, the first
meaning that comes up concerns the life of Christ and more specifically that
concentrated time just prior to and during His death. This is obviously not the definition we’re
looking at. It’s the second definition of passion that I want
to emphasize this year: an intense desire or enthusiasm for
something. Synonyms for passion are fervor, ardor, enthusiasm,
eagerness, zeal, zealousness, vigor, fire, fieriness, energy, fervency,
animation, spirit, spiritedness, and fanaticism. If you’ve hung with me for the
past several years, you know that I am incredibly passionate about quilts,
quilting, and quilters. In the words of
my husband, “She’d rather quilt than eat.”
That’s true. And I love a good meal.
I’ve always loved quilts. From the minute my mother gave me my great-grandmother’s quilt, as corny as it may sound, that quilt whispered something to me. “I have a history,” it said. “And it involves your kin. Your blood.”
Great Grandma Perry’s Quilt, affectionately known to me as “The Quilt that Started it All.”
So, I set out to learn as much as I could about the fabric in the quilt and then about the maker. I can’t describe how excited I was as my mother would point to certain patches and tell me, “That was from one of my grandpa’s shirts,” and “That was from one of my grandma’s dresses.” Those feed sack remnants quilted with heavy cotton thread on top of a castoff Fieldcrest blanket sang a song that completely bewitched me. In return, I learned as much as I could about the quilter.
Annie Elizabeth Wolfe Perry
Annie Elizabeth Wolfe was born August 4,
1890 in Virginia. Her father was
Marcelle (Sell) Wolfe and her mother was Susan Buskell. She had four sisters, three brothers and two
half-brothers. She married my
great-grandpa, Felix Gather Perry on May 13, 1908 in Johnson County,
Virginia. By 1910, they were living in
Leaksville – which used to be a small town in Rockingham County, North
Carolina. Years later it was swallowed up
by Eden. Her husband died in 1958. She had four daughters and three or four
sons. My grandmother, Cora Perry Forbes,
was her third daughter. Annie passed
away on October 21, 1971 from pneumonia at Annie Penn Hospital. She was 81. She’s buried in Roselawn Memorial Garden
Cemetery in Rockingham County.
And between birth and death, she
quilted.
Since the time of gifting of her quilt to
me and now, I’ve had the extra-ordinarily wonderful opportunity to meet so many
quilters and see so many of their quilts. When I started researching the quilts
and their makers, I had only the intention of making one or two quilts. But as I talked with quilters, their passion
for the craft rubbed off on me. While a
great deal of my passion for the art still revolves around quilters and their
quilts, most of my excitement now is making my own quilts that, hopefully at some point in the future, will tell
their own stories to my children and grandchildren.
What drives your passion for
quilting? Is it a certain type of
pattern? Fabric acquisition? A color?
Or the euphoria that comes from making something with your own
hands? Is it the creativity of the
art? Is it the fellowship with other
quilters? Or is it a combination of several
of those and some I haven’t mentioned?
There is probably as many reasons for loving the craft as there are quilters. This is what I want us to focus on in 2019 –
what puts our own personal zeal behind the art of quilting.
I enjoy most steps of the process. The one I like least is cutting the quilt
out. After that, I’m good with most everything else. That’s why I cut everything out at once when
I start a new top. That way I don’t have
to go back and re-visit the cutting table!
I can just keep stitching. What I
enjoy the most is changing up a pattern to suit my tastes and needs. Take this quilt:
Winter on the Ohio
This quilt is from Our Best Seasonal Quilts. These are quilt patterns that have been published in Fons and Porter Magazine. The name of this little beauty is Winter on the Ohio. The original quilt measures 21 x 21-inches. And that cute, mitered blue border? That was mitered off the quilt top and appliqued on.
Who came up with that nonsense? If you’re
constructing the mitered border off the quilt and then appliqueing it down by
either hand or machine, you’re dealing with some serious bias. So, I began playing with the pattern. There were some important factors involved.
I really liked my November wall hanging. It was a nice change. The same pictures had hung in this spot for several years, and it was time for something different.
As a result, I decided
that I wanted to do a winter wall hanging that could stay up until March. The size of the original quilt was a bit
small for my entry way. To make the
quilt bigger, I sewed the original 5-inch borders the pattern called for to the
edges of the background instead of the insanity of mitering them and
appliqueing them on the white fabric.
This increased the quilt size by 10 inches, a size much more suitable
for a wall hanging.
Notice the little, curly white pieces around the blue border. These are cut separately and appliqued down. Of course, there is a pattern for these in the book, but it is for the original quilt size of 21 x 21-inches. Since my quilt now measures 31 x 31-inches, I knew I would have to play with the pattern – make it a little bigger and a little longer. It didn’t help matters that my quilt’s dimensions are prime numbers. Prime numbers! What was I thinking! However, I did the math just right, and pulled it off without too many mishaps. I also had to reverse part of the pattern to pull off the corners just right.
Did it take more time than I thought it
would? Absolutely.
Am I glad I did it anyway? Absolutely.
I love it. I took a pattern,
changed it to suit me, didn’t sacrifice any of the basics, and made that quilt
mine. Although a bit difficult to
execute, my heart and mind soared through the process and I found myself a bit
disappointed when it was done.
That is the feeling I am pushing for this
year. I want that feeling of soaring and
loving what you’re doing with your quilts to dominate this year. In a world where we are constantly barraged
with negativity, this should be the area where your heart and soul takes
flight.
Normally, it’s at this point I give my annual “State of the Quilt” address and discuss my predictions from last year – how many came true and which ones didn’t – as well as make my predictions for the New Year. And I’m going to do that…but then I want to talk about the State of the Quilter … and that quilter being me.
Last year, this is what I predicted:
That younger group of quilters will
make their voices heard. I was right about that one. At the end of 2017, I wrote about the second
largest group of quilters – the ones 45 years-old and younger. I see more and more modern quilt patterns and
more local modern quilt guilds. At the
last local quilt show I attended, this Modern Quilt Group had a large display
section all to themselves. I am
incredibly thankful to be right about this.
And what thrills me even more is that the “traditional” quilters were
right there, mingling with the “newbies” and swapping quilt patterns and
tips. Keep it going folks. Pass the art along to the next generation.
More
on-line classes will be available for quilters of all levels. Definitely
right on this one. Have you looked at
what Craftsy or The Quilt Show is offering?
Oh. My. There is something for everyone at every
level and every interest.
I
see a new group of quilt teachers. I haven’t seen this yet. I’m still seeing the same names (not that
there is anything wrong with
this). I’m waiting on the next rising
star to make herself or himself known.
Quilting
is not a dying art. It’s not. Numbers may have fallen off a tad this past
year (I’m still waiting on the latest numbers and will let you know), but it’s
still vital and growing and strong. The
number of attendees at quilt shows is pretty stable as are the number of local
guild members.
So, what are my predictions
for 2019?
I think
there will be a return to traditional quilting. By this I mean I think we will see a
resurgence in hand quilting and hand piecing, a renewed interest in significant
historical quilts, and a return to traditional quilt blocks.
More acceptance of embroidery machines as
part of the quilting landscape. Believe
it or not, this is a hot-button issue among quilters and administrators of
quilt shows. Embroidery machines are
pre-programed and all you do is switch out thread. The real art involved is developing the
programs and making quilts out of the embroidered pieces. However, just as machine-quilted quilts were
once thought of as “not real quilts because they weren’t hand quilted,” I see
the stance against machine embroidery work softening. Why?
Because so many of us have and enjoy these machines.
The layout of fabric stores and quilt
shops will change.
Because there are more and more younger quilters, retail and on-line
establishments will have to change in order to remain viable. This means different fabrics and machines
available to rent by the hour. Call it a
“try-it-before-you-buy-it” mentality or simply tuning into the fact that this
new generation of quilters doesn’t want to own several machines, but more
retail dealers will not only offer machines to rent, but spaces to cut out
patterns and meet with quilters. This is
awesome…especially if there is coffee thrown in that mix.
This is where I think quilting is heading, but I promised
earlier that this blog is more about the State of the Quilter (and that quilter
being me) than the State of the Quilt.
Let me be blunt: 2018 was absolutely the worst year of my
life and I am more than happy to see it leave.
To recap: 1. My daughter was diagnosed with cervical
cancer.
2.
My mother’s anemia and internal bleeding re-occurred.
3. My brother – my only sibling –
was diagnosed with MGUR. This is a funky
extra protein found in the blood that could bode for serious illness in the
future.
There were days I dreaded answering my phone because I
simply could not take another phone call where something else – anything else,
large or small – was going wrong. I worried all the time. I felt as if I was perpetually on a set of
monkey bars – swinging from one emotional bar to another every day. If I didn’t
“crash” at any point, I was having a good day.
I’d take a shower just to go somewhere and cry, so no one would know how
stressed I was.
It. Was. Awful.
But let me also tell you something else…I have discovered
that God’s grace and His mercy are indeed new every morning. I have re-discovered the power of
prayer. I know first hand His love.
The first part of 2018 was the worst. Meagan’s surgery was successful, but she was re-hospitalized twice. One of those times I thought I was going to lose her. This mother’s heart broke for my daughter. My mother’s hemoglobin level plummeted. And through follow-up tests for vertigo, my brother discovered this protein in his blood. It was a scary, scary time. I prayed as I’ve never prayed before and through this, I learned that His presence was real and His care unmeasurable.
I’ve also learned to thank God daily for modern
technology. While any or all of these
medical issues could have been tragic as few as 10 years ago, today they are
not. As of this blog, my daughter is
cancer-free. She is still undergoing Pap
Smears every three months and will for the next two years. A new gastrointestinal specialist tested my
mother for a stomach bacterium that came back positive. This may have been the issue all along. And it’s one easily treated with
antibiotics. My brother’s protein levels
have remained consistent and he’s under the watchful eye of a specialist. He has his blood tested every three months so
that if the protein does spike, the doctors can catch it early. I pray for each of them daily…and thank God
for Wake Forest Baptist Hospital and Duke Medical Centers.
I’ve learned a great deal this year…about Him and about
myself. I can struggle through difficult
times, or just keep putting one foot in front of the other and keep
moving. I can collapse under the weight
of hard times or trust God to keep me upright (and sometimes carry me).
Still…. I was more than ready to kiss 2018 good-bye and
tell it good riddance.
My blogs this year are going to reflect some of what I’ve
learned and some of what I hope you learned from reading my highly
instructional columns from last year.
And because this year will be more personal, and I will tell you how
quilting kept me sane more days than not, I have decided that our theme for
2019 will be Quilt with Passion.
This is the last blog post for 2018. I have had one goal with this year’s theme Quilt with Excellence: Go back over the quilting basics and hone in on those skills. As any coach (athletic, academic, or art) will tell you, repeating the basics, practicing the fundamentals over and over again is really what makes you a better athlete, academic, or artist. The reason behind that theory is this — You can’t move on to harder stuff until a true understanding of the basics is there. Those basics should come as natural as breathing. They should be second nature. I wrote almost every one of 2018’s blogs from the stand point that each reader was pretty much a beginner. In writing this way, it allowed me to carefully emphasize each step and try to explain it fully.
Why all this emphasis on the basics? Because 2019 will be a bit different for my blog. It will be more personal, for sure. Less teaching and instructing and more just assuming you folks know what you’re doing. It will be more creative and less structured. But before we leave 2018, I would like to leave you with these recommendations for any level quilter – beginning or advanced – that should set you up for always Quilting with Excellence.
Don’t ever become discouraged. Sometimes it’s easy to get in a funk with your project. The reasons for this can vary from you’ve simply worked on a project too long or it’s a little beyond your skill set. I would like to encourage you to take a break from a project if you need to or hit up YouTube for some tutorials if that’s the problem. But don’t abandon the art just because you’ve hit that quilting wall.
Learn quilting terms. Every hobby, profession, etc., has its own jargon – terms and lingo only associated with that area. If I slung the term fat quarter out at a grocery store, I’m sure someone would think I was pondering the poultry poundage of a possible purchase. Throw that same term out at a LQS and it’s understood. If you come across a term you don’t know, look it up.
Buy the best fabric, thread, needles, and machine you can afford. Once the quilting bug has bitten, make sure you have the basics in your sewing caddie – seam ripper, scissors (for paper and fabric), mat, rotary cutter, pins, etc. But don’t skimp on the important stuff. When I first began quilting in 1986, I was on a budget. I would walk into Piece Goods (remember them?) and head straight to the remnant section. That department held small quantities of quality fabric. This buying strategy allowed me to practice on good material that didn’t bust my checkbook all to pieces. If I made a mistake and had to “unsew,” this fabric could take the abuse without fraying. Likewise my $200 Singer machine (purchased as a floor model from Brendles — remember them?) was a great starter machine. I wish I had her back but used her as a trade in on my first “big girl” machine – A New Home. The Singer, called Betsy, sewed like a top until her bobbin case went wonky. The New Home introduced me to the joys of good thread and Schmetz needles. I purchased the best of what I could afford each step of the way and the quality of the tools made sewing wonderful. I seldom had to worry about something malfunctioning.
That said, take care of your supplies. Replace your rotary cutter’s blade regularly. Replace the needles in your sewing machine after 8-10 hours of sewing. Clean your machine and oil it. Take it in to the tech at least every 18 months (if you use it every day) for a deep cleaning and oiling. Replace hand sewing needles and pins. Don’t use short staple thread. Take care of your equipment and it will take care of you.
Read the pattern through before you take the first stitch or make the first cut. And that bit of advice comes from the woman who truly believes directions are simply a suggestion instead of the gospel-truth. There is certainly more than one way to make flying geese or half-square triangles…and you may want to use your method rather than the pattern’s instructions. That’s fine. But the pattern will give you the “start-to-finish” GPS for a project and if you want to take a detour on your way to the finish line, that’s awesome. The instructions may give helpful hints about how big each block unit should be before they’re all sewn together. Highlight the important information. Circle what confuses you and google that part before starting – because chances are if you’re not clear on something, another quilt artist had the same issue. There may even be a YouTube video or blog for your quilt. Either or both of these are valuable helps.
Have a pretty good idea of how you plan to handle your quilt from start to finish. I’m a big proponent of having all the supplies purchased and kitted together from start to finish. Cut everything out – even the borders but leave them a bit longer in case your quilt top is a bit bigger than the directions indicated – put the like pieces in Ziplock bags and mark them. Make your binding and your label. Sew your quilt top. Press it. Sandwich it and know how either you’re going to quilt it or how you want the long arm artist to work his or her magic. I’ve found if you must stop and cut borders or binding or flounder when the quilting process starts, it’s just easy to shelve the project and not finish it.
Make a practice block first. This will let you know if you need to use a regular ¼-inch seam or a scant one. It will give you a good idea of how big each unit of the block should be before the entire thing is stitched together. You can make it from scraps, and yes, it does take a little extra time, but it’s fabric and time well spent. Which brings us to the next point…
Learn how to sew a consistent ¼-inch seam. I know I blew all sorts of quilting gaskets in everyone’s head when I wrote the blog about how the ¼-inch seam is not the Holy Grail of quilting. And it’s not. The unfinished size of the quilt block is most important. Sometimes getting that correct unfinished size means not using a ¼-inch seam…but most of the time it does. Practice until you can sew a consistent ¼-inch seam and know the difference between a regular quarter-inch seam and a scant quarter-inch seam.
Learn how to correctly use a rotary cutter. When those things first hit the sewing market, I thought they were just glorified pizza cutters. But once I learned how to use one I have never been so thankful for a new quilting notion. Now instead of spending time meticulously tracing templates and cutting my patches out with scissors, I could zip through my cutting process in half the time.
Learn several different methods of quick-piecing techniques and use those for making “standard” quilting units, such as half-square triangles, pinwheels, and flying geese. These will allow you to cut out fabric quickly and piece quickly and accurately. Try different ones until you’ve found your favorite methods.
Press your blocks and seams…don’t iron them.
Measure and sew borders the correct way. Don’t just cut long strips of fabric, sew them to the sides and then cut the excess fabric off. Do it correctly so that you can square up that quilt top one last time.
Sew your binding on with a consistent seam allowance and miter the corners. The mitered corners give such a nice, finished look to a quilt.
And finally…
DON’T OBSESS OVER ERRORS
In another life, years ago, I was a high school science teacher. One of the life lessons I tried to leave with my students is this – mistakes can either be road blocks or detours. They can either stop you dead in your tracks and you never move another inch, or those same mistakes can teach you another way around a problem. What you make of them – a road block or detour – is entirely up to you.
Each quilt should be fun to make and teach you something new. That’s the joy of quilting. And that’s what I’ve told every person that I’ve taught to quilt. If you let the errors made in each quilt teach you something, you’re well on your way to becoming a better quilter. If you don’t, and those mistakes stop you from quilting, then they’ve become a road block to your creativity. It’s your decision which way you treat them.
Don’t obsess over them. Don’t compare your quilts to another quilter’s. Take what you’ve learned from each quilt and make the next quilt better. And in the process, you’ve taken a detour to learn something new. It’s a win-win. Don’t sweat it.
Christmas is next week, so this is the last blog for 2018. I want to thank you for being along for the ride. I’m excited about next year’s theme and can’t wait to tell you about it!
If you’re a devoted Disney fan and have had the opportunity to go to one of the Disney parks, you may be aware of a little game that visitors can play called “Hidden Mickeys.” Scattered throughout the parks are various Mickey Mouse logos. They can be hidden in tile work, stones, art work, or even in the rides themselves. Finding them takes a good eye and patience, but they’re so cleverly hidden that you feel extremely accomplished when you do.
I want to play this game with you in this blog. Except in this little exercise instead of finding Mickey, we’re going to find hidden quilt blocks. Unlike the Hidden Mickey’s, these blocks are hiding in plain sight. I call them “Peek-a-Boo Blocks.” They are simply pieced blocks that are a version of the “parent” block. But instead of being identical to the “parent,” there are slight differences. A line, square, or triangle could be removed, making the hidden block look different, but not so different that it doesn’t play well with the “parent” blocks. Using the hidden blocks with the “parent” blocks is a great and easy way to design your own quilt. And the more patches in the quilt block, the more options are available for hidden blocks.
Take for instance this block:
If the side units are replaced with solid patches, you get kind of an cross design.
Remove more units, and the cross appears even stronger.
Remove some of the patches that form the cross and you get a kind of a pinwheel design going on:
You can combine the “parent” block with the hidden blocks for a quick, easy design that looks complicated. It’s really just the same block with different color combinations that gives the appearance of being really complex.
If this appeals to you, remember the more patches the block has, the more opportunities there are to change it up and make hidden blocks. Like with this one.
You can remove and add patches, keeping the same three colors, and get these combinations:
These can be combined to create a quilt that looks intimidating, but it’s really easy:
These are blocks that I’ve played with. But how do you start with any block? It’s not hard, I promise.
Find a block that appeals to you.
Replace the outer patches with strips of background fabric. Alternating these blocks with the parent blocks will eliminate the need for sashing.
OR:
Find a block that appeals to you.
Remove only some of the side and corner pieces and see what you get.
OR:
Find a block that already has some recognizable blocks within it.
Replace the material around the recognizable block with background fabric.
OR:
Find a block with a strong center unit.
Begin deleting some of the adjoining units and bringing in the corner units.
Not all pieced quilt blocks will have hidden blocks lurking within them. The only way to know for sure is to draw them on graph paper (if the design doesn’t have too many pieces) or work with a designing software program such as Electric Quilt if the block has lots of pieces (this is just easier than drawing it out).
And if this idea has really tickled your fancy, there is a wonderful book by Lerlene Nevaril called Hidden Quilt Blocks. She has many different blocks already broken out for you and sized. It’s simply a matter of picking out what you want and going with it for your next quilt. This book is a wonderful addition (and one of those quilting investments) that any quilter should have in their library.
We’re quickly coming to the end of 2018 and our Year of Quilting with Excellence! We have one more blog left for this year and I want to discuss how to set yourself up to successfully make any quilt you want to sew. This will recap some of what we’ve discussed as well as throw in some personal experiences I’ve had in quilting. Then, per usual, I will give you my Annual State of the Quilt and introduce our theme for 2019 – which I decided on back in February 2018. I’m excited, as this next year will be more personal than normal. This year has been a real “how to” year, and my inner teacher was happy to instruct. But 2019 will be different. I promise.